算法笔记 一些好的逻辑思路 反问题 如果一个问题正问题很复杂,可以尝试想一下反问题,3405. 统计恰好有 K 个相等相邻元素的数组数目
子问题 如果一个大的问题可以分解成多个子问题,可以尝试先解决子问题,再解决大问题.这就可以用递归或动态规划的方法来解决.
邻域消除问题 对于临项消除问题,并且先后顺序无关,可以考虑使用栈来实现.
ACM 格式 1 2 3 4 5 6 7 8 9 10 11 12 13 14 15 16 17 18 19 20 21 22 23 24 25 26 27 28 29 30 31 32 33 import java.util.*;import java.io.*;public class Main { public static void main (String[] args) throws IOException { BufferedReader br = new BufferedReader (new InputStreamReader (System.in)); PrintWriter pw = new PrintWriter (System.out); int n = Integer.parseInt(br.readLine()); String[] times = br.readLine().split(" " ); long prev = parseTime(times[0 ]); for (int i = 1 ; i < n; i++) { long current = parseTime(times[i]); long diff = current - prev; if (diff < 0 ) { diff += 24 * 60 * 60 ; } double circles = diff / 60.0 ; pw.printf("%.2f\n" , circles); prev = current; } pw.flush(); } private static long parseTime (String time) { String[] parts = time.split(":" ); int hour = Integer.parseInt(parts[0 ]); int minute = Integer.parseInt(parts[1 ]); int second = Integer.parseInt(parts[2 ]); return hour * 3600L + minute * 60L + second; } }
1 2 3 4 5 6 7 8 9 10 11 12 13 14 15 16 17 18 19 20 21 22 23 24 25 26 27 28 import java.util.*;import java.io.*;public class Main { public static void main (String[] args) throws IOException { BufferedReader br = new BufferedReader (new InputStreamReader (System.in)); String line; while ((line = br.readLine()) != null ) { int n = Integer.parseInt(line.trim()); int [] nums = new int [n]; String[] parts = br.readLine().split(" " ); for (int i = 0 ; i < n; i++) { nums[i] = Integer.parseInt(parts[i]); } System.out.println(result); } } } public static void main (String[] args) { Scanner scanner = new Scanner (System.in); String s = scanner.next(); System.out.println(replaceNumber(s)); scanner.close(); }
第二种:
1 2 3 4 5 6 7 8 9 import java.util.*;import java.io.*;public static void main (String[] args) { Scanner scanner = new Scanner (System.in); String s = scanner.next(); System.out.println(replaceNumber(s)); scanner.close(); }
输入格式 1 2 3 4 5 6 7 8 9 10 11 12 13 14 15 16 17 18 19 20 21 22 23 24 25 26 27 28 29 30 31 32 33 34 35 36 37 38 39 40 41 42 43 public class Main { public static void main (String[] args) { int [] nums = {1 , 3 , 5 , 2 , 4 }; int target = 5 ; int [][] matrix = { {1 , 2 , 3 }, {4 , 5 , 6 }, {7 , 8 , 9 } }; ListNode head = new ListNode (1 ); head.next = new ListNode (2 ); head.next.next = new ListNode (3 ); String s = "hello world" ; String pattern = "hello" ; int result = twoSum(nums, target); System.out.println("结果: " + result); } public static int twoSum (int [] nums, int target) { return 0 ; } } String[] words1 = {"hello" , "world" , "java" , "algorithm" }; class ListNode { int val; ListNode next; ListNode(int x) { val = x; } }
杂项操作 绝对值:Math.abs();Integer.MAX_VALUE
取随机值:
1 2 3 4 5 6 7 8 9 10 11 12 13 14 15 16 17 18 19 20 21 import java.util.Random;import java.util.concurrent.ThreadLocalRandom;public class RandomDemo { public static void main (String[] args) { int n = 10 ; int random1 = (int ) (Math.random() * n); System.out.println("Math.random(): " + random1); Random rand = new Random (); int random2 = rand.nextInt(n); System.out.println("Random: " + random2); int random3 = ThreadLocalRandom.current().nextInt(n); System.out.println("ThreadLocalRandom: " + random3); } }
Array 常用操作 1 2 3 4 5 6 7 8 9 10 11 12 13 14 15 16 17 18 19 20 21 22 23 24 25 26 27 28 int [] arr = new int [5 ]; int [] nums = {3 ,1 ,4 ,5 ,2 }; String[] strArr = {"A" , "B" , "C" }; int [][] matrix = {{1 ,2 }, {3 ,4 ,5 }}; int first = nums[0 ]; nums[2 ] = 9 ; int len = nums.length; int cols = matrix[1 ].length; for (int i=0 ; i<nums.length; i++) { System.out.print(nums[i] + " " ); } for (int num : nums) { System.out.print(num + " " ); } for (int [] row : matrix) { for (int n : row) { System.out.print(n + " " ); } }
数组工具操作
1 2 3 4 5 6 7 8 9 10 11 12 13 14 15 16 17 18 19 20 21 22 23 24 25 26 27 28 29 30 31 32 33 34 Arrays.sort(array); Arrays.sort(Collections.reverseOrder()); Arrays.sort(array, (a, b) -> a - b); Arrays.sort(array, (a, b) -> b - a); int [] copy1 = Arrays.copyOf(nums, 3 ); int [] copy2 = Arrays.copyOfRange(nums, 1 , 4 ); boolean isEqual = Arrays.equals(nums, copy1); Arrays.fill(nums, 0 ); Arrays.fill(nums, 1 , 3 , 5 ); List<Integer> list = Arrays.asList(1 ,2 ,3 ); IntStream stream = Arrays.stream(nums);int index = Arrays.binarySearch(nums, 5 ); int [][] matrixCopy = Arrays.copyOf(matrix, matrix.length); String deepStr = Arrays.deepToString(matrix); for (int i=0 ; i<nums.length/2 ; i++) { int temp = nums[i]; nums[i] = nums[nums.length-1 -i]; nums[nums.length-1 -i] = temp; }
数组带着索引排序 例题
1 2 3 4 5 6 7 8 9 10 11 12 13 14 15 16 17 18 public int [] maxSubsequence(int [] nums, int k) { int n=nums.length; int ans[]=new int [k]; Integer idx[]=new Integer [n]; Arrays.setAll(idx, i->i); Arrays.sort(idx,(a,b)->nums[a]-nums[b]); int j=0 ; for (int i=n-k;i<n;i++) { ans[j++]=idx[i]; } Arrays.sort(ans); for (int i=0 ;i<k;i++) { ans[i]=nums[ans[i]]; } return ans; }
和 int 数组相互转换:
1 2 3 4 5 6 7 Integer[] arr = {1 ,2 ,3 }; ArrayList<Integer> list = new ArrayList <>(Arrays.asList(arr)); ArrayList<Integer> list = new ArrayList <>(); Integer[] arr = list.toArray(new Integer [0 ]); arr = list.stream().mapToInt(Integer::valueOf).toArray();
List 常用操作 初始化
1 2 3 4 List<String> arrayList = new ArrayList <>(); List<Integer> linkedList = new LinkedList <>(); List<String> immutableList = List.of("A" , "B" , "C" );
增删改查
1 2 3 4 5 6 7 8 9 10 11 12 13 14 15 16 17 18 19 20 21 22 23 24 25 26 27 28 29 30 31 32 33 34 35 36 37 38 39 40 41 arrayList.add("Apple" ); arrayList.add(0 , "Banana" ); arrayList.addAll(List.of("Orange" , "Grape" )); String firstElement = arrayList.get(0 ); boolean containsApple = arrayList.contains("Apple" ); int indexOfOrange = arrayList.indexOf("Orange" ); arrayList.remove("Banana" ); arrayList.remove(0 ); arrayList.clear(); arrayList.add("Mango" ); arrayList.set(0 , "Pineapple" ); Collections.sort(path); Collections.sort(path, Collections.reverseOrder()); for (int i = 0 ; i < arrayList.size(); i++) { System.out.println(arrayList.get(i)); } for (String fruit : arrayList) { System.out.println(fruit); } Iterator<String> it = arrayList.iterator(); while (it.hasNext()) { System.out.println(it.next()); } arrayList.forEach(System.out::println);
其他操作
1 2 3 4 5 6 7 8 9 10 11 12 13 14 15 int size = arrayList.size(); boolean isEmpty = arrayList.isEmpty(); List<String> subList = arrayList.subList(0 , 2 ); Object[] array = arrayList.toArray();
二维List例子
1 2 3 4 5 6 7 8 9 10 11 12 13 14 15 16 17 18 19 20 21 22 23 24 25 26 27 28 29 30 31 32 33 34 35 36 37 38 39 40 41 42 43 44 45 46 47 48 49 50 51 52 53 54 55 56 57 58 59 60 61 62 63 64 65 66 67 68 69 70 71 72 73 74 75 76 77 78 79 80 81 82 83 84 85 86 87 88 89 90 91 92 93 94 95 96 97 98 99 100 101 102 103 104 105 106 107 108 109 110 111 112 113 114 115 116 117 118 119 120 121 122 123 124 125 126 127 128 129 130 131 132 133 134 135 136 137 138 139 140 141 142 143 144 145 146 147 148 149 150 151 152 153 154 155 156 157 158 159 160 161 162 163 164 165 166 167 168 169 import java.util.ArrayList;import java.util.Arrays;import java.util.List;public class TwoDListExample { public static void main (String[] args) { List<Integer>[] ls = new ArrayList [26 ]; Arrays.setAll(ls,i->new ArrayList <>()); List<List<Integer>> matrix1 = new ArrayList <>(); matrix1.add(Arrays.asList(1 , 2 , 3 )); matrix1.add(Arrays.asList(4 , 5 , 6 )); matrix1.add(Arrays.asList(7 , 8 , 9 )); List<List<String>> matrix2 = new ArrayList <>(); List<List<Character>> matrix3 = new ArrayList <>(); for (int i = 0 ; i < 3 ; i++) { List<Character> row = new ArrayList <>(); for (int j = 0 ; j < 4 ; j++) { row.add((char ) ('A' + i + j)); } matrix3.add(row); } matrix2.add(new ArrayList <>(Arrays.asList("Java" , "Python" ))); matrix2.add(new ArrayList <>(Arrays.asList("C++" , "JavaScript" ))); matrix2.get(0 ).add("Ruby" ); matrix2.get(1 ).add(0 , "Go" ); matrix2.add(new ArrayList <>()); matrix2.get(2 ).add("Swift" ); int element = matrix1.get(1 ).get(2 ); String lang = matrix2.get(0 ).get(1 ); int rows = matrix1.size(); int colsRow0 = matrix1.get(0 ).size(); int colsRow2 = matrix2.get(2 ).size(); matrix1.get(0 ).set(0 , 100 ); matrix2.get(1 ).set(2 , "TypeScript" ); matrix1.get(2 ).remove(1 ); matrix2.remove(2 ); System.out.println("\n遍历matrix1:" ); for (int i = 0 ; i < matrix1.size(); i++) { for (int j = 0 ; j < matrix1.get(i).size(); j++) { System.out.print(matrix1.get(i).get(j) + " " ); } System.out.println(); } System.out.println("\n遍历matrix2:" ); for (List<String> row : matrix2) { for (String item : row) { System.out.print(item + " " ); } System.out.println(); } System.out.println("\n遍历matrix3:" ); matrix3.forEach(row -> { row.forEach(item -> System.out.print(item + " " )); System.out.println(); }); boolean isEmpty = matrix2.isEmpty(); boolean containsPython = matrix2.get(0 ).contains("Python" ); int rowIndex = -1 , colIndex = -1 ; for (int i = 0 ; i < matrix1.size(); i++) { int index = matrix1.get(i).indexOf(5 ); if (index != -1 ) { rowIndex = i; colIndex = index; break ; } } String[][] array2D = new String [matrix2.size()][]; for (int i = 0 ; i < matrix2.size(); i++) { List<String> row = matrix2.get(i); array2D[i] = row.toArray(new String [0 ]); } List<List<Integer>> matrix = new ArrayList <>(); Collections.reverse(matrix); List<List<Integer>> matrix = new ArrayList <>(); int left = 0 ; int right = matrix.size() - 1 ; while (left < right) { List<Integer> temp = matrix.get(left); matrix.set(left, matrix.get(right)); matrix.set(right, temp); left++; right--; } List<List<Integer>> matrix = new ArrayList <>(); List<List<Integer>> reversed = IntStream.range(0 , matrix.size()) .mapToObj(i -> matrix.get(matrix.size() - 1 - i)) .collect(Collectors.toList()); matrix = reversed; System.out.println("\nmatrix1: " + matrix1); System.out.println("matrix2: " + matrix2); System.out.println("matrix3: " + matrix3); System.out.println("找到数字5的位置: [" + rowIndex + "][" + colIndex + "]" ); } }
HashSet 常用操作 1 2 3 4 5 6 7 8 9 10 11 12 13 14 15 16 17 18 19 20 21 22 23 24 25 26 27 28 29 30 31 32 33 34 35 36 37 38 39 40 41 42 43 44 45 46 47 48 49 50 51 52 53 54 55 56 57 58 59 60 61 62 63 64 65 66 67 68 import java.util.Collections;import java.util.HashSet;import java.util.Iterator;import java.util.Set;Set<String> set = new HashSet <>(); Set<Integer> initSet = new HashSet <>(32 ); Set<String> prefilled = new HashSet <>(Arrays.asList("A" , "B" , "C" )); boolean added = set.add("Apple" ); boolean dupAdd = set.add("Apple" ); boolean hasBanana = set.contains("Apple" ); boolean removed = set.remove("Apple" ); set.clear(); Set<String> fruits = new HashSet <>(Arrays.asList("Orange" , "Mango" )); boolean addedAll = set.addAll(fruits); boolean retainAll = set.retainAll(Arrays.asList("Mango" )); boolean removeAll = set.removeAll(fruits); set.add("Apple" ); set.add("Banana" ); for (String item : set) { System.out.print(item + " " ); } Iterator<String> it = set.iterator(); while (it.hasNext()) { System.out.print(it.next() + " " ); } set.forEach(item -> System.out.print(item)); int size = set.size(); boolean isEmpty = set.isEmpty(); Object[] array = set.toArray(); String[] strArray = set.toArray(new String [0 ]); Set<String> cloneSet = (HashSet<String>) ((HashSet<String>) set).clone(); Set<String> syncSet = Collections.synchronizedSet(set); Set<String> set1 = new HashSet <>(Arrays.asList("A" , "B" )); Set<String> set2 = new HashSet <>(Arrays.asList("B" , "C" )); Set<String> union = new HashSet <>(set1); union.addAll(set2); Set<String> intersection = new HashSet <>(set1); intersection.retainAll(set2); Set<String> difference = new HashSet <>(set1); difference.removeAll(set2);
HashMap 常用操作 1 2 3 4 5 6 7 8 9 10 11 12 13 14 15 16 17 18 19 20 21 22 23 24 25 26 27 28 29 30 31 32 33 34 35 36 37 38 39 40 41 42 43 44 45 46 47 48 49 50 51 52 53 54 55 56 57 58 59 60 61 62 63 64 65 66 67 68 69 70 71 72 73 74 75 76 77 import java.util.Collections;import java.util.HashMap;import java.util.Map;import java.util.Set;Map<String, Integer> map = new HashMap <>(); Map<String, String> initMap = new HashMap <>(32 ); Map<String, Integer> prefilled = new HashMap <>(Map.of("A" , 1 , "B" , 2 )); map.put("Apple" , 10 ); map.put("Banana" , 20 ); map.putIfAbsent("Apple" , 50 ); map.replace("Apple" , 15 ); map.remove("Banana" ); map.replace("Apple" , 15 , 20 ); map.clear(); int count = map.get("Apple" ); Integer countSafe = map.get("Orange" ); boolean existsKey = map.containsKey("Apple" ); boolean existsValue = map.containsValue(20 ); int size = map.size(); boolean isEmpty = map.isEmpty(); for (Map.Entry<String, Integer> entry : map.entrySet()) { System.out.println(entry.getKey() + ": " + entry.getValue()); } for (String key : map.keySet()) { System.out.println(key + " -> " + map.get(key)); } for (Integer value : map.values()) { System.out.println("Value: " + value); } map.forEach((k, v) -> System.out.println(k + "=" + v)); Map<String, Integer> newItems = Map.of("Cherry" , 5 , "Durian" , 8 ); map.putAll(newItems); map.put(null , 0 ); map.put("Mango" , null ); map.computeIfAbsent("Orange" , k -> 3 ); map.computeIfPresent("Apple" , (k, v) -> v + 5 ); map.merge("Apple" , 10 , (oldVal, newVal) -> oldVal + newVal); Map<String, Integer> syncMap = Collections.synchronizedMap(map); Map<String, Integer> immutableMap = Map.ofEntries( Map.entry("A" , 1 ), Map.entry("B" , 2 ) );
1 2 3 4 5 6 7 HashMap<Character, Integer> hm_s = new HashMap <>(); for (char c : s.toCharArray()) { hm_s.merge(c, 1 , Integer::sum); } int countS = hm_s.getOrDefault(c, 0 );
一个 Key 只能对应一个值,所以如果要实现类似 Multimap 的结构需要如下方式:
1 2 3 4 5 6 7 8 9 10 11 12 13 14 15 16 17 18 19 20 21 22 23 24 25 26 27 28 29 30 31 32 33 34 35 36 37 38 39 40 41 42 43 44 45 46 47 48 49 50 51 52 53 54 HashMap<String, List<Integer>> multiValueMap = new HashMap <>(); if (!multiValueMap.containsKey("scores" )) { multiValueMap.put("scores" , new ArrayList <>()); } multiValueMap.get("scores" ).add(90 ); multiValueMap.computeIfAbsent("scores" , k -> new ArrayList <>()).add(90 ); multiValueMap.computeIfAbsent("scores" , k -> new ArrayList <>()).add(85 ); List<Integer> scores = multiValueMap.get("scores" ); if (scores != null ) { for (int num : scores) { System.out.println(num); } } List<Integer> scores = multiValueMap.getOrDefault("scores" , new ArrayList <>()); for (int num : scores) { System.out.println(num); } multiValueMap.remove("scores" ); List<Integer> scores = multiValueMap.get("scores" ); if (scores != null ) { scores.remove(Integer.valueOf(90 )); if (scores.isEmpty()) { multiValueMap.remove("scores" ); } } for (Map.Entry<String, List<Integer>> entry : multiValueMap.entrySet()) { String key = entry.getKey(); List<Integer> values = entry.getValue(); System.out.println(key + ": " + values); } for (String key : multiValueMap.keySet()) { System.out.println("Key: " + key); } for (List<Integer> values : multiValueMap.values()) { System.out.println("Values: " + values); }
String的常用操作 1 2 3 4 5 6 7 8 9 10 11 12 13 14 15 16 17 18 19 20 21 22 23 24 25 26 27 28 29 30 31 32 33 34 35 36 37 38 39 40 41 42 43 44 45 46 47 48 49 String str1 = "Hello" ; String str2 = new String ("World" ); char [] chars = {'J' ,'a' ,'v' ,'a' };String str3 = new String (chars); int len = str1.length(); char c = str1.charAt(1 ); String substr1 = str1.substring(2 ); String substr2 = str1.substring(1 ,4 ); String concatStr = str1.concat(" World" );String upper = str1.toUpperCase(); String lower = "HELLO" .toLowerCase(); String trimStr = " text " .trim(); String replaced = str1.replace('l' , 'L' );String replacedAll = "a1b2c3" .replaceAll("\\d" , "#" ); char [] arr = str1.toCharArray(); byte [] bytes = str1.getBytes(); boolean eq1 = str1.equals("Hello" ); boolean eq2 = str1.equalsIgnoreCase("hElLo" ); int cmp = str1.compareTo("Hella" ); boolean matches = "123" .matches("\\d+" ); String[] parts = "a,b,c" .split("," ); String[] regexParts = "a1b2c3" .split("\\d" ); String format1 = String.format("%s-%d" , "ID" , 100 ); String format2 = String.join("|" , "A" , "B" , "C" ); boolean isEmpty = "" .isEmpty(); boolean isBlank = " " .isBlank(); boolean starts = str1.startsWith("He" ); boolean ends = str1.endsWith("lo" );
int转String String s = String.valueOf(i);String s = Integer.toString(i);String 转 int String str = "123";int num = Integer.parseInt(str);
StringBuffer 和 StringBuilder StringBuilder 类在 Java 5 中被提出,它和 StringBuffer 之间的最大不同在于 StringBuilder 的方法不是线程安全的(不能同步访问)。StringBuilder 相较于 StringBuffer 有速度优势,所以多数情况下建议使用 StringBuilder 类。
1 2 3 4 5 6 7 8 9 10 11 12 13 14 15 16 17 18 19 20 21 22 23 24 25 26 27 28 29 30 31 32 33 34 35 36 37 38 39 40 41 42 43 44 45 46 47 48 49 50 StringBuilder sb = new StringBuilder (); StringBuilder sb2 = new StringBuilder ("Hello" ); sb.append(" World" ); sb.insert(5 , " Java" ); sb.delete(5 , 10 ); sb.replace(6 , 11 , "Earth" ); sb.reverse(); sb.setLength(5 ); char c = sb.charAt(2 ); sb.setCharAt(0 , 'H' ); int len = sb.length(); String s = sb.toString(); res = new StringBuilder (p.s).repeat(res,p.k); for (int i = 0 ; i < sb.length(); i++) { char c = sb.charAt(i); System.out.println(c); } StringBuilder sb3 = new StringBuilder () .append(123 ) .append(3.14 ) .append(true ); sb.setLength(prevLen); StringBuffer sbf = new StringBuffer (); sbf.append(100 ); sbf.insert(3 , new char []{'A' ,'B' }); sbf.deleteCharAt(4 ); sbf.setLength(0 ); sbf.append("ThreadSafe" ); String s1 = buffer.toString(); String s2 = builder.toString();
PriorityQueue的常用操作 record的常用操作 相当于定义一个不可变的数据类.
1 2 3 4 5 6 7 8 record Node (double gain , int a , int b) {}PriorityQueue<Node> pq = new PriorityQueue <>((a, b) -> Double.compare(b.gain, a.gain)); pq.offer(new Node (1.0 , 1 , 2 )); pq.offer(new Node (2.0 , 2 , 3 )); pq.offer(new Node (3.0 , 3 , 4 )); System.out.println(pq.poll().gain); System.out.println(pq.poll().gain); System.out.println(pq.poll().gain);
输出:
基本用法就是这样.
小顶堆(默认,前 K 大,升序)
1 2 3 4 5 6 7 8 9 10 11 12 13 14 15 16 17 PriorityQueue<Integer> minHeap = new PriorityQueue <>(); minHeap.offer(5 ); minHeap.add(3 ); int min = minHeap.peek();int removedMin = minHeap.poll();int size = minHeap.size();boolean isEmpty = minHeap.isEmpty();minHeap.remove(2 ); minHeap.clear();
大顶堆(前 K 小,降序)
1 2 3 4 5 6 7 8 9 10 11 12 13 14 15 16 17 18 19 20 21 22 23 PriorityQueue<Integer> maxHeap = new PriorityQueue <>((a, b) -> b - a); maxHeap.offer(8 ); maxHeap.add(4 ); int max = maxHeap.peek();int removedMax = maxHeap.poll();boolean contains = maxHeap.contains(5 );for (Integer num : minHeap) { System.out.println(num); } PriorityQueue<Integer> pq = new PriorityQueue <>((a, b) -> { String strA = String.valueOf(a); String strB = String.valueOf(b); return strA.compareTo(strB); });
堆求前k大,然后存储索引(需要保存下标的写法) 堆求前k大,然后存储索引
1 2 3 4 5 6 7 8 9 10 11 12 13 14 15 16 17 18 19 20 21 public int [] maxSubsequence(int [] nums, int k) { PriorityQueue<int []> heap = new PriorityQueue <>((o1,o2)->o1[0 ]-o2[0 ]); int n = nums.length; for (int i = 0 ; i < n; i++) { if (heap.size() < k) heap.offer(new int []{nums[i], i}); else if (nums[i] > heap.peek()[0 ]) { heap.poll(); heap.offer(new int []{nums[i], i}); } } int [] idx = new int [k]; for (int i = 0 ; i < k; i++) { idx[i] = heap.poll()[1 ]; } Arrays.sort(idx); for (int i = 0 ; i < k; i++) { idx[i] = nums[idx[i]]; } return idx; }
自定义对象堆
1 2 3 4 5 6 7 8 9 10 11 12 13 14 15 16 class Student { String name; int score; } PriorityQueue<Student> studentMinHeap = new PriorityQueue <>( (s1, s2) -> s1.score - s2.score ); PriorityQueue<Student> studentMaxHeap = new PriorityQueue <>( (s1, s2) -> s2.score - s1.score ); studentMinHeap.offer(new Student ("Alice" , 85 ));
堆序性质 比较器的本质 a-b 要小于0 a优先级才高 a<b 所以是最小堆
比较器定义的是”优先级”关系:
返回负数:第一个参数(a)应该排在前面(更高优先级)
返回正数:第二个参数(b)应该排在前面
返回零:两者优先级相同
使用场景
1 2 3 4 5 6 7 8 9 10 11 12 13 14 15 16 17 18 19 20 21 22 23 24 25 26 27 28 29 30 31 32 class Solution { public int maxEvents (int [][] events) { int mx = 0 ; for (int [] e : events) { mx = Math.max(mx, e[1 ]); } List<Integer>[] groups = new ArrayList [mx + 1 ]; Arrays.setAll(groups, i -> new ArrayList <>()); for (int [] e : events) { groups[e[0 ]].add(e[1 ]); } int ans = 0 ; PriorityQueue<Integer> pq = new PriorityQueue <>(); for (int i = 0 ; i <= mx; i++) { while (!pq.isEmpty() && pq.peek() < i) { pq.poll(); } for (int endDay : groups[i]) { pq.offer(endDay); } if (!pq.isEmpty()) { ans++; pq.poll(); } } return ans; } }
Deque 的常用操作 Deque常用于实现队列和栈.包括维护单调栈.
创建
1 2 3 4 5 6 7 import java.util.Deque;import java.util.ArrayDeque;import java.util.Iterator;Deque<String> deque = new ArrayDeque <>(); Deque<String> deque = new LinkedList <>();
插入
1 2 3 4 5 6 7 8 deque.addFirst("A" ); deque.offerFirst("B" ); deque.addLast("C" ); deque.offerLast("D" ); deque.addAll(List.of("E" , "F" ));
删除
1 2 3 4 5 6 7 8 9 10 String first1 = deque.removeFirst(); String first2 = deque.pollFirst(); String last1 = deque.removeLast(); String last2 = deque.pollLast(); boolean removed1 = deque.remove("E" ); boolean removed2 = deque.removeFirstOccurrence("F" ); boolean removed3 = deque.removeLastOccurrence("G" );
查看
1 2 3 4 5 6 7 String head1 = deque.getFirst(); String head2 = deque.peekFirst(); String tail1 = deque.getLast(); String tail2 = deque.peekLast();
状态
1 2 3 boolean isEmpty = deque.isEmpty(); int size = deque.size(); boolean exists = deque.contains("A" );
遍历
1 2 3 4 5 6 7 8 9 10 11 Iterator<String> iterator = deque.iterator(); while (iterator.hasNext()) { String element = iterator.next(); } Iterator<String> descendingIterator = deque.descendingIterator(); while (descendingIterator.hasNext()) { String element = descendingIterator.next(); }
其他
1 2 3 4 5 6 7 8 9 10 11 12 13 14 15 16 17 18 deque.clear(); Object[] array1 = deque.toArray(); String[] array2 = deque.toArray(new String [0 ]); deque.push("X" ); String popped = deque.pop();
TreeMap 的常用操作 创建
1 2 3 4 5 6 TreeMap<Integer, String> map = new TreeMap <>(); TreeMap<String, Integer> map = new TreeMap <>(Collections.reverseOrder()); TreeMap<String, Integer> map = new TreeMap <>((a, b) -> a.compareTo(b));
添加/修改
1 2 3 4 map.put(1 , "A" ); map.put(2 , "B" ); map.put(3 , "C" );
删除
1 2 3 4 5 6 7 8 String removed = map.remove(1 );Map.Entry<Integer, String> first = map.pollFirstEntry(); Map.Entry<Integer, String> last = map.pollLastEntry(); map.clear();
遍历
1 2 3 4 5 6 7 8 9 10 11 12 for (Map.Entry<Integer, String> entry : map.entrySet()) { System.out.println(entry.getKey() + " = " + entry.getValue()); } for (Integer key : map.keySet()) { System.out.println(key); } for (String value : map.values()) { System.out.println(value); }
有序操作
1 2 3 4 5 6 7 8 9 10 11 12 13 14 15 16 Map.Entry<Integer, String> first = map.firstEntry(); Map.Entry<Integer, String> last = map.lastEntry(); Integer firstKey = map.firstKey();Integer lastKey = map.lastKey();Map.Entry<Integer, String> lower = map.lowerEntry(5 ); Map.Entry<Integer, String> higher = map.higherEntry(5 ); Map.Entry<Integer, String> floor = map.floorEntry(5 ); Map.Entry<Integer, String> ceiling = map.ceilingEntry(5 );
其他
1 2 3 4 5 6 int size = map.size();boolean isEmpty = map.isEmpty();NavigableMap<Integer, String> descMap = map.descendingMap();
并发编程 继承Thread类 1 2 3 4 5 6 7 8 9 10 11 12 13 14 15 16 17 18 19 20 21 22 23 24 25 26 27 28 29 30 31 32 33 34 35 36 37 class MyThread extends Thread { private String name; public MyThread (String name) { this .name = name; } @Override public void run () { for (int i = 0 ; i < 5 ; i++) { System.out.println(name + " 运行: " + i); try { Thread.sleep((int ) (Math.random() * 1000 )); } catch (InterruptedException e) { e.printStackTrace(); } } } } public class ThreadDemo { public static void main (String[] args) { MyThread t1 = new MyThread ("线程A" ); MyThread t2 = new MyThread ("线程B" ); t1.start(); t2.start(); } }
Runnable接口 1 2 3 4 5 6 7 8 9 10 11 12 13 14 15 16 17 18 19 20 21 22 23 24 25 26 27 28 29 30 31 32 33 34 35 36 37 38 39 40 41 42 43 class MyRunnable implements Runnable { private String name; public MyRunnable (String name) { this .name = name; } @Override public void run () { for (int i = 0 ; i < 5 ; i++) { System.out.println(name + " 运行: " + i); try { Thread.sleep((int ) (Math.random() * 1000 )); } catch (InterruptedException e) { e.printStackTrace(); } } } } public class RunnableDemo { public static void main (String[] args) { Runnable task1 = new MyRunnable ("线程-1" ); Runnable task2 = new MyRunnable ("线程-2" ); Thread t1 = new Thread (task1); Thread t2 = new Thread (task2); t1.start(); t2.start(); new Thread (() -> { System.out.println("Lambda线程运行中" ); }).start(); } }
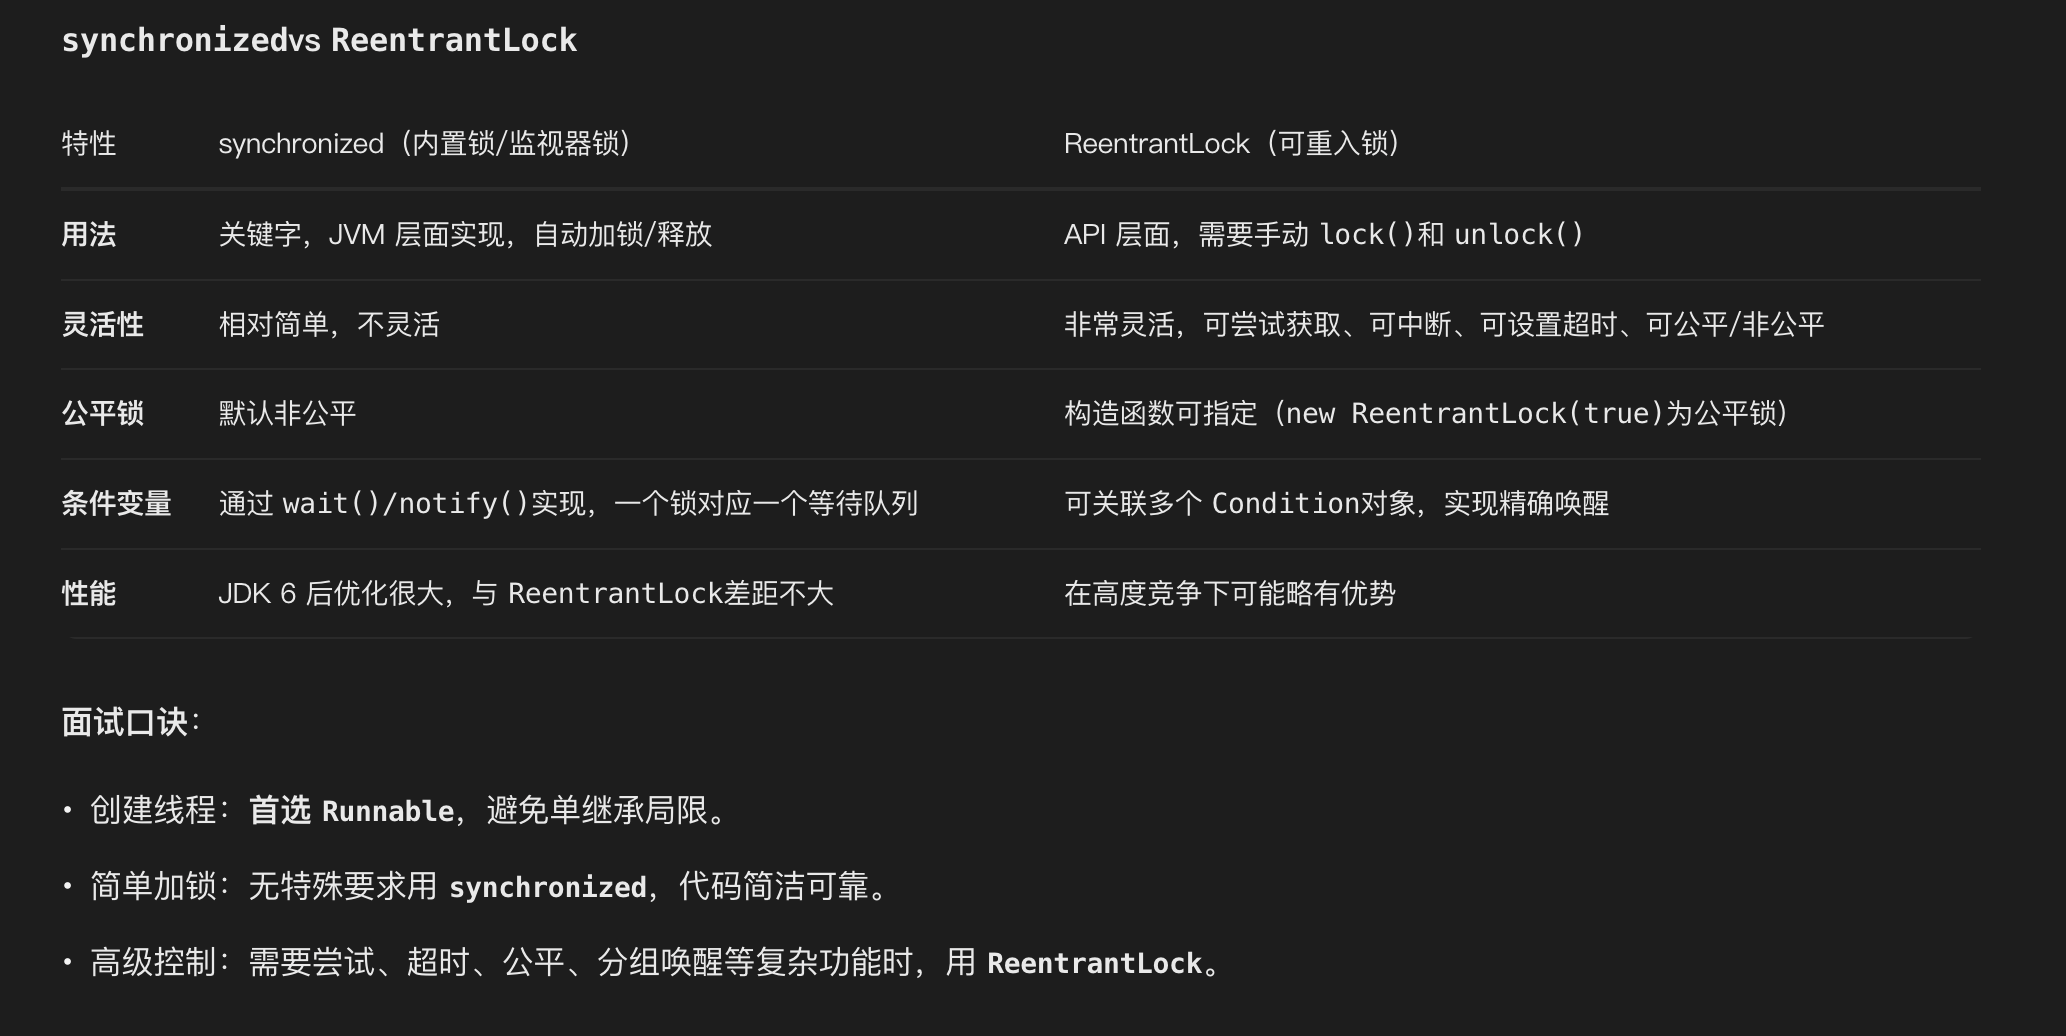
上锁 synchronized 同步代码块
1 2 3 4 5 6 7 8 9 private final Object lock = new Object (); private int count = 0 ;public void add () { synchronized (lock) { count++; } }
同步实例方法
1 2 3 4 5 6 7 8 9 public synchronized void add () { count++; } public void add () { synchronized (this ) { count++; } }
同步静态方法
1 2 3 4 5 6 7 8 9 public static synchronized void staticAdd () { } public static void staticAdd () { synchronized (MyClass.class) { } }
Lock 1 2 3 4 5 6 7 8 9 10 11 12 13 14 15 16 17 18 19 20 21 22 23 24 25 26 27 28 29 30 31 import java.util.concurrent.locks.Lock;import java.util.concurrent.locks.ReentrantLock;public class LockDemo { private final Lock lock = new ReentrantLock (); private int count = 0 ; public void add () { lock.lock(); try { count++; } finally { lock.unlock(); } } public void tryAdd () { if (lock.tryLock()) { try { count++; } finally { lock.unlock(); } } else { System.out.println("获取锁失败,执行备用逻辑" ); } } }
题目
两个线程交替输出1A2B3C4D5E
1 2 3 4 5 6 7 8 9 10 11 12 13 14 15 16 17 18 19 20 21 22 23 24 25 26 27 28 29 30 31 32 33 34 35 36 37 38 39 40 41 42 43 44 45 46 47 48 49 public class AlternatePrintBasic { private static final Object lock = new Object (); private static boolean numTurn = true ; public static void main (String[] args) { Thread numThread = new Thread (() -> { synchronized (lock) { for (int i = 1 ; i <= 5 ; i++) { while (!numTurn) { try { lock.wait(); } catch (InterruptedException e) { e.printStackTrace(); } } System.out.print(i); numTurn = false ; lock.notify(); } } }); Thread letterThread = new Thread (() -> { synchronized (lock) { for (char c = 'A' ; c <= 'E' ; c++) { while (numTurn) { try { lock.wait(); } catch (InterruptedException e) { e.printStackTrace(); } } System.out.print(c); numTurn = true ; lock.notify(); } } }); numThread.start(); letterThread.start(); } }
1 2 3 4 5 6 7 8 9 10 11 12 13 14 15 16 17 18 19 20 21 22 23 24 25 26 27 28 29 30 31 32 33 34 35 36 37 38 39 40 41 42 43 44 45 46 47 48 49 50 51 52 import java.util.concurrent.locks.Condition;import java.util.concurrent.locks.ReentrantLock;public class AlternatePrintWithLock { private static ReentrantLock lock = new ReentrantLock (); private static Condition numCondition = lock.newCondition(); private static Condition letterCondition = lock.newCondition(); private static boolean numTurn = true ; public static void main (String[] args) { Thread numThread = new Thread (() -> { lock.lock(); try { for (int i = 1 ; i <= 5 ; i++) { while (!numTurn) { numCondition.await(); } System.out.print(i); numTurn = false ; letterCondition.signal(); } } catch (InterruptedException e) { e.printStackTrace(); } finally { lock.unlock(); } }); Thread letterThread = new Thread (() -> { lock.lock(); try { for (char c = 'A' ; c <= 'E' ; c++) { while (numTurn) { letterCondition.await(); } System.out.print(c); numTurn = true ; numCondition.signal(); } } catch (InterruptedException e) { e.printStackTrace(); } finally { lock.unlock(); } }); numThread.start(); letterThread.start(); } }
线程池 简单实现
1 2 3 4 5 6 7 8 9 10 11 12 13 14 15 16 17 18 19 20 21 22 23 24 25 26 27 28 29 30 31 32 33 34 35 36 37 38 39 40 41 42 43 44 45 46 47 48 49 50 51 52 53 54 55 56 57 58 59 60 61 62 63 64 65 66 67 68 69 70 71 72 73 74 75 76 77 78 79 80 81 82 83 84 85 86 87 88 89 90 91 92 93 94 95 96 97 98 99 100 101 102 103 104 105 106 107 108 109 110 111 112 113 114 115 116 117 118 119 120 121 122 123 124 125 126 127 128 129 130 131 132 133 134 135 136 import java.util.ArrayList;import java.util.List;import java.util.concurrent.BlockingQueue;import java.util.concurrent.LinkedBlockingQueue;import java.util.concurrent.atomic.AtomicBoolean;public class SimpleThreadPool { private final List<WorkerThread> workers; private final BlockingQueue<Runnable> taskQueue; private final AtomicBoolean isShutdown; private final int poolSize; public SimpleThreadPool (int poolSize) { this .poolSize = poolSize; this .taskQueue = new LinkedBlockingQueue <>(); this .workers = new ArrayList <>(poolSize); this .isShutdown = new AtomicBoolean (false ); initializeWorkers(); } public boolean isShutdown () { return isShutdown.get(); } private void initializeWorkers () { for (int i = 0 ; i < poolSize; i++) { WorkerThread worker = new WorkerThread ("Pool-Thread-" + i); worker.start(); workers.add(worker); } } public void execute (Runnable task) { if (isShutdown.get()) { throw new IllegalStateException ("线程池已关闭,无法提交新任务" ); } if (task == null ) { throw new NullPointerException ("任务不能为null" ); } try { taskQueue.put(task); } catch (InterruptedException e) { Thread.currentThread().interrupt(); } } public void shutdown () { isShutdown.set(true ); System.out.println("线程池开始关闭..." ); } public void shutdownNow () { isShutdown.set(true ); for (WorkerThread worker : workers) { worker.interrupt(); } taskQueue.clear(); } public void awaitTermination () throws InterruptedException { for (WorkerThread worker : workers) { worker.join(); } } public int getPendingTaskCount () { return taskQueue.size(); } private class WorkerThread extends Thread { public WorkerThread (String name) { super (name); } @Override public void run () { System.out.println(Thread.currentThread().getName() + " 开始工作" ); while (!isShutdown.get() || !taskQueue.isEmpty()) { try { Runnable task = taskQueue.take(); System.out.println(Thread.currentThread().getName() + " 执行任务" ); task.run(); } catch (InterruptedException e) { if (isShutdown.get()) { System.out.println(Thread.currentThread().getName() + " 被中断,准备退出" ); break ; } } catch (Exception e) { System.err.println("任务执行异常: " + e.getMessage()); e.printStackTrace(); } } System.out.println(Thread.currentThread().getName() + " 结束工作" ); } } }
简单线程池的测试
1 2 3 4 5 6 7 8 9 10 11 12 13 14 15 16 17 18 19 20 21 22 23 24 25 26 27 28 29 30 31 32 33 34 35 36 37 38 39 40 41 42 43 44 45 46 47 48 49 50 51 52 53 54 public class ThreadPoolTest { public static void main (String[] args) throws InterruptedException { SimpleThreadPool threadPool = new SimpleThreadPool (3 ); System.out.println("=== 提交10个任务到线程池 ===" ); for (int i = 1 ; i <= 10 ; i++) { final int taskId = i; threadPool.execute(() -> { try { System.out.println(Thread.currentThread().getName() + " 正在执行任务 " + taskId); Thread.sleep(1000 ); System.out.println(Thread.currentThread().getName() + " 完成任务 " + taskId); } catch (InterruptedException e) { Thread.currentThread().interrupt(); } }); } new Thread (() -> { while (true ) { try { Thread.sleep(500 ); int pendingTasks = threadPool.getPendingTaskCount(); System.out.println("当前等待任务数: " + pendingTasks); if (pendingTasks == 0 && threadPool.isShutdown()) { break ; } } catch (InterruptedException e) { break ; } } }).start(); Thread.sleep(5000 ); System.out.println("\n=== 准备关闭线程池 ===" ); threadPool.shutdown(); threadPool.awaitTermination(); System.out.println("所有任务执行完毕,程序退出" ); } }
带返回值的
1 2 3 4 5 6 7 8 9 10 11 12 13 14 15 16 17 18 19 20 21 22 23 24 25 26 27 28 29 30 31 32 33 34 35 36 37 38 39 40 41 42 43 44 45 46 47 48 49 50 51 52 53 54 55 56 57 58 59 60 61 62 63 64 65 66 67 68 69 70 71 72 73 74 import java.util.concurrent.Callable;import java.util.concurrent.Future;import java.util.concurrent.FutureTask;public class EnhancedThreadPool { private final SimpleThreadPool threadPool; public EnhancedThreadPool (int poolSize) { this .threadPool = new SimpleThreadPool (poolSize); } public <T> Future<T> submit (Callable<T> task) { FutureTask<T> futureTask = new FutureTask <>(task); threadPool.execute(futureTask); return futureTask; } public Future<?> submit(Runnable task) { FutureTask<?> futureTask = new FutureTask <>(task, null ); threadPool.execute(futureTask); return futureTask; } public void execute (Runnable task) { threadPool.execute(task); } public void shutdown () { threadPool.shutdown(); } public void shutdownNow () { threadPool.shutdownNow(); } public void awaitTermination () throws InterruptedException { threadPool.awaitTermination(); } } class EnhancedThreadPoolTest { public static void main (String[] args) throws Exception { EnhancedThreadPool pool = new EnhancedThreadPool (2 ); Future<String> future1 = pool.submit(() -> { Thread.sleep(1000 ); return "任务1结果" ; }); Future<Integer> future2 = pool.submit(() -> { Thread.sleep(2000 ); return 42 ; }); System.out.println("任务1结果: " + future1.get()); System.out.println("任务2结果: " + future2.get()); pool.shutdown(); } }
模运算恒等式/费马小定理/组合数 灵神的模运算帖子.respect.https://leetcode.cn/discuss/post/3584387/fen-xiang-gun-mo-yun-suan-de-shi-jie-dan-7xgu/
Java的取模(mod)和取余(% rem),发现我们常用的基本都是正数取余或取模,那带有负数的要怎么计算呢。
取模的时候,因为mod 函数采用了 floor 函数,floor函数是向下取整的 ,所以-2.5向下取整就是-3,那么d=5-(-2)*(-3)=5-6=-1。
取余(%)的时候,因为rem 函数采用 fix 函数,fix函数是向0取整的 ,所以-2.5向0取整就是-2,那么d=5-(-2)*(-2)=5-4=1。
前言
如何正确的取模呢?
加法和乘法的取模 个位数 ,你会如何计算?
由于只有个位数会影响到乘积的个位数,那么 4×9=36 的个位数 6 就是答案。
对于 1234+6789 的个位数,同理,4+9=13 的个位数 3 就是答案。
你能把这个结论抽象成数学等式吗?
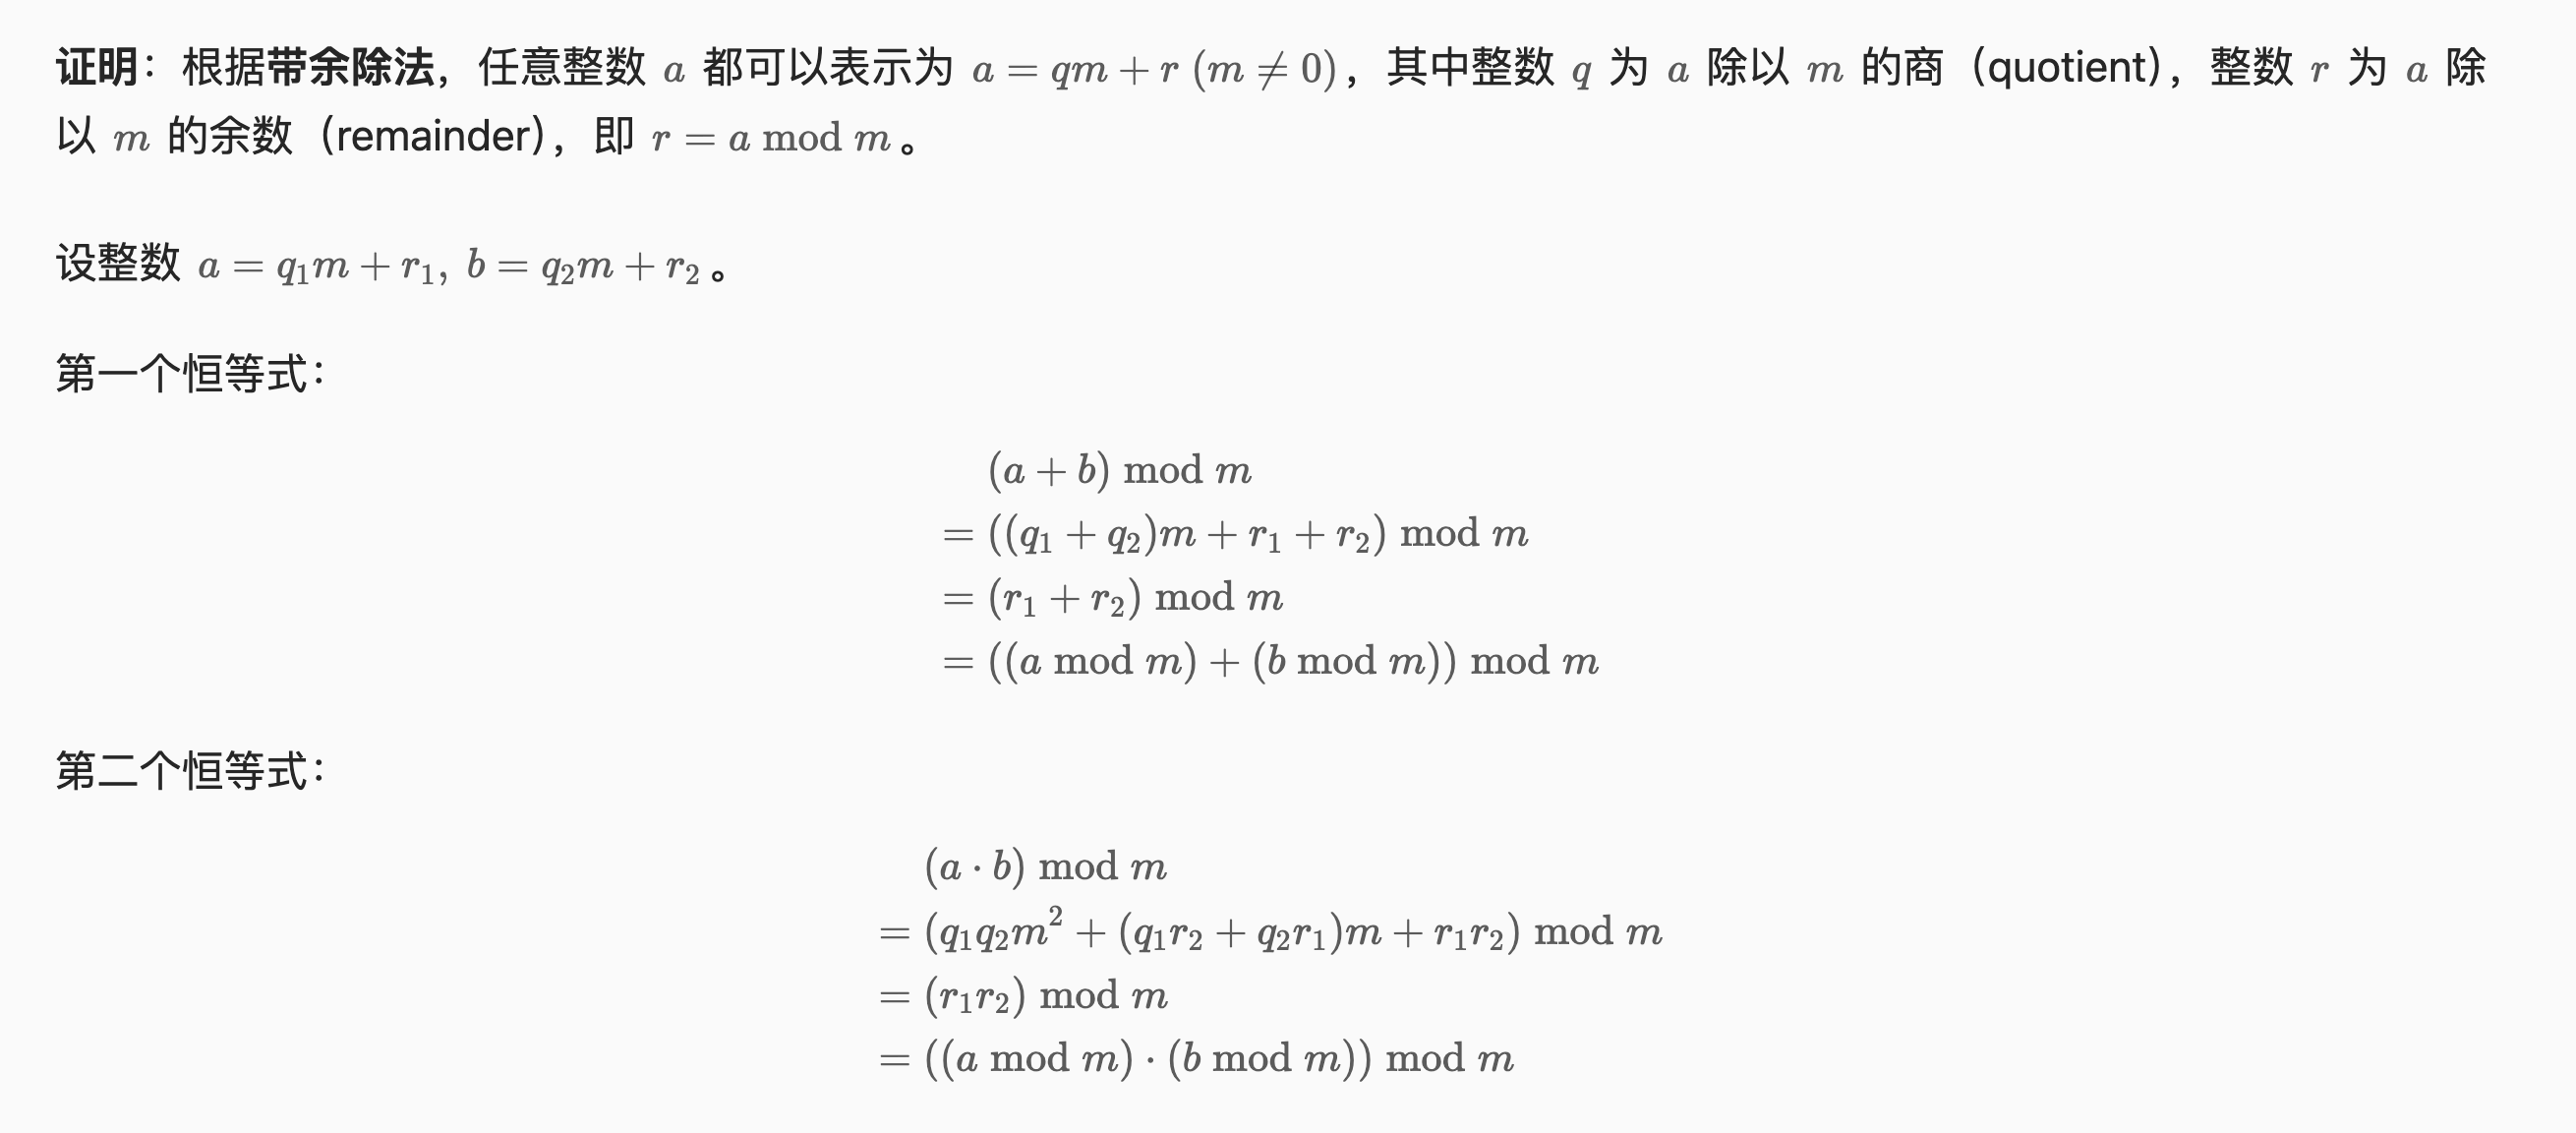
一般涉及到取模的题目,会用到如下两个恒等式,其中 mod 表示取模运算(modulo),即编程语言中的 %。上面计算的是 m=10 的情况。
在计算过程中(例如循环),对加法和乘法的结果取模 ,而不是在循环结束后再取模。指数是不能随意取模的 。如果指数在 64 位整数的范围内,可以用快速幂计算,原理见一张图秒懂快速幂;如果指数超出 64 位整数的范围,见欧拉降幂。
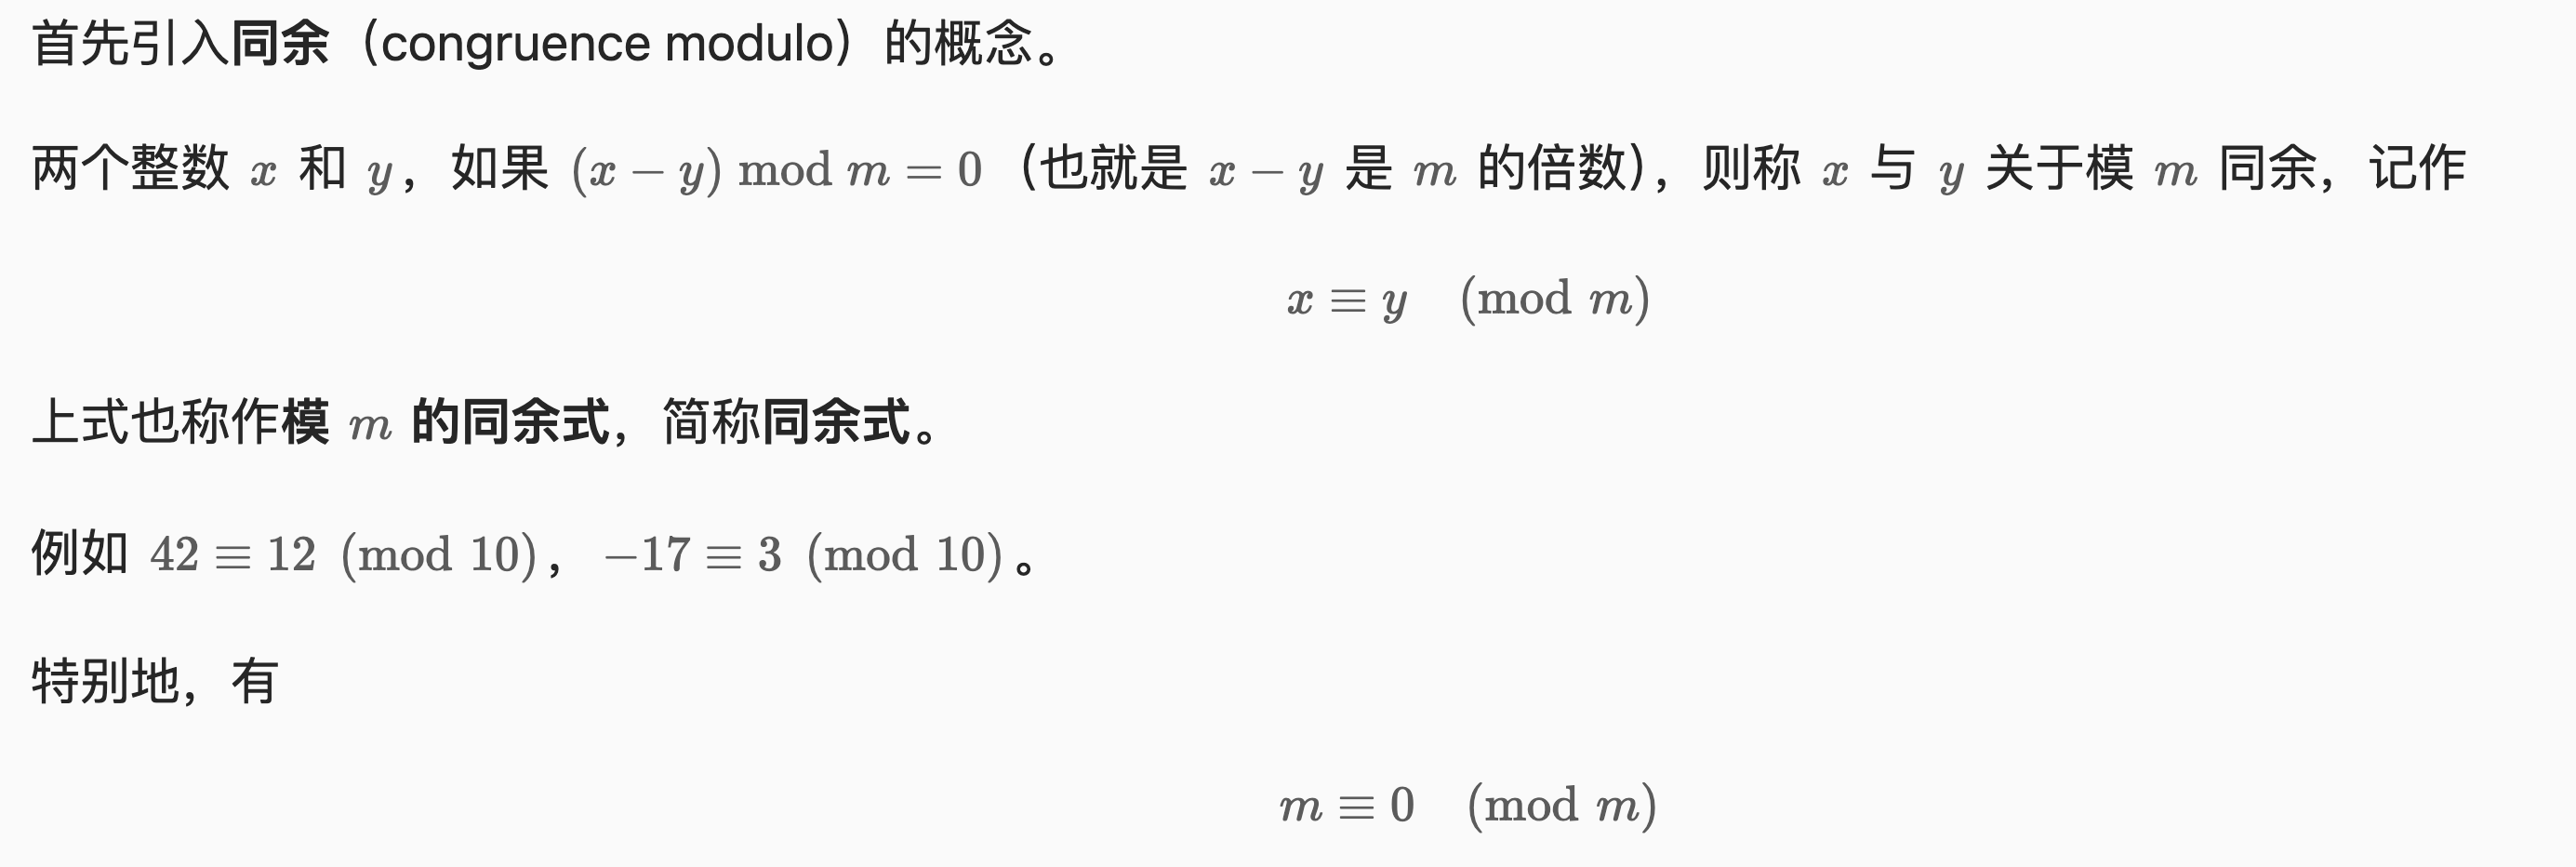
如果计算过程中有减法,可能会产生负数,处理不当也会导致 WA。如何正确处理这种情况呢?同余
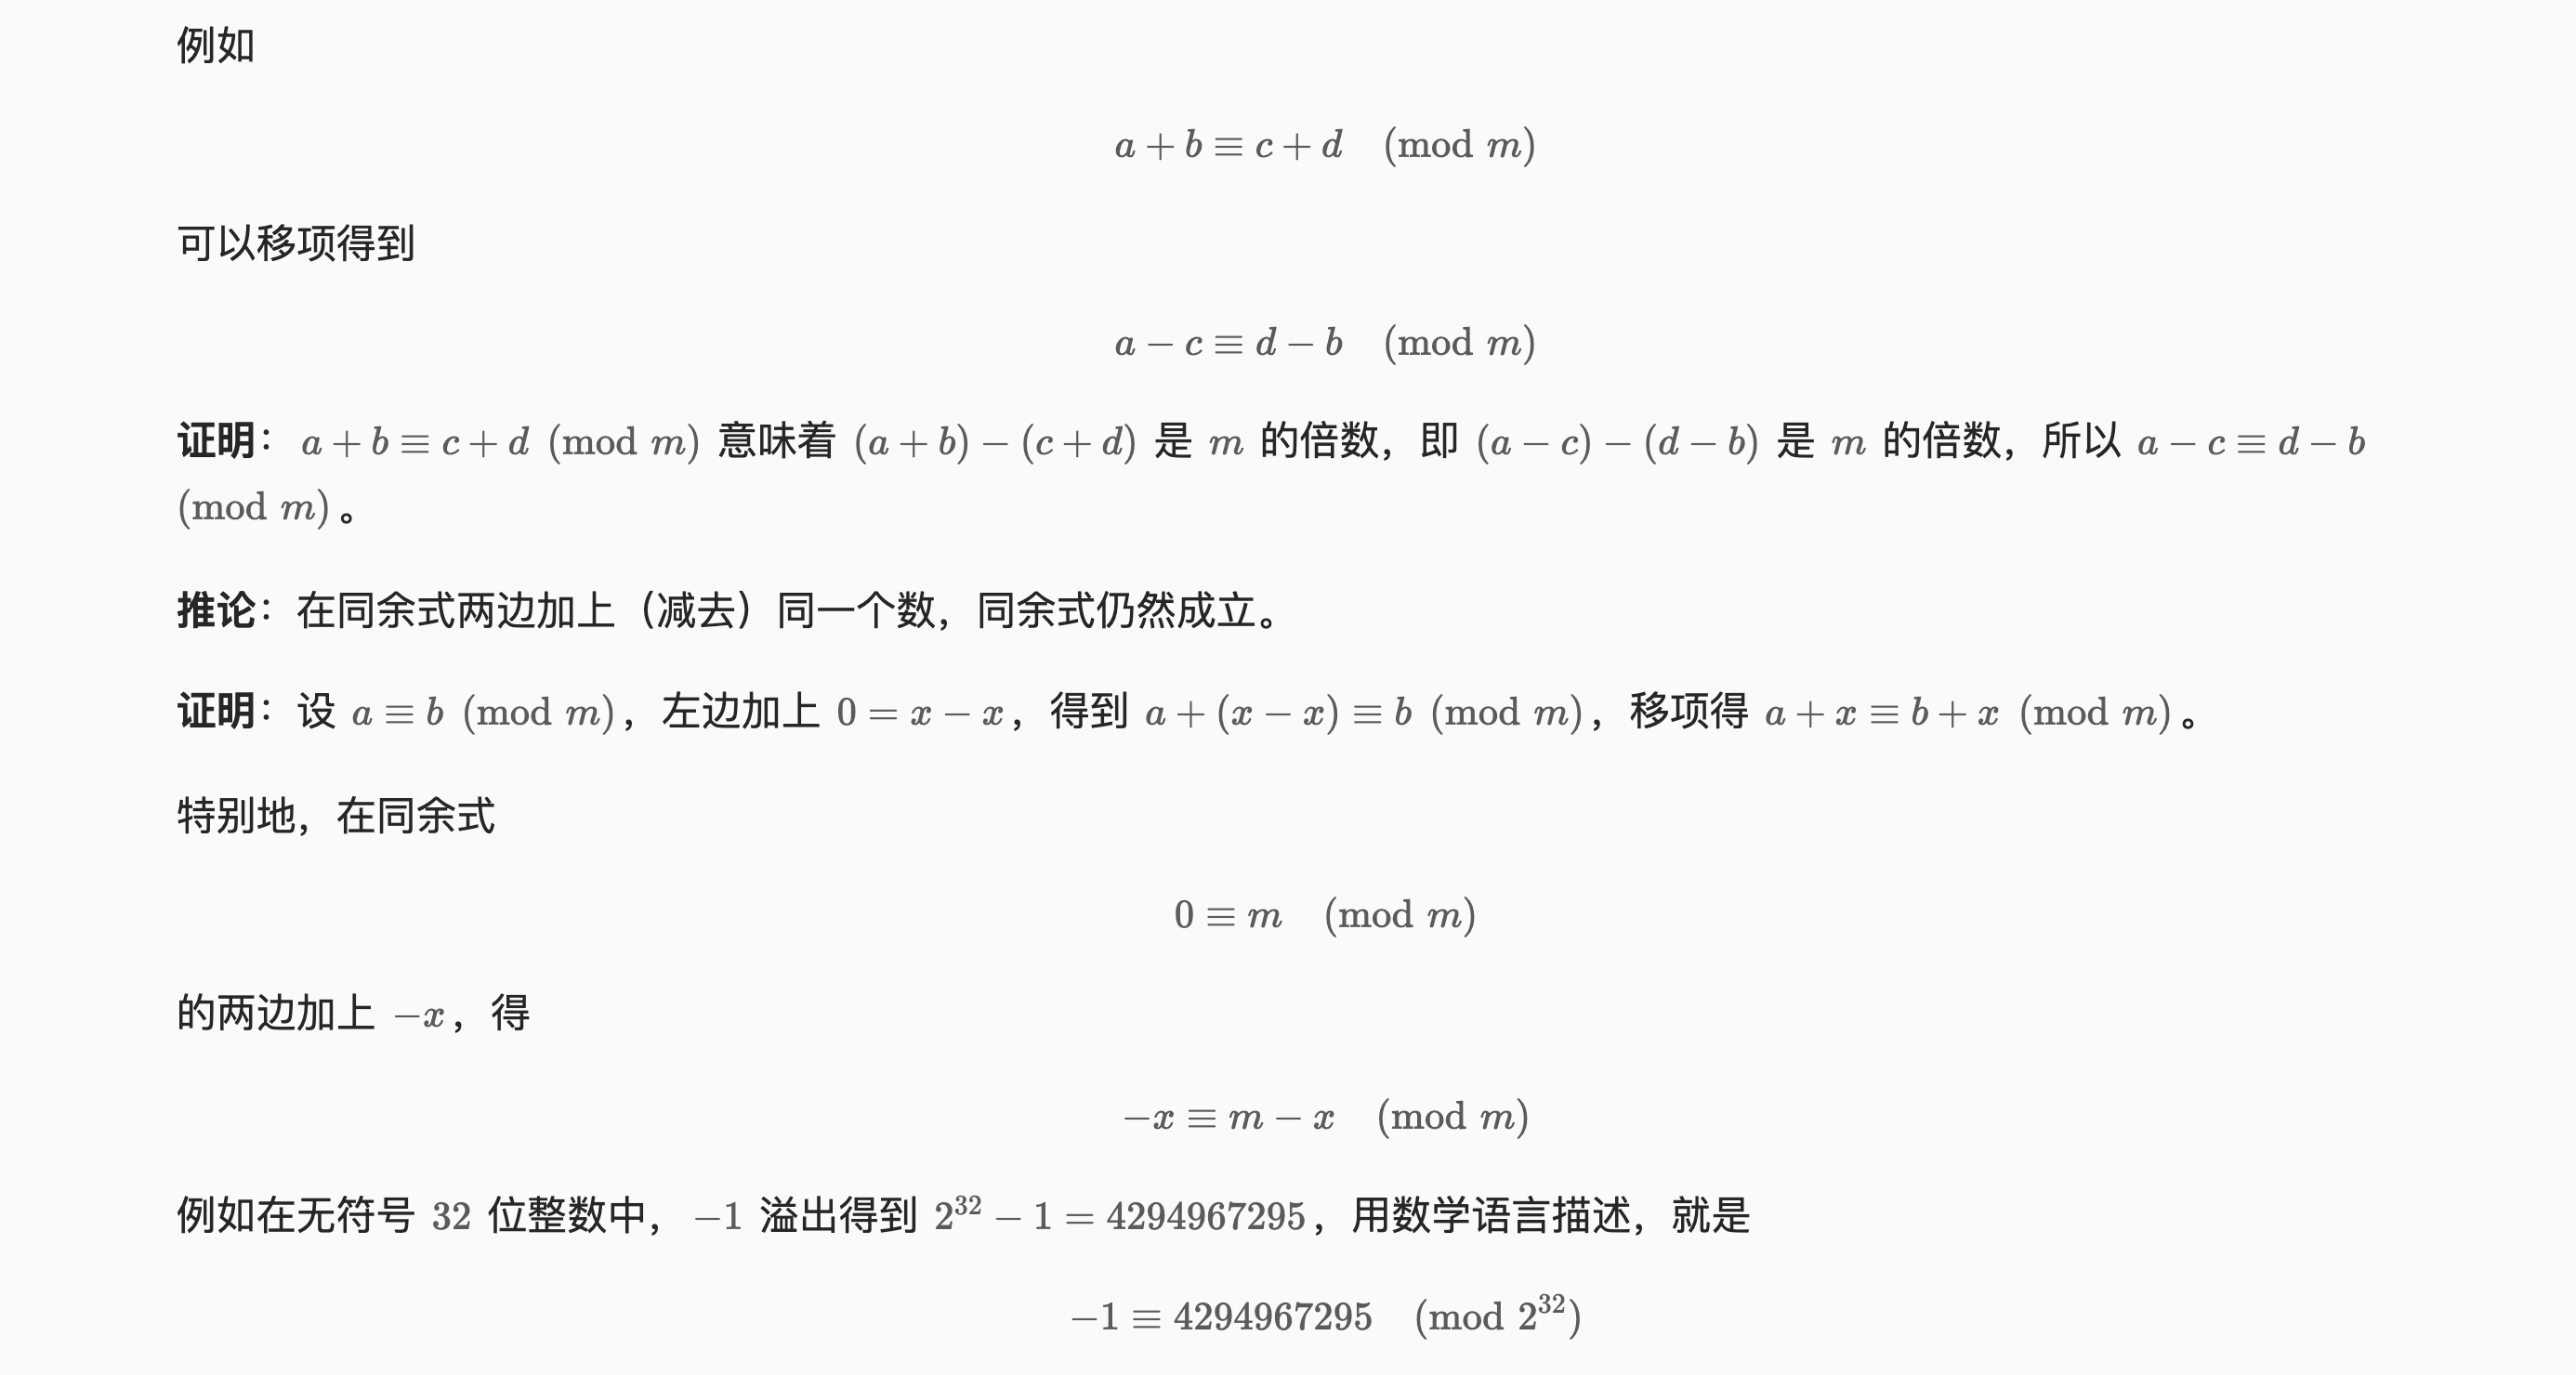
同余式的移项 负数和减法的取模
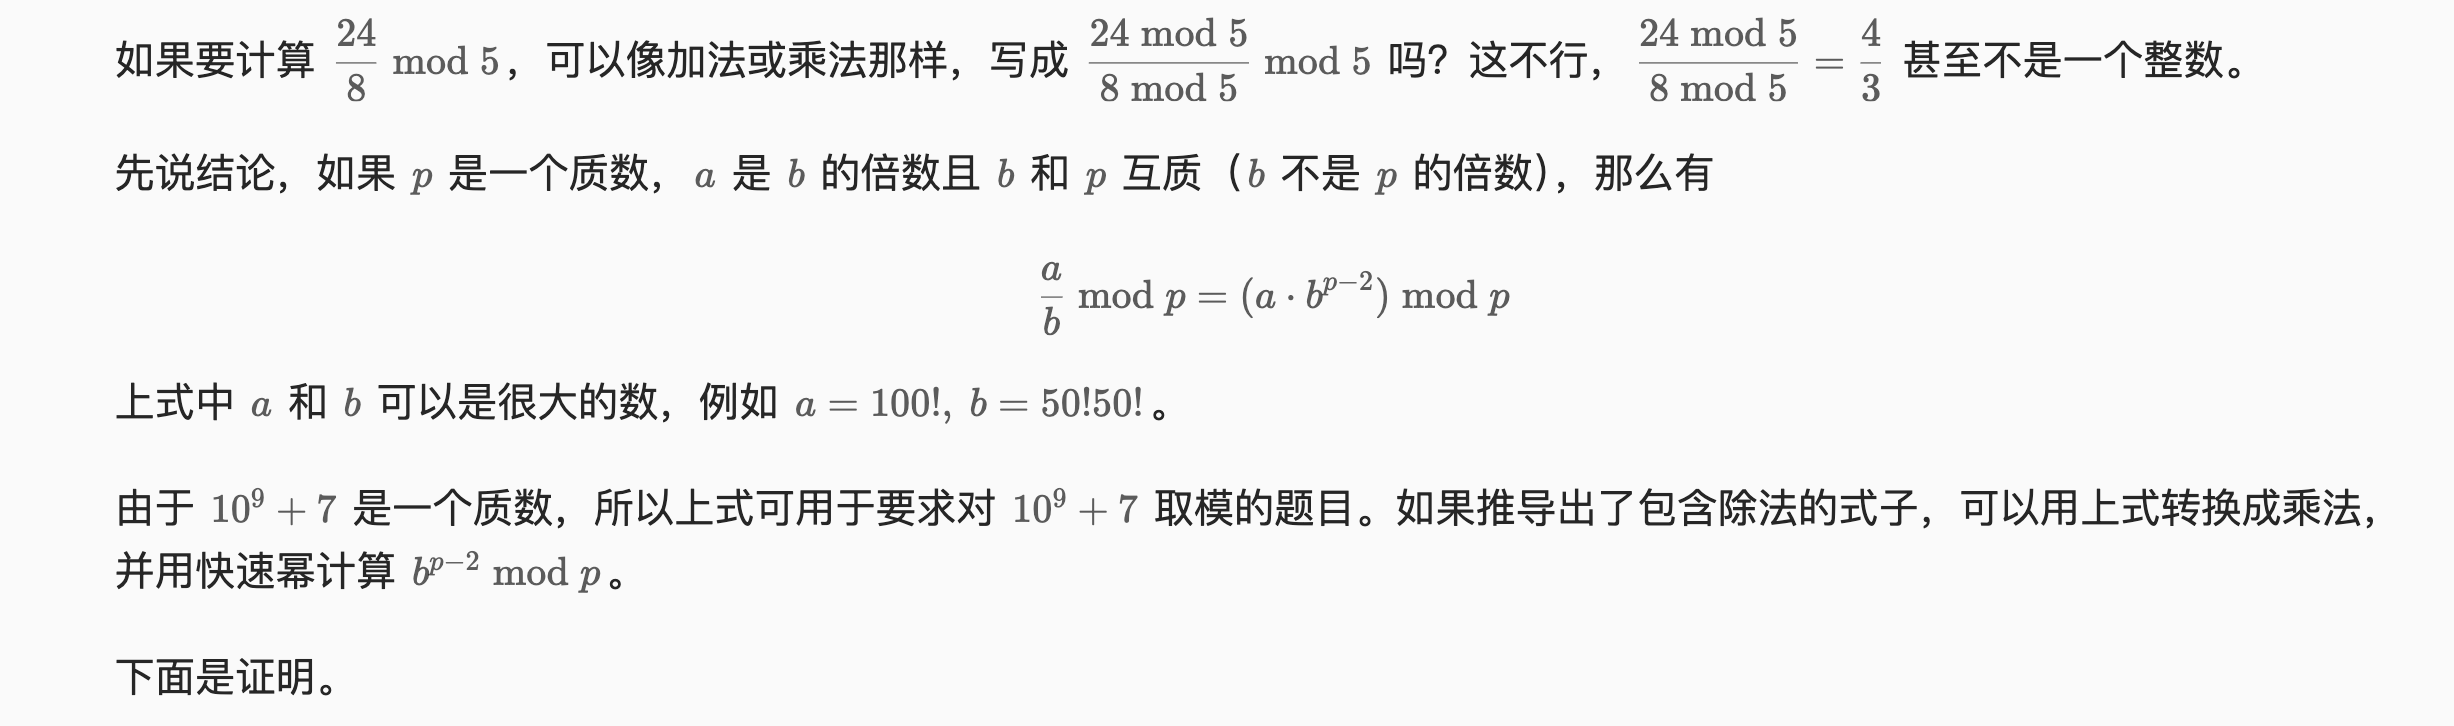
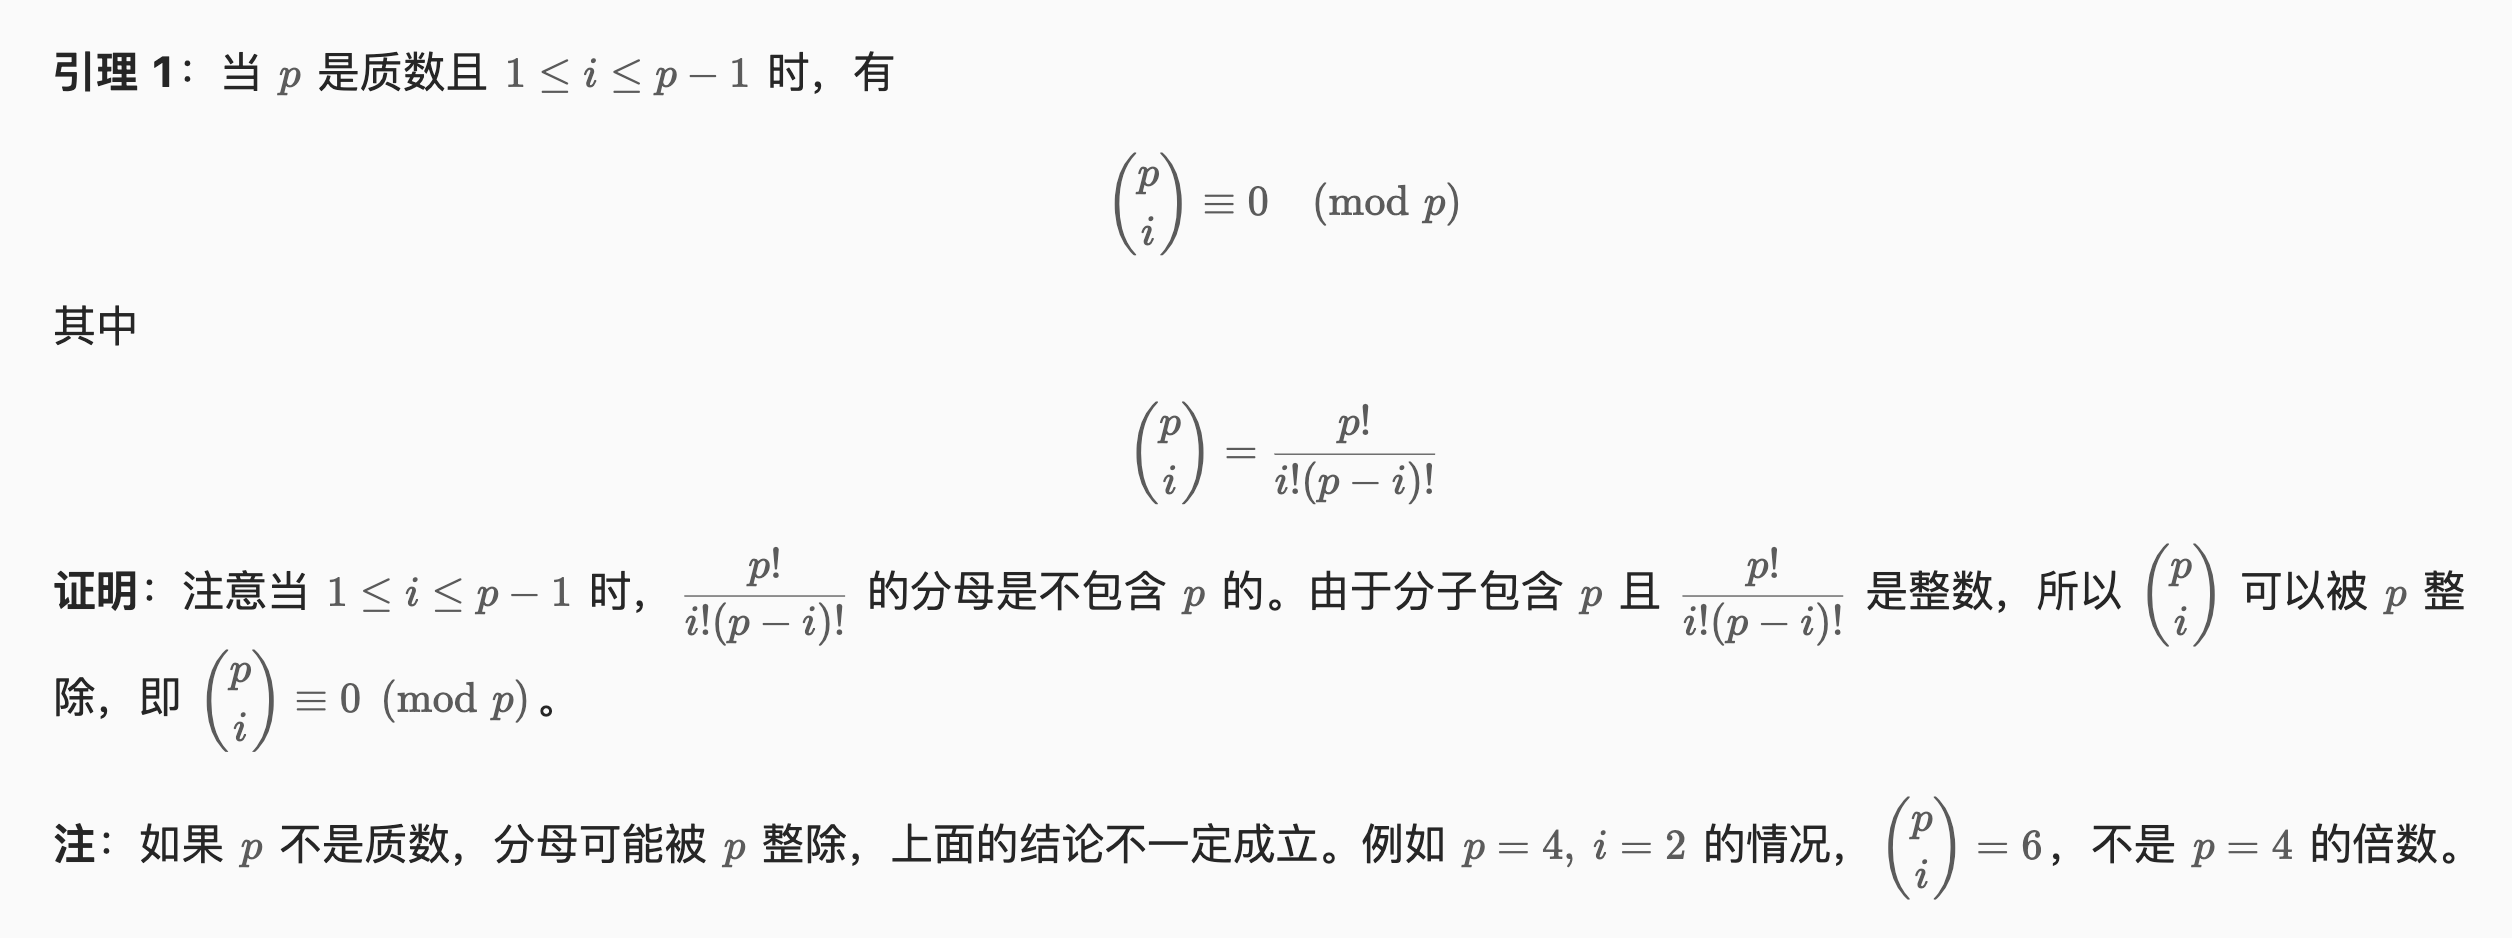
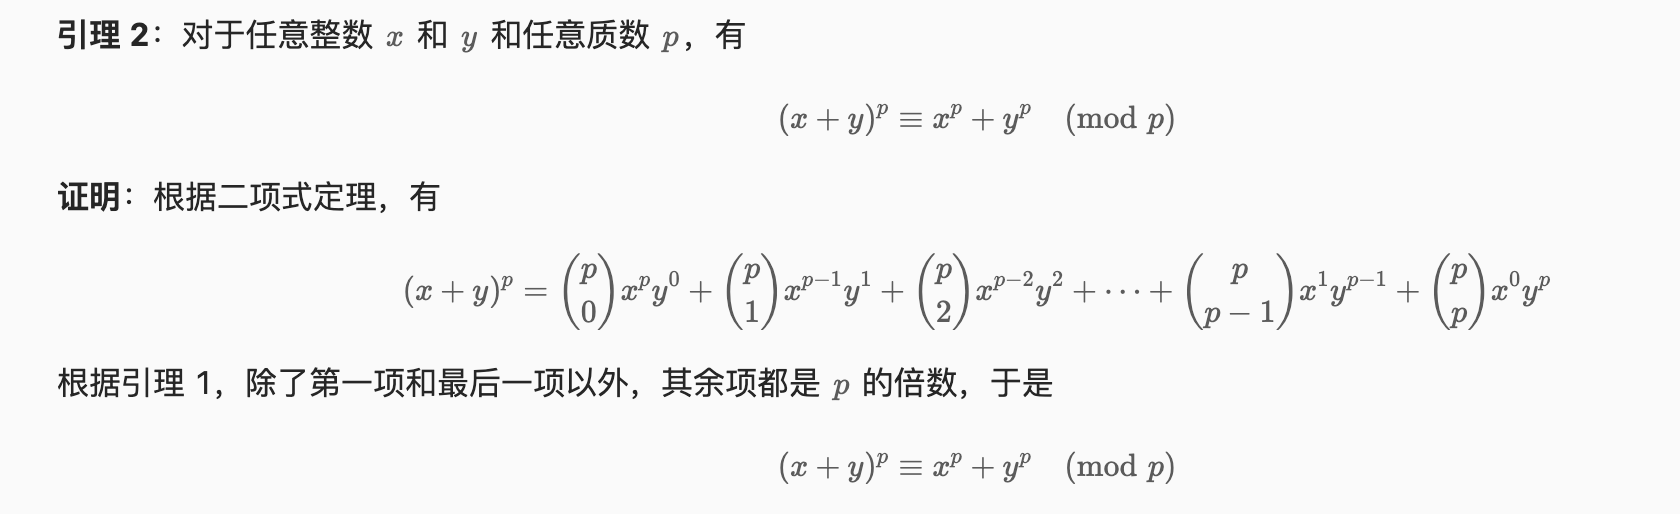
除法的取模
求模运算总结
代码实现时,上面的加减乘除通常是这样写的:
1 2 3 4 5 6 7 8 9 10 11 12 13 14 15 16 17 18 19 MOD = 1_000_000_007 (a + b) % MOD (a - b + MOD) % MOD (a % MOD + MOD) % MOD a * b % MOD a * b % MOD * c % MOD a * qpow(b, MOD - 2 , MOD) % MOD
其中 qpow 为快速幂.
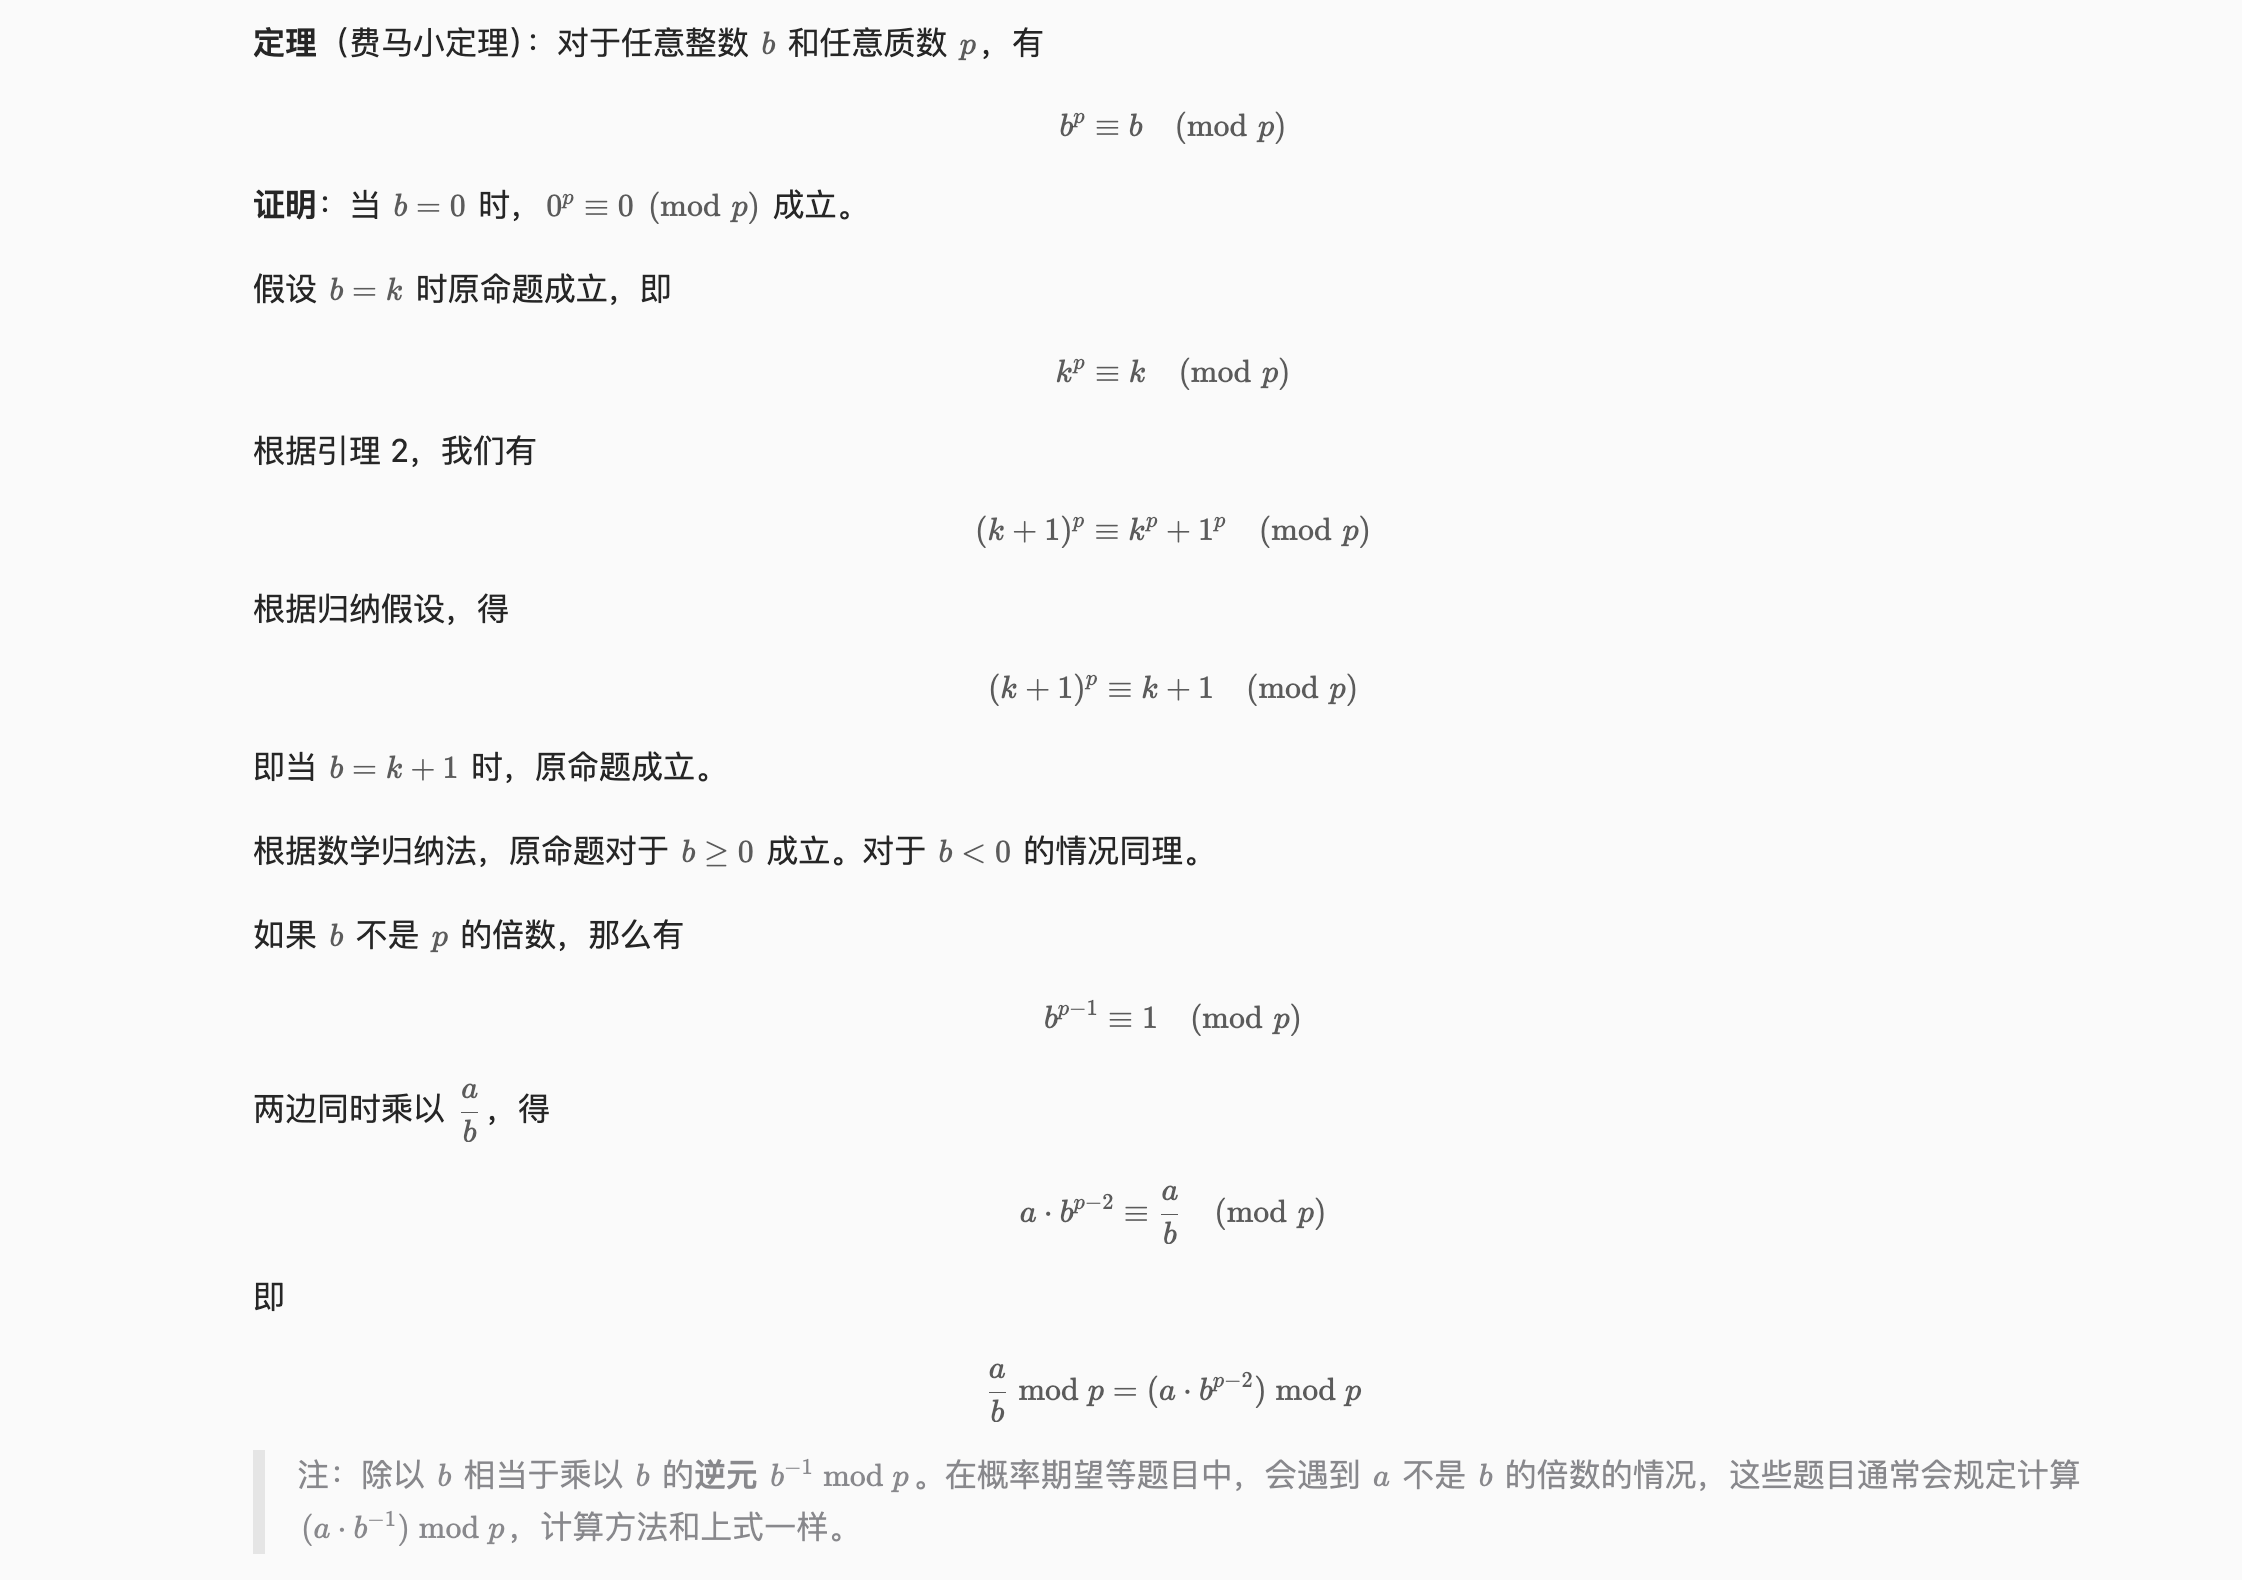
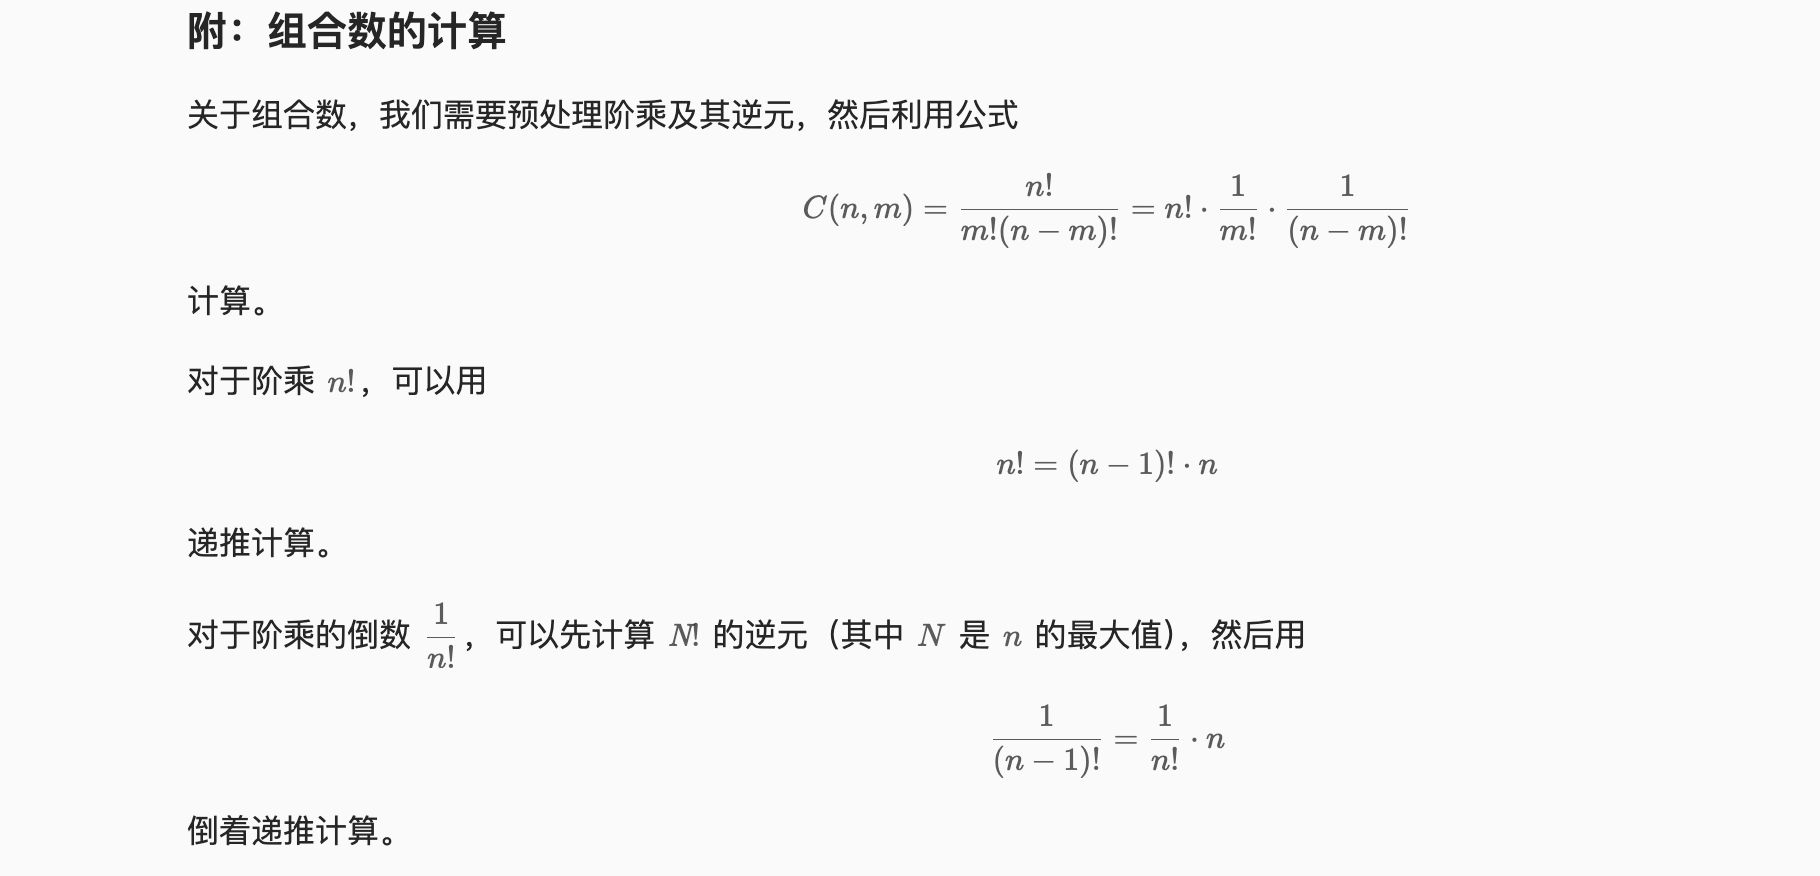
总之,如果发现解答错误,可以检查下代码,看看是不是哪里漏掉取模了。附:组合数计算
1 2 3 4 5 6 7 8 9 10 11 12 13 14 15 16 17 18 19 20 21 22 23 24 25 26 27 28 29 30 31 32 33 34 35 36 37 38 39 class Solution { private static final int MOD = 1_000_000_007 ; private static final int MX = 100_001 ; private static final long [] F = new long [MX]; private static final long [] INV_F = new long [MX]; static { F[0 ] = 1 ; for (int i = 1 ; i < MX; i++) { F[i] = F[i - 1 ] * i % MOD; } INV_F[MX - 1 ] = pow(F[MX - 1 ], MOD - 2 ); for (int i = MX - 1 ; i > 0 ; i--) { INV_F[i - 1 ] = INV_F[i] * i % MOD; } } private static long pow (long x, int n) { long res = 1 ; for (; n > 0 ; n /= 2 ) { if (n % 2 > 0 ) { res = res * x % MOD; } x = x * x % MOD; } return res; } private long comb (int n, int m) { return m < 0 || m > n ? 0 : F[n] * INV_F[m] % MOD * INV_F[n - m] % MOD; } public int solve (int [] nums) { } }
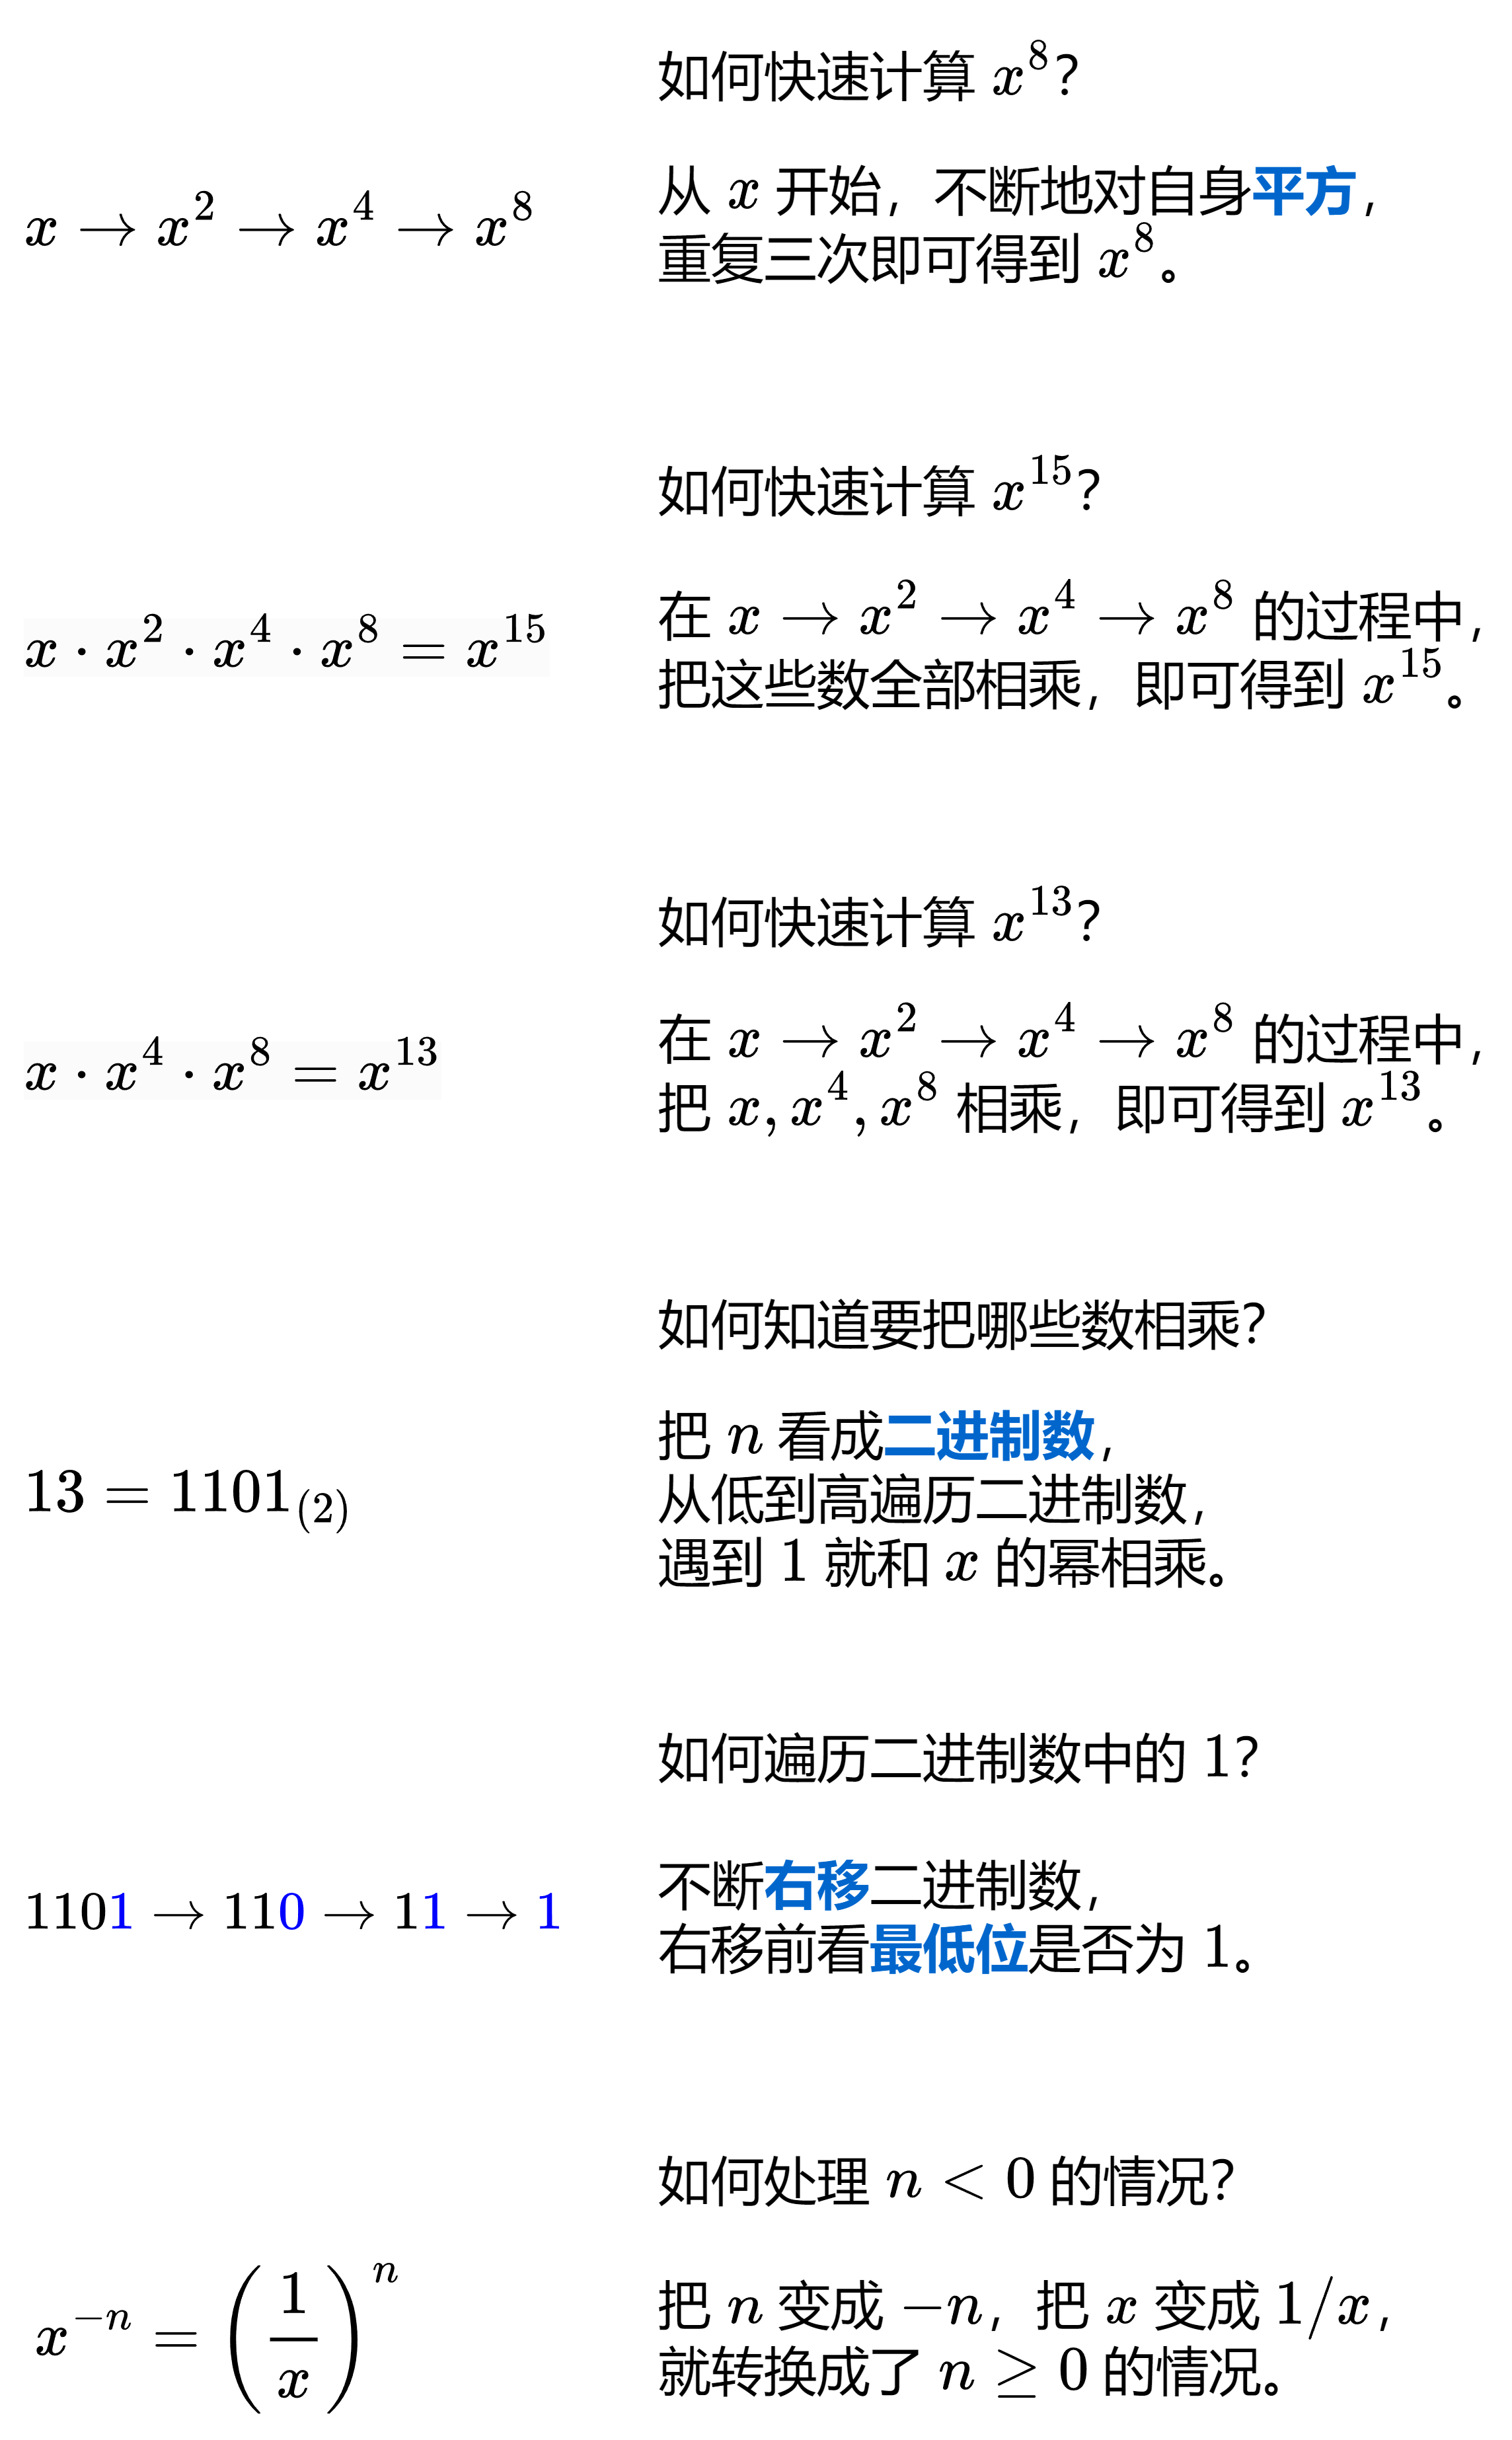
快速幂 一图流(灵神):
代码实现时,注意 n=−2^31的情况,取反后 n=2^31超出 int 最大值。可以转成 64 位 int 解决。
1 2 3 4 5 6 7 8 9 10 11 12 13 14 15 16 17 18 class Solution { public double myPow (double x, int N) { double ans = 1 ; long n = N; if (n < 0 ) { n = -n; x = 1 / x; } while (n != 0 ) { if ((n & 1 ) == 1 ) { ans *= x; } x *= x; n >>= 1 ; } return ans; } }
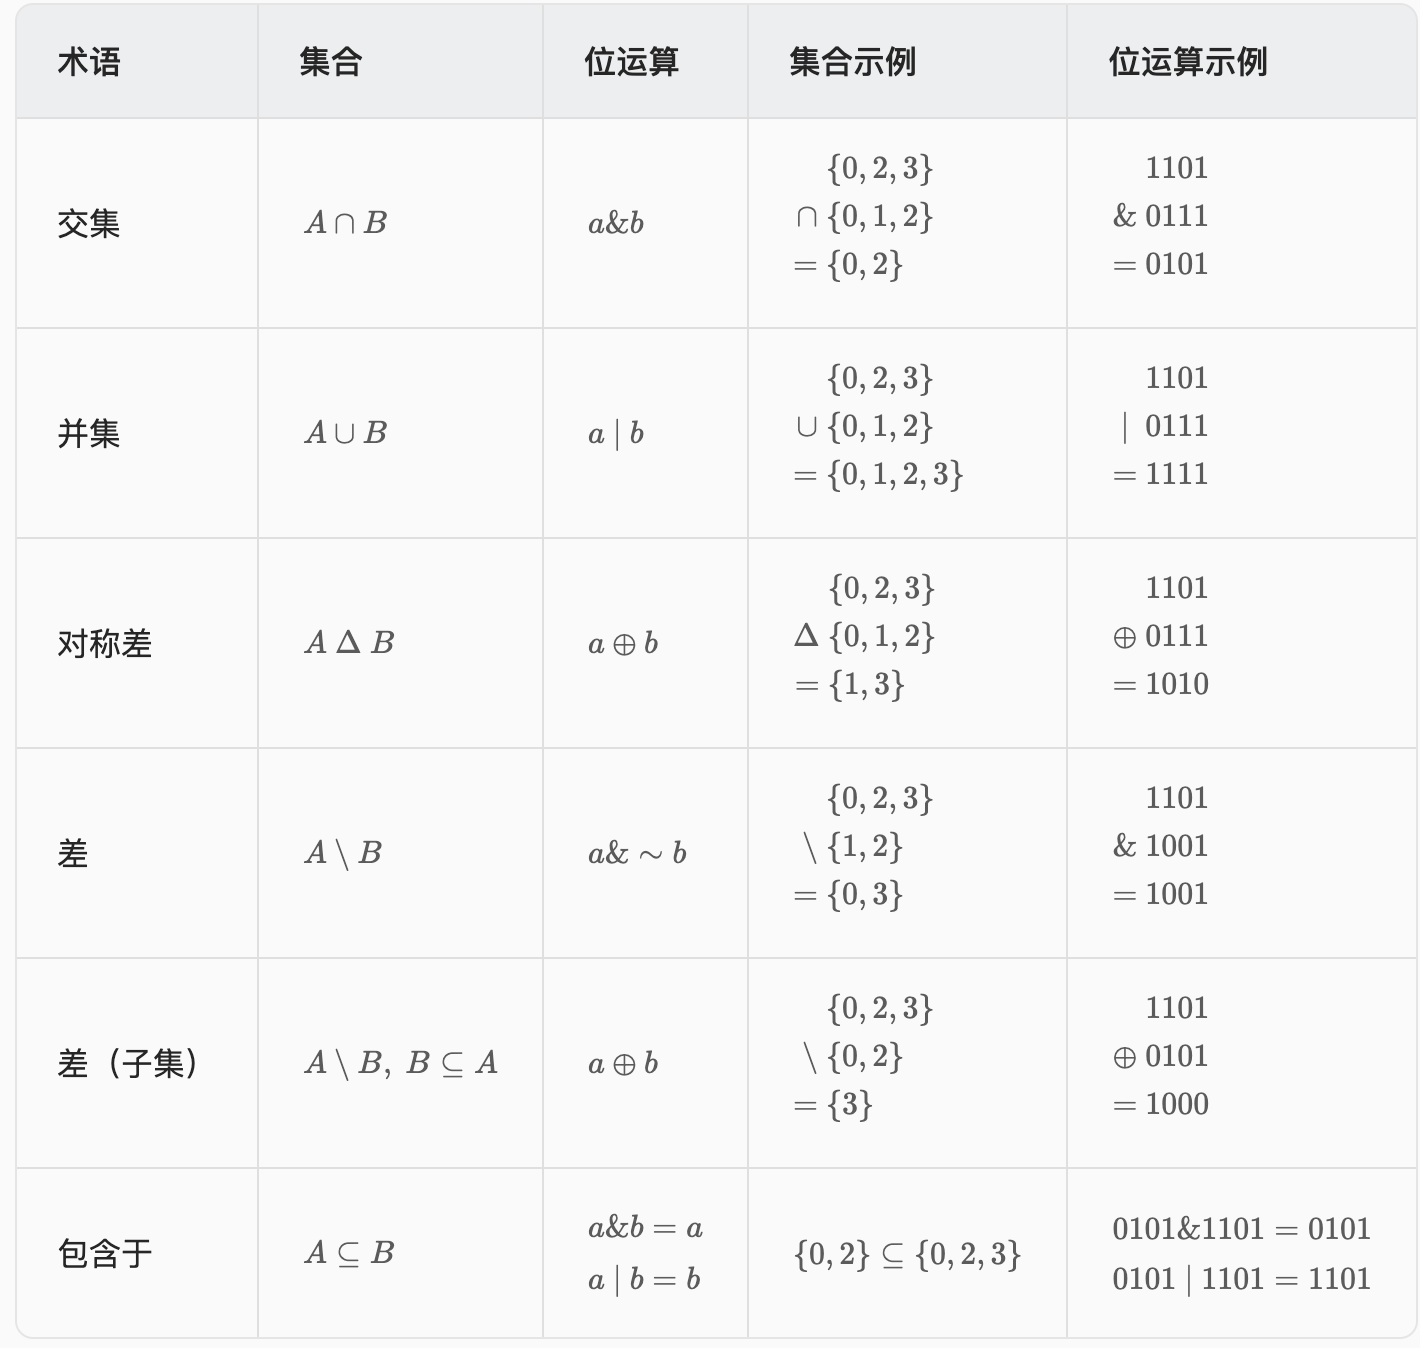
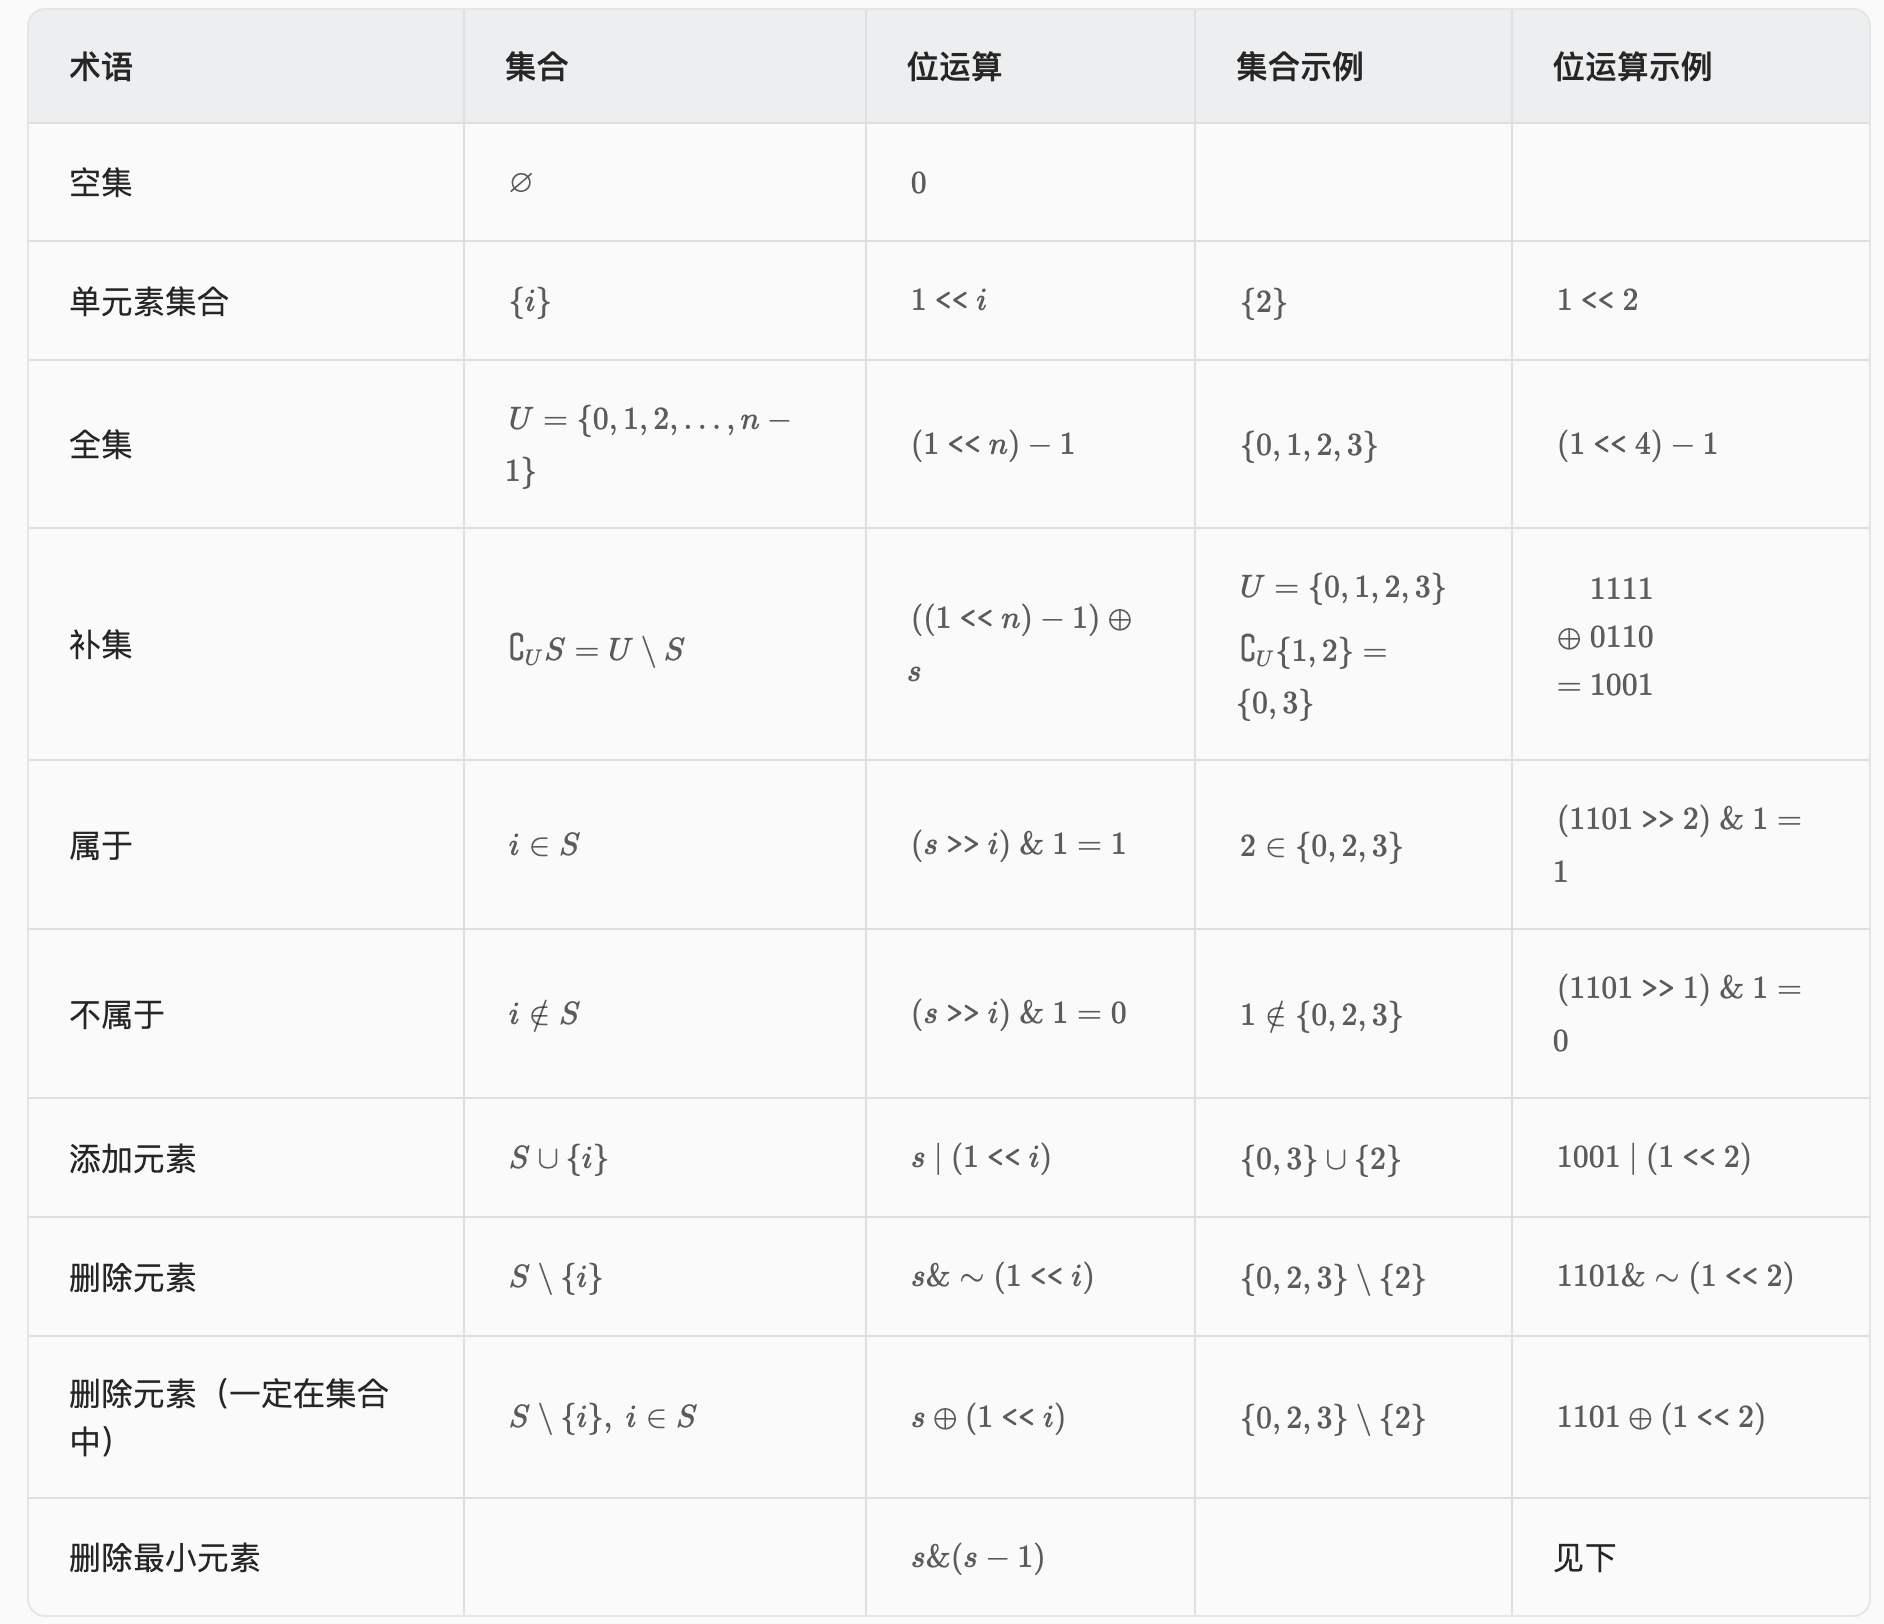
二进制 从集合论到位运算,常见位运算技巧分类总结
1 2 3 s = 101100 s-1 = 101011 s&(s-1 ) = 101000
特别地,如果 s 是 2 的幂,那么 s&(s−1)=0。
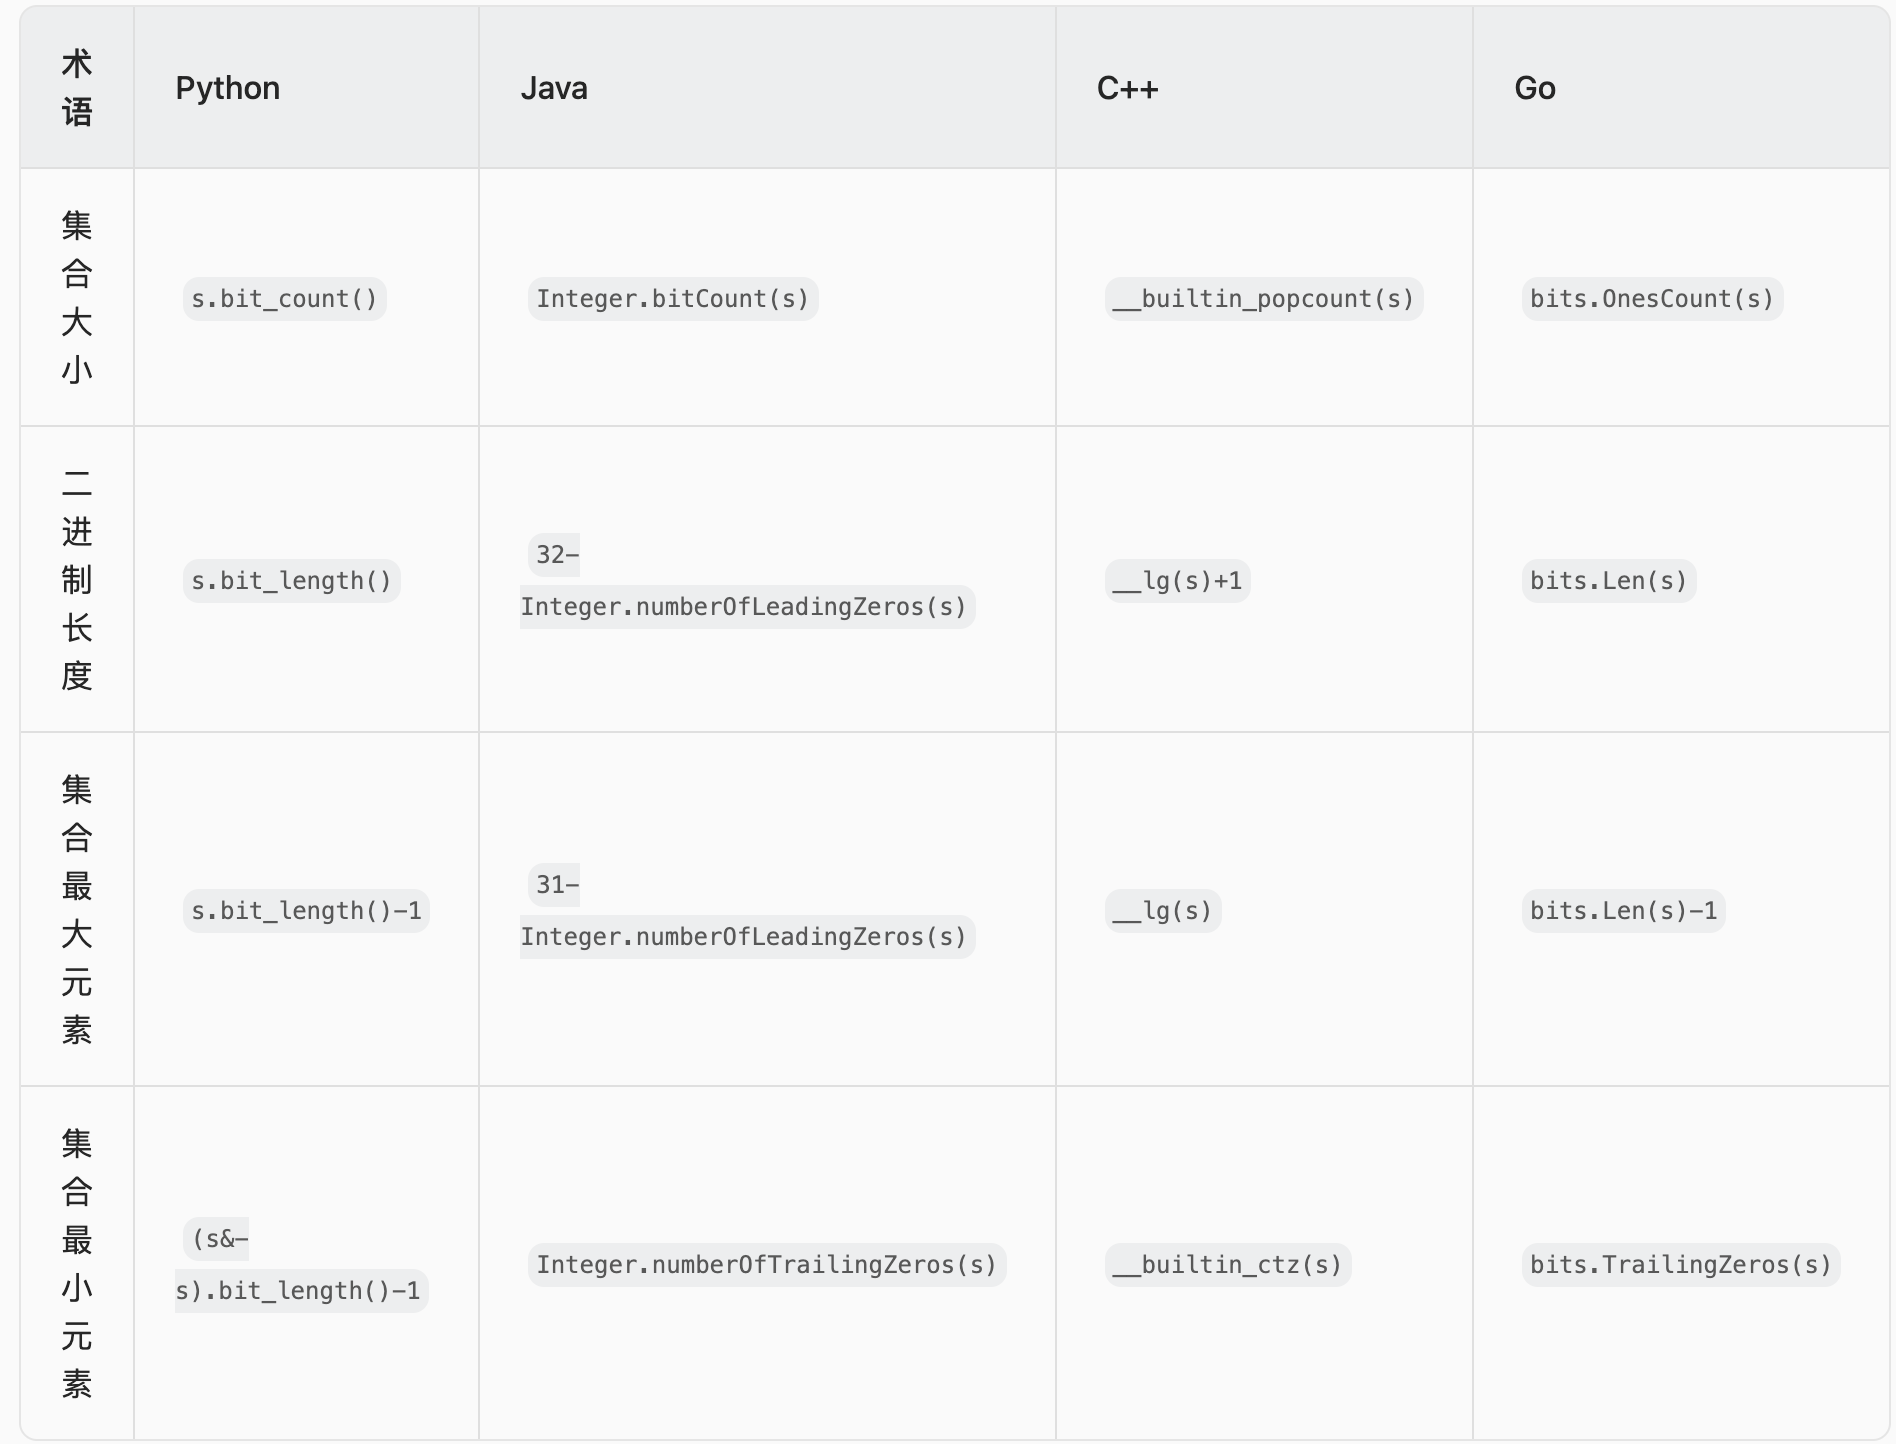
此外,编程语言提供了一些和二进制有关的库函数,例如:
计算二进制中的 1 的个数,也就是集合大小;
计算二进制长度,减一后得到集合最大元素;
计算二进制尾零个数,也就是集合最小元素。
调用这些函数的时间复杂度都是 O(1)。
1 2 3 4 s = 101100 ~s = 010011 (~s)+1 = 010100 s & -s = 000100
遍历集合
1 2 3 4 5 6 7 8 9 10 for (int i = 0 ; i < n; i++) { if (((s >> i) & 1 ) == 1 ) { } } for (int t = s; t > 0 ; t &= t - 1 ) { int i = Integer.numberOfTrailingZeros(t); }
四、枚举集合
1 2 3 for (int s = 0 ; s < (1 << n); s++) { }
§4.2 枚举非空子集
1 2 3 for (int sub = s; sub > 0 ; sub = (sub - 1 ) & s) { }
为什么要写成 sub = (sub - 1) & s 呢?
暴力做法是从 s 出发,不断减一,直到 0。但这样做,中途会遇到很多并不是 s 的子集的情况。例如 s=10101 时,减一得到 10100,这是 s 的子集。但再减一就得到 10011 了,这并不是 s 的子集,下一个子集应该是 10001。
把所有的合法子集按顺序列出来,会发现我们做的相当于「压缩版」的二进制减法,例如
10101→10100→10001→10000→00101→⋯
111→110→101→100→011→⋯
普通的二进制减法,是 10100−1=10011,也就是把最低位的 1 变成 0,同时把最低位的 1 右边的 0 都变成 1。
1 2 3 4 5 int sub = s;do { sub = (sub - 1 ) & s; } while (sub != s);
其中 Java 和 C++ 的原理是,当 sub=0 时(空集),再减一就得到 −1,对应的二进制为 111⋯1,再 &s 就得到了 s。所以当循环到 sub=s 时,说明最后一次循环的 sub=0(空集),s 的所有子集都枚举到了,退出循环。
注:还可以枚举全集 U 的所有大小恰好为 k 的子集,这一技巧叫做 Gosper’s Hack,具体请看 视频讲解。
§4.4 枚举超集
枚举超集的原理和上文枚举子集是类似的,这里通过或运算保证枚举的集合 S 一定包含集合 T 中的所有元素。
枚举 S,满足 S 是 T 的超集,也是全集 U={0,1,2,…,n−1} 的子集。
1 2 3 for (int s = t; s < (1 << n); s = (s + 1 ) | t) { }
数组
快速排序 1 2 3 4 5 6 7 8 9 10 11 12 13 14 15 16 17 18 19 20 21 22 23 24 25 26 27 28 29 30 31 32 33 34 35 36 37 38 39 40 41 42 43 44 45 46 47 48 49 50 51 52 53 54 55 56 57 58 59 60 61 62 63 64 65 66 67 68 69 70 71 72 73 74 75 76 77 78 79 80 81 82 83 84 85 86 87 88 89 90 91 92 93 94 95 96 class Solution { private static final Random rand = new Random (); public int [] sortArray(int [] nums) { quickSort(nums, 0 , nums.length - 1 ); return nums; } private void quickSort (int [] nums, int left, int right) { boolean ordered = true ; for (int i = left; i < right; i++) { if (nums[i] > nums[i + 1 ]) { ordered = false ; break ; } } if (ordered) { return ; } int i = partition(nums, left, right); quickSort(nums, left, i - 1 ); quickSort(nums, i + 1 , right); } private int partition (int [] nums, int left, int right) { int i = left + rand.nextInt(right - left + 1 ); int pivot = nums[i]; swap(nums, i, left); i = left + 1 ; int j = right; while (true ) { while (i <= j && nums[i] < pivot) { i++; } while (i <= j && nums[j] > pivot) { j--; } if (i >= j) { break ; } swap(nums, i, j); i++; j--; } swap(nums, left, j); return j; } private void swap (int [] nums, int i, int j) { int tmp = nums[i]; nums[i] = nums[j]; nums[j] = tmp; } }
二分查找 https://leetcode.cn/problems/binary-search/ 通用模板:
1 2 3 4 5 6 7 8 9 10 11 12 13 14 15 16 17 18 19 20 21 22 23 24 25 26 27 28 29 30 31 32 33 34 35 36 37 38 39 40 41 42 43 44 45 46 47 48 49 50 51 52 53 54 55 56 57 58 59 60 61 class Solution { public int search (int [] nums, int target) { int i = lowerBound(nums, target); return i < nums.length && nums[i] == target ? i : -1 ; } private int lowerBound (int [] nums, int target) { int left = 0 , right = nums.length - 1 ; while (left <= right) { int mid = left + (right - left) / 2 ; if (nums[mid] < target) left = mid + 1 ; else right = mid - 1 ; } return left; } private int lowerBound2 (int [] nums, int target) { int left = 0 , right = nums.length; while (left < right) { int mid = left + (right - left) / 2 ; if (nums[mid] < target) left = mid + 1 ; else right = mid; } return left; } private int lowerBound3 (int [] nums, int target) { int left = -1 , right = nums.length; while (left + 1 < right) { int mid = left + (right - left) / 2 ; if (nums[mid] < target) left = mid; else right = mid; } return right; } }
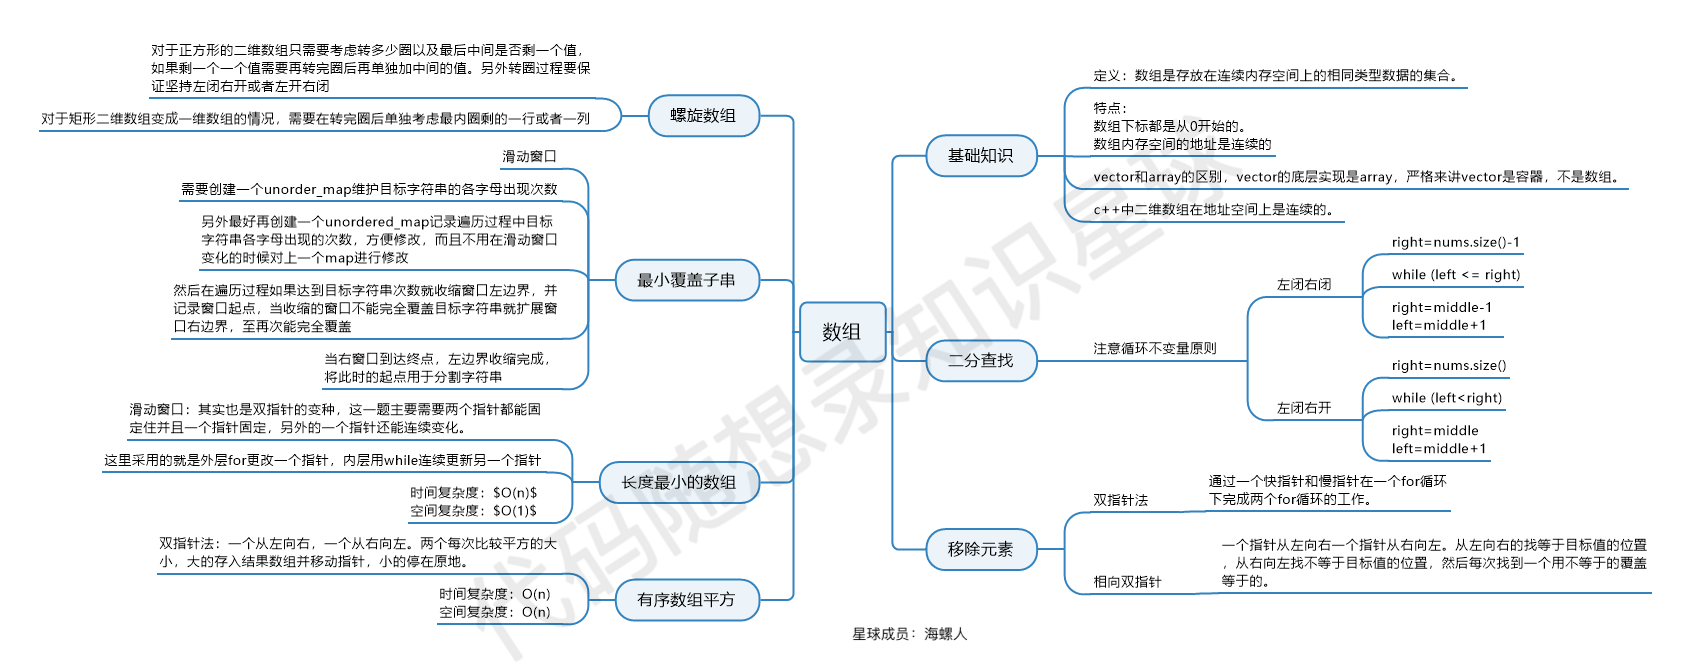
二分法数组:每次遇到二分法,都是一看就会,一写就废
暴力解法时间复杂度:O(n)
二分法时间复杂度:O(logn)
双指针 双指针法
双指针法(快慢指针法):通过一个快指针和慢指针在一个for循环下完成两个for循环的工作。
暴力解法时间复杂度:O(n^2)
双指针时间复杂度:O(n)
滑动窗口 滑动窗口
滑动窗口的精妙之处在于根据当前子序列和大小的情况,不断调节子序列的起始位置。从而将O(n^2)的暴力解法降为O(n)。
恰好包含k个 恰好等于k个的,可以通过至少包含k个的,然后减去至少包含k-1个的,就是恰好包含k个的.
模拟行为
在这道题目中,我们再一次介绍到了循环不变量原则,其实这也是写程序中的重要原则。
相信大家有遇到过这种情况: 感觉题目的边界调节超多,一波接着一波的判断,找边界,拆了东墙补西墙,好不容易运行通过了,代码写的十分冗余,毫无章法,其实真正解决题目的代码都是简洁的,或者有原则性的,大家可以在这道题目中体会到这一点。
前缀和 快速排序 1 2 3 4 5 6 7 8 9 10 11 12 13 14 15 16 17 18 19 20 21 22 23 24 25 26 27 28 29 30 31 32 33 34 35 36 37 38 39 40 41 42 43 44 45 46 47 48 49 50 51 52 53 54 55 56 57 58 59 60 61 62 63 64 65 66 67 68 69 70 71 72 73 74 75 76 77 78 79 80 81 82 83 84 85 86 87 88 89 90 91 92 93 94 95 96 class Solution { private static final Random rand = new Random (); public int [] sortArray(int [] nums) { quickSort(nums, 0 , nums.length - 1 ); return nums; } private void quickSort (int [] nums, int left, int right) { boolean ordered = true ; for (int i = left; i < right; i++) { if (nums[i] > nums[i + 1 ]) { ordered = false ; break ; } } if (ordered) { return ; } int i = partition(nums, left, right); quickSort(nums, left, i - 1 ); quickSort(nums, i + 1 , right); } private int partition (int [] nums, int left, int right) { int i = left + rand.nextInt(right - left + 1 ); int pivot = nums[i]; swap(nums, i, left); i = left + 1 ; int j = right; while (true ) { while (i <= j && nums[i] < pivot) { i++; } while (i <= j && nums[j] > pivot) { j--; } if (i >= j) { break ; } swap(nums, i, j); i++; j--; } swap(nums, left, j); return j; } private void swap (int [] nums, int i, int j) { int tmp = nums[i]; nums[i] = nums[j]; nums[j] = tmp; } }
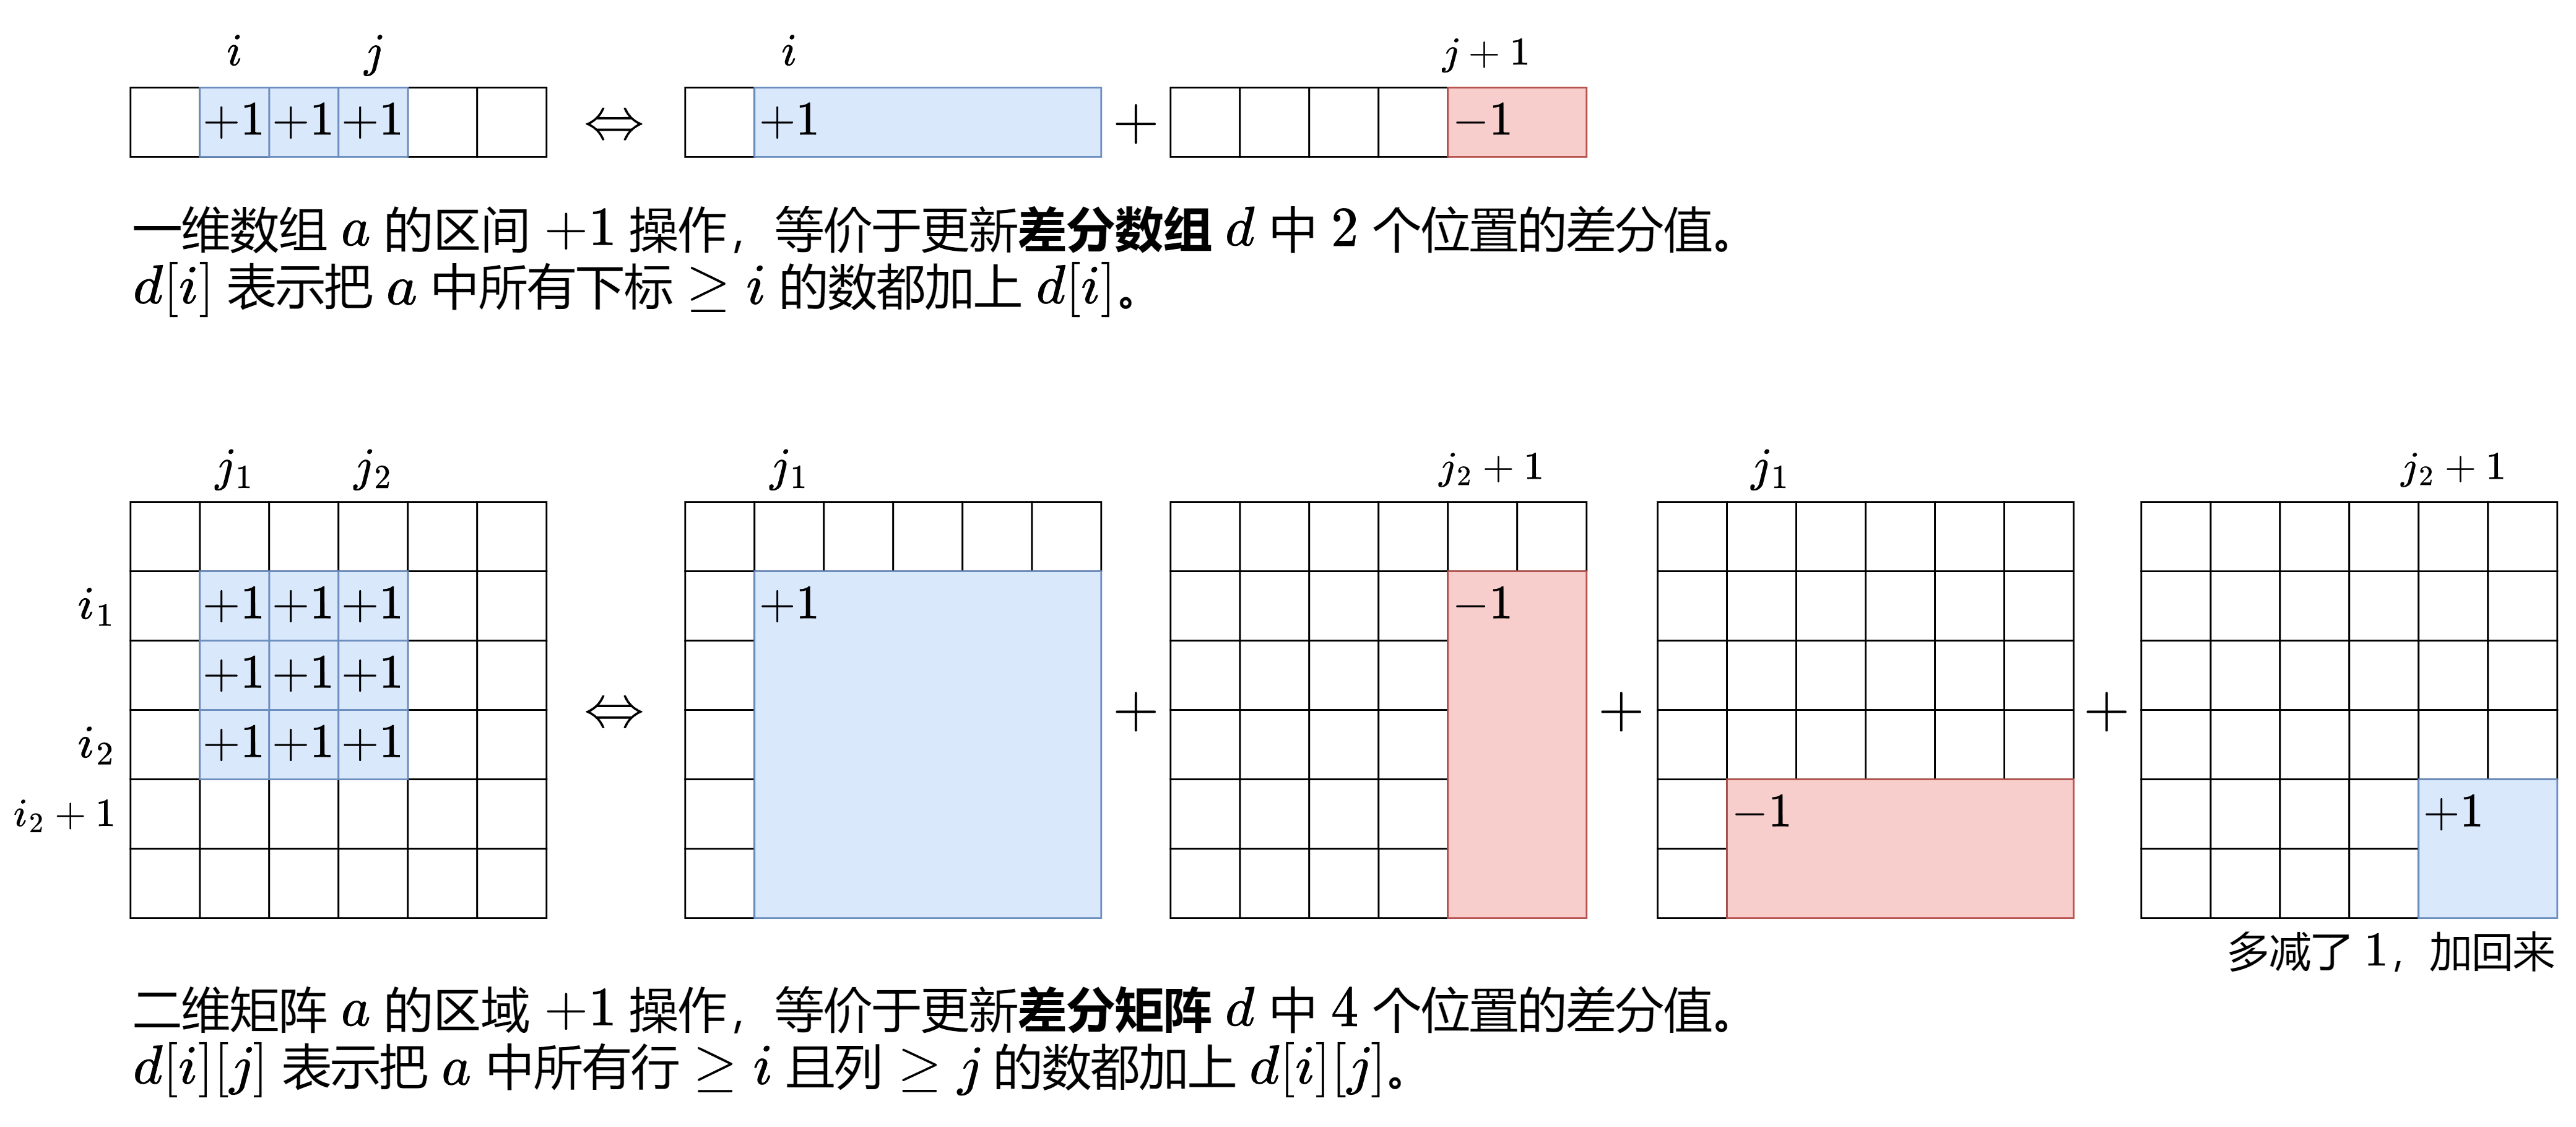
差分数组 二维差分:
链表
1 2 3 4 5 6 7 8 9 10 11 12 13 14 15 16 public class ListNode { int val; ListNode next; public ListNode () {} public ListNode (int val) { this .val = val; } public ListNode (int val, ListNode next) { this .val = val; this .next = next; } }
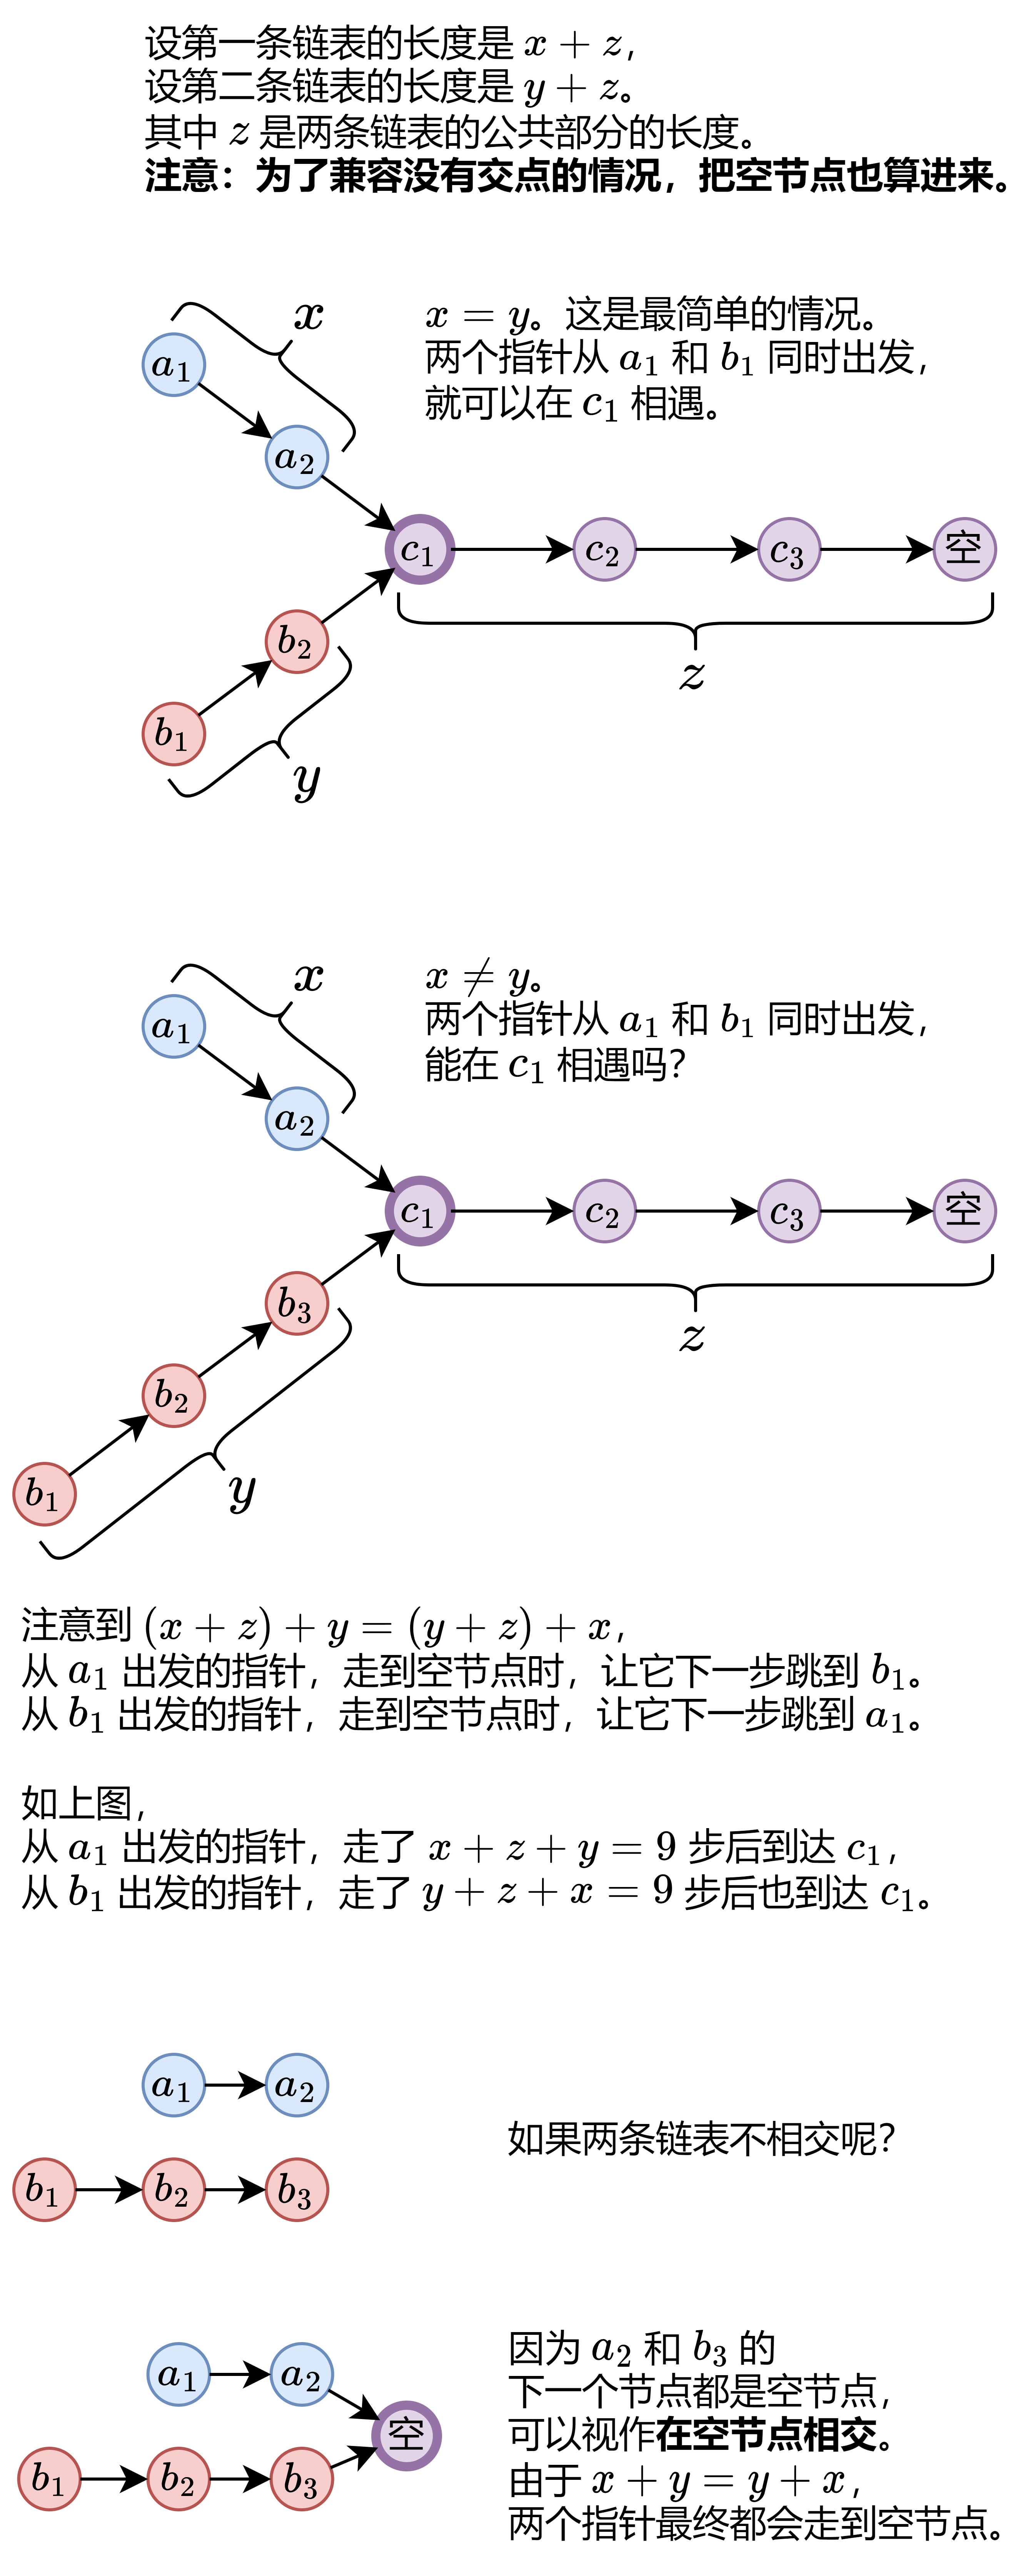
相交链表 题目链接
1 2 3 4 5 6 7 8 9 10 11 class Solution { public ListNode getIntersectionNode (ListNode headA, ListNode headB) { ListNode p = headA; ListNode q = headB; while (p != q) { p = p != null ? p.next : headB; q = q != null ? q.next : headA; } return p; } }
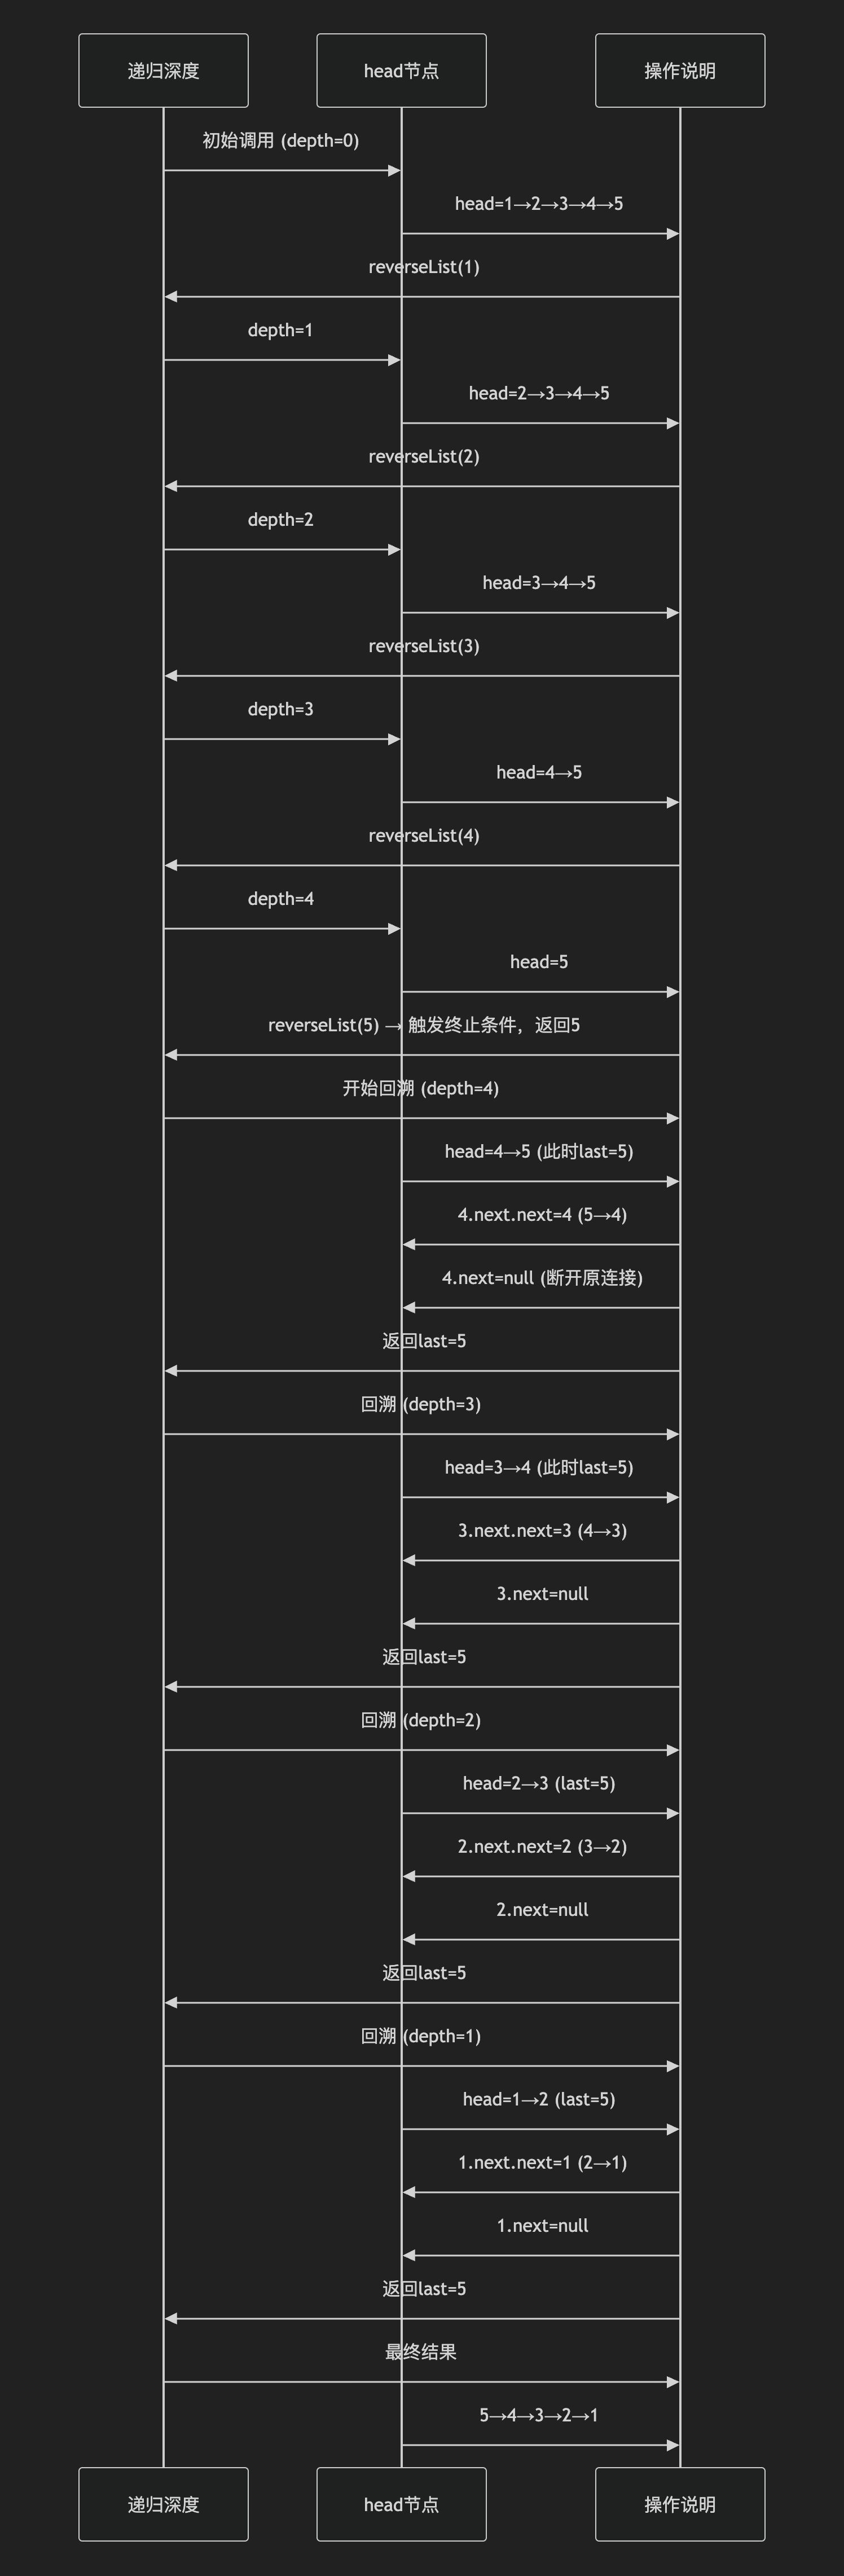
反转链表 1 2 3 4 5 6 7 8 9 class Solution { public ListNode reverseList (ListNode head) { if (head == null || head.next == null )return head; ListNode last = reverseList(head.next); head.next.next = head; head.next = null ; return last; } }
递归流程图:
移除链表元素 设计链表 反转链表 两两交换链表中的节点 删除链表的倒数第N个节点 链表相交 环形链表II 环形链表 https://leetcode.cn/problems/find-the-duplicate-number
1 2 3 4 5 6 7 8 9 10 11 12 13 14 15 16 17 18 19 class Solution { public int findDuplicate (int [] nums) { int slow = 0 ; int fast = 0 ; slow = nums[slow]; fast = nums[nums[fast]]; while (slow != fast){ slow = nums[slow]; fast = nums[nums[fast]]; } int pre1 = 0 ; int pre2 = slow; while (pre1 != pre2){ pre1 = nums[pre1]; pre2 = nums[pre2]; } return pre1; } }
哈希表 题目 242.有效的字母异位词力扣题目链接 力扣题目链接 力扣题目链接 力扣题目链接 力扣题目链接 力扣题目链接 力扣题目链接 力扣题目链接
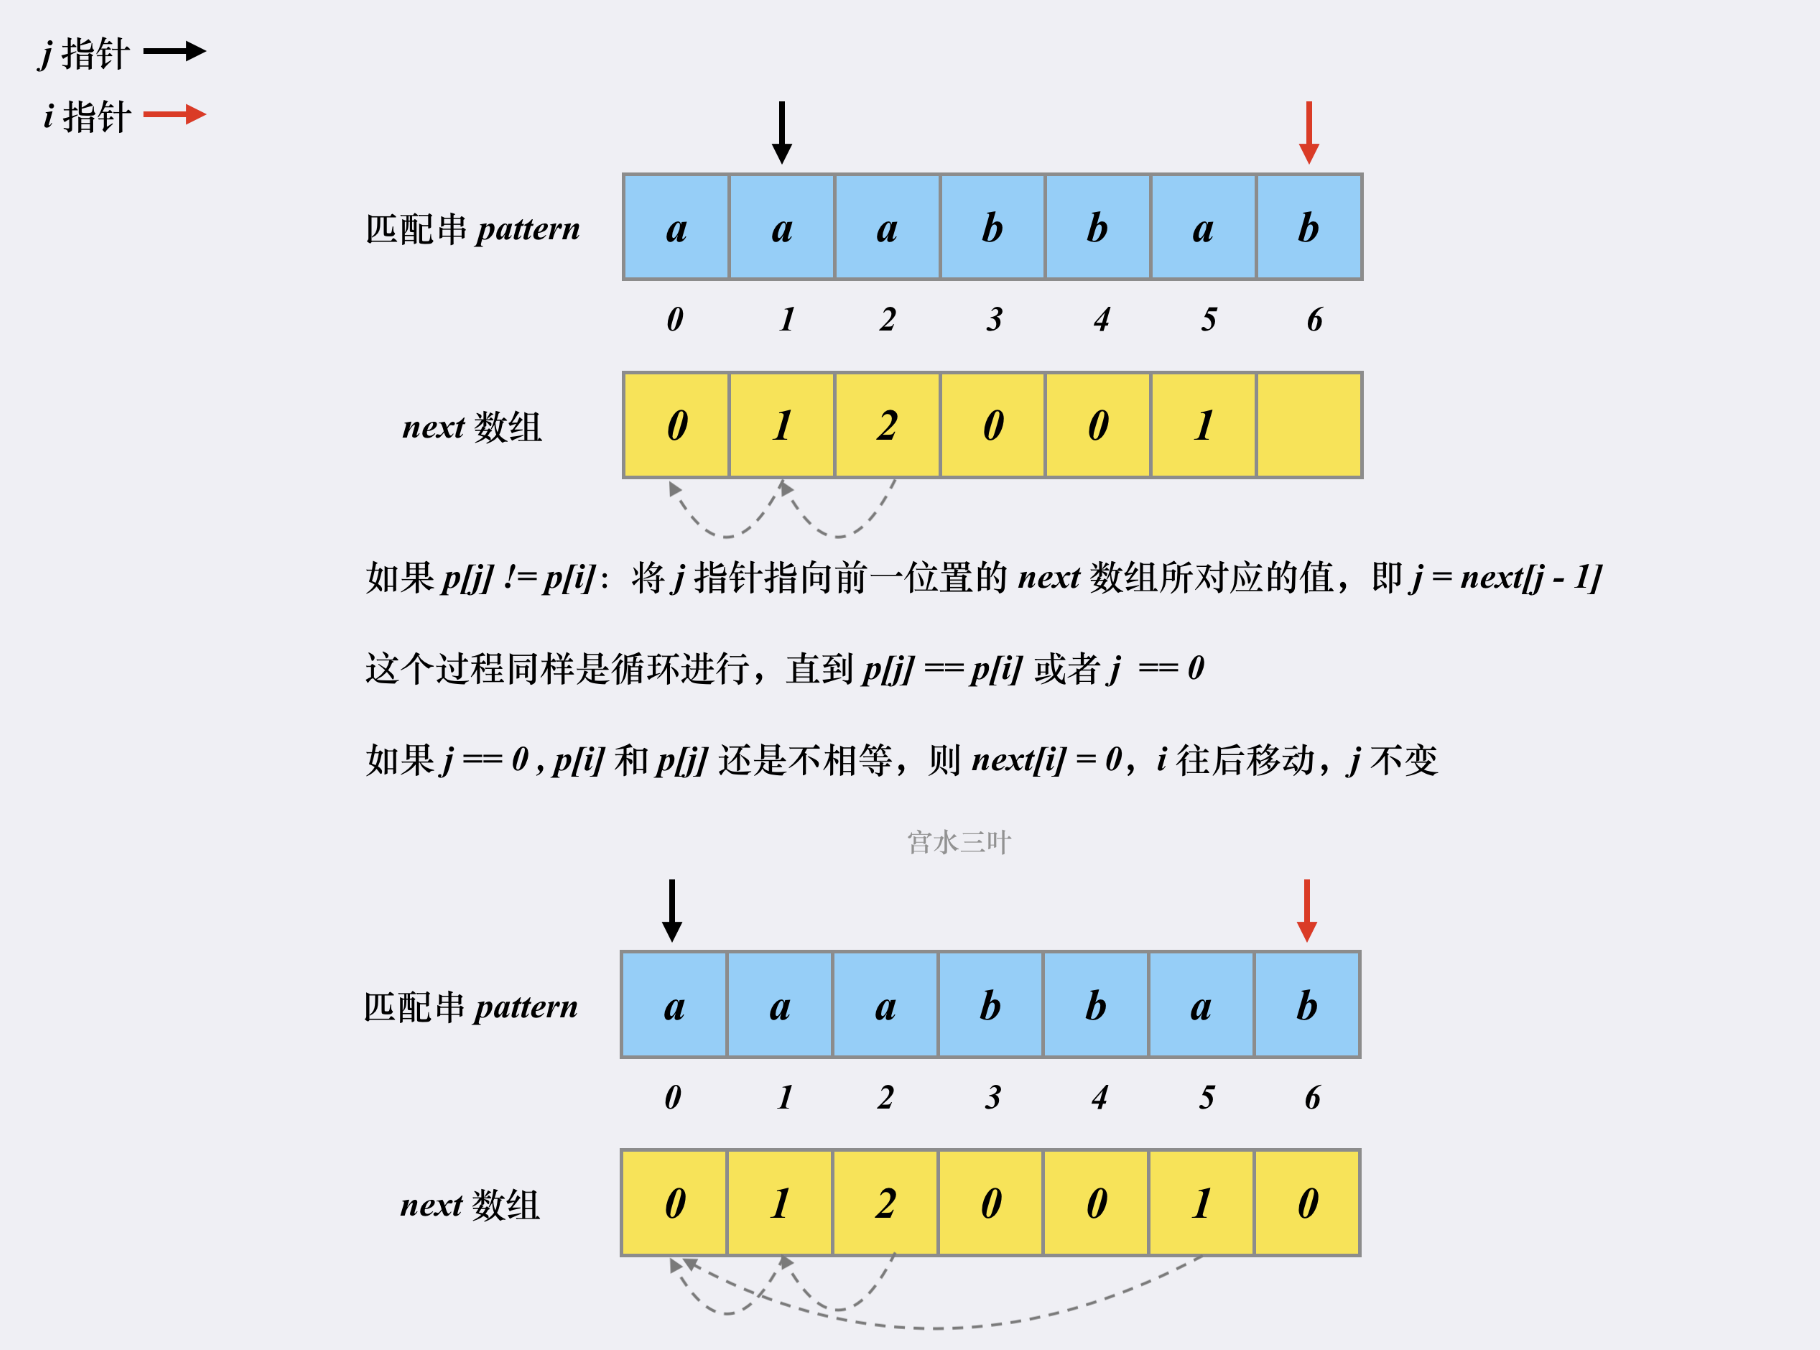
字符串 KMP算法 介绍:
上述的朴素解法,不考虑剪枝的话复杂度是 O(m∗n) 的,而 KMP 算法的复杂度为 O(m+n)。
KMP 之所以能够在 O(m+n) 复杂度内完成查找,是因为其能在「非完全匹配」的过程中提取到有效信息进行复用,以减少「重复匹配」的消耗。
先贴一个实现:
1 2 3 4 5 6 7 8 9 10 11 12 13 14 15 16 17 18 19 20 21 22 23 24 25 26 27 28 29 30 31 32 33 34 35 36 37 38 39 40 class Solution { public int strStr (String ss, String pp) { if (pp.isEmpty()) return 0 ; int n = ss.length(), m = pp.length(); ss = " " + ss; pp = " " + pp; char [] s = ss.toCharArray(); char [] p = pp.toCharArray(); int [] next = new int [m + 1 ]; for (int i = 2 , j = 0 ; i <= m; i++) { while (j > 0 && p[i] != p[j + 1 ]) j = next[j]; if (p[i] == p[j + 1 ]) j++; next[i] = j; } for (int i = 1 , j = 0 ; i <= n; i++) { while (j > 0 && s[i] != p[j + 1 ]) j = next[j]; if (s[i] == p[j + 1 ]) j++; if (j == m) return i - m; } return -1 ; } }
next数组构造:
匹配过程:
题目 344.反转字符串力扣题目链接
a=a^b: 先把a和b中,不相同的位保存到a,现在a中置1的位,代表原始的a和b不相同的位,而0,就是a和b相同的位。
b=a^b: 不相同的位是1和原始b异或,就得到原始a的那个位的值;相同的位是0和原始b异或就是原始a或者原始b的值(本来就相同)。现在得到的就是原始a的值,现在存在b中。
a=a^b:和上面相同。
a,b已经交换。
1.反转字符串II力扣题目链接
二叉树 二叉树基础
满二叉树:
完全二叉树:
二叉搜索树:
若它的左子树不空,则左子树上所有结点的值均小于它的根结点的值;
若它的右子树不空,则右子树上所有结点的值均大于它的根结点的值;
它的左、右子树也分别为二叉排序树
平衡二叉搜索树:高度差的绝对值不超过1 ,并且左右两个子树都是一棵平衡二叉树。
二叉树的存储方式
二叉树遍历顺序 前序遍历 :中左右中序遍历 :左中右后序遍历 :左右中
1 2 3 4 5 6 7 8 9 10 11 12 13 public class TreeNode { int val; TreeNode left; TreeNode right; TreeNode() {} TreeNode(int val) { this .val = val; } TreeNode(int val, TreeNode left, TreeNode right) { this .val = val; this .left = left; this .right = right; } }
二叉树递归遍历 递归的三要素 :1.确定递归函数的参数和返回值: 确定哪些参数是递归的过程中需要处理的,那么就在递归函数里加上这个参数, 并且还要明确每次递归的返回值是什么进而确定递归函数的返回类型。
2.确定终止条件: 写完了递归算法, 运行的时候,经常会遇到栈溢出的错误,就是没写终止条件或者终止条件写的不对,操作系统也是用一个栈的结构来保存每一层递归的信息,如果递归没有终止,操作系统的内存栈必然就会溢出。
3.确定单层递归的逻辑: 确定每一层递归需要处理的信息。在这里也就会重复调用自己来实现递归的过程。
递归三部曲
确定递归函数的参数以及返回值
确定终止条件
确定单层递归的逻辑
参数 :需要二叉树的根节点,还需要一个计数器 ,这个计数器用来计算二叉树的一条边之和是否正好是目标和,计数器为int型。再来看返回值,递归函数什么时候需要返回值?
如果需要搜索整棵二叉树且不用处理递归返回值,递归函数就不要返回值。(这种情况就是本文下半部分介绍的113.路径总和ii)
如果需要搜索整棵二叉树且需要处理递归返回值,递归函数就需要返回值。 (这种情况我们在236. 二叉树的最近公共祖先 中介绍)
如果要搜索其中一条符合条件的路径,那么递归一定需要返回值,因为遇到符合条件的路径了就要及时返回。(本题的情况)
终止条件
1 2 3 4 5 6 7 8 9 10 11 12 13 14 15 16 17 18 19 20 21 22 23 24 25 26 27 28 29 30 31 32 33 34 35 36 37 38 39 40 41 42 43 44 45 46 47 48 49 50 51 class Solution { public List<Integer> preorderTraversal (TreeNode root) { List<Integer> result = new ArrayList <Integer>(); preorder(root, result); return result; } public void preorder (TreeNode root, List<Integer> result) { if (root == null ) { return ; } result.add(root.val); preorder(root.left, result); preorder(root.right, result); } } class Solution { public List<Integer> inorderTraversal (TreeNode root) { List<Integer> res = new ArrayList <>(); inorder(root, res); return res; } void inorder (TreeNode root, List<Integer> list) { if (root == null ) { return ; } inorder(root.left, list); list.add(root.val); inorder(root.right, list); } } class Solution { public List<Integer> postorderTraversal (TreeNode root) { List<Integer> res = new ArrayList <>(); postorder(root, res); return res; } void postorder (TreeNode root, List<Integer> list) { if (root == null ) { return ; } postorder(root.left, list); postorder(root.right, list); list.add(root.val); } }
二叉树迭代遍历 144.二叉树的前序遍历https://leetcode.cn/problems/binary-tree-preorder-traversal/ https://leetcode.cn/problems/binary-tree-inorder-traversal/ https://leetcode.cn/problems/binary-tree-postorder-traversal/
统一写法!!!!!!!!
方法一:就是要处理的节点放入栈之后,紧接着放入一个空指针作为标记。 这种方法可以叫做空指针标记法。
方法二:加一个 boolean 值跟随每个节点,false (默认值) 表示需要为该节点和它的左右儿子安排在栈中的位次,true 表示该节点的位次之前已经安排过了,可以收割节点了。 这种方法可以叫做boolean 标记法。 这种方法更容易理解,在面试中更容易写出来。前序遍历代码: 1 2 3 4 5 6 7 8 9 10 11 12 13 14 15 16 17 18 19 20 21 22 public List<Integer> preorderTraversal (TreeNode root) { List<Integer> result = new LinkedList <>(); Deque<TreeNode> st = new LinkedList <>(); if (root != null ) st.push(root); while (!st.isEmpty()) { TreeNode node = st.peek(); if (node != null ) { st.pop(); if (node.right!=null ) st.push(node.right); if (node.left!=null ) st.push(node.left); st.push(node); st.push(null ); } else { st.pop(); node = st.peek(); st.pop(); result.add(node.val); } } return result; }
中序遍历代码: 1 2 3 4 5 6 7 8 9 10 11 12 13 14 15 16 17 18 19 20 21 public List<Integer> inorderTraversal (TreeNode root) { List<Integer> result = new LinkedList <>(); Deque<TreeNode> st = new LinkedList <>(); if (root != null ) st.push(root); while (!st.isEmpty()) { TreeNode node = st.peek(); if (node != null ) { st.pop(); if (node.right!=null ) st.push(node.right); st.push(node); st.push(null ); if (node.left!=null ) st.push(node.left); } else { st.pop(); node = st.peek(); st.pop(); result.add(node.val); } } return result; }
后序遍历代码: 1 2 3 4 5 6 7 8 9 10 11 12 13 14 15 16 17 18 19 20 21 22 public List<Integer> postorderTraversal (TreeNode root) { List<Integer> result = new LinkedList <>(); Deque<TreeNode> st = new LinkedList <>(); if (root != null ) st.push(root); while (!st.isEmpty()) { TreeNode node = st.peek(); if (node != null ) { st.pop(); st.push(node); st.push(null ); if (node.right!=null ) st.push(node.right); if (node.left!=null ) st.push(node.left); } else { st.pop(); node = st.peek(); st.pop(); result.add(node.val); } } return result; }
直接用栈模拟的写法:
1 2 3 4 5 6 7 8 9 10 11 12 13 14 15 16 17 18 19 20 21 22 23 24 25 26 27 28 29 30 31 32 33 34 35 36 37 38 39 40 41 42 43 44 45 46 47 48 49 50 51 52 53 54 55 56 57 58 59 60 61 62 63 64 65 66 67 68 69 class Solution { public List<Integer> preorderTraversal (TreeNode root) { List<Integer> result = new ArrayList <>(); if (root == null ){ return result; } Stack<TreeNode> stack = new Stack <>(); stack.push(root); while (!stack.isEmpty()){ TreeNode node = stack.pop(); result.add(node.val); if (node.right != null ){ stack.push(node.right); } if (node.left != null ){ stack.push(node.left); } } return result; } } class Solution { public List<Integer> inorderTraversal (TreeNode root) { List<Integer> result = new ArrayList <>(); if (root == null ){ return result; } Stack<TreeNode> stack = new Stack <>(); TreeNode cur = root; while (cur != null || !stack.isEmpty()){ if (cur != null ){ stack.push(cur); cur = cur.left; }else { cur = stack.pop(); result.add(cur.val); cur = cur.right; } } return result; } } class Solution { public List<Integer> postorderTraversal (TreeNode root) { List<Integer> result = new ArrayList <>(); if (root == null ){ return result; } Stack<TreeNode> stack = new Stack <>(); stack.push(root); while (!stack.isEmpty()){ TreeNode node = stack.pop(); result.add(node.val); if (node.left != null ){ stack.push(node.left); } if (node.right != null ){ stack.push(node.right); } } Collections.reverse(result); return result; } }
二叉树的层序遍历(BFS) 1 2 3 4 5 6 7 8 9 10 11 12 13 14 15 16 17 18 19 20 21 22 23 24 25 26 27 28 29 30 31 32 33 34 35 36 37 38 39 40 41 42 43 44 45 46 47 48 49 50 51 class Solution { public List<List<Integer>> resList = new ArrayList <List<Integer>>(); public List<List<Integer>> levelOrder (TreeNode root) { checkFun02(root); return resList; } public void checkFun01 (TreeNode node, Integer deep) { if (node == null ) return ; deep++; if (resList.size() < deep) { List<Integer> item = new ArrayList <Integer>(); resList.add(item); } resList.get(deep - 1 ).add(node.val); checkFun01(node.left, deep); checkFun01(node.right, deep); } public void checkFun02 (TreeNode node) { if (node == null ) return ; Queue<TreeNode> que = new LinkedList <TreeNode>(); que.offer(node); while (!que.isEmpty()) { List<Integer> itemList = new ArrayList <Integer>(); int len = que.size(); while (len > 0 ) { TreeNode tmpNode = que.poll(); itemList.add(tmpNode.val); if (tmpNode.left != null ) que.offer(tmpNode.left); if (tmpNode.right != null ) que.offer(tmpNode.right); len--; } resList.add(itemList); } } }
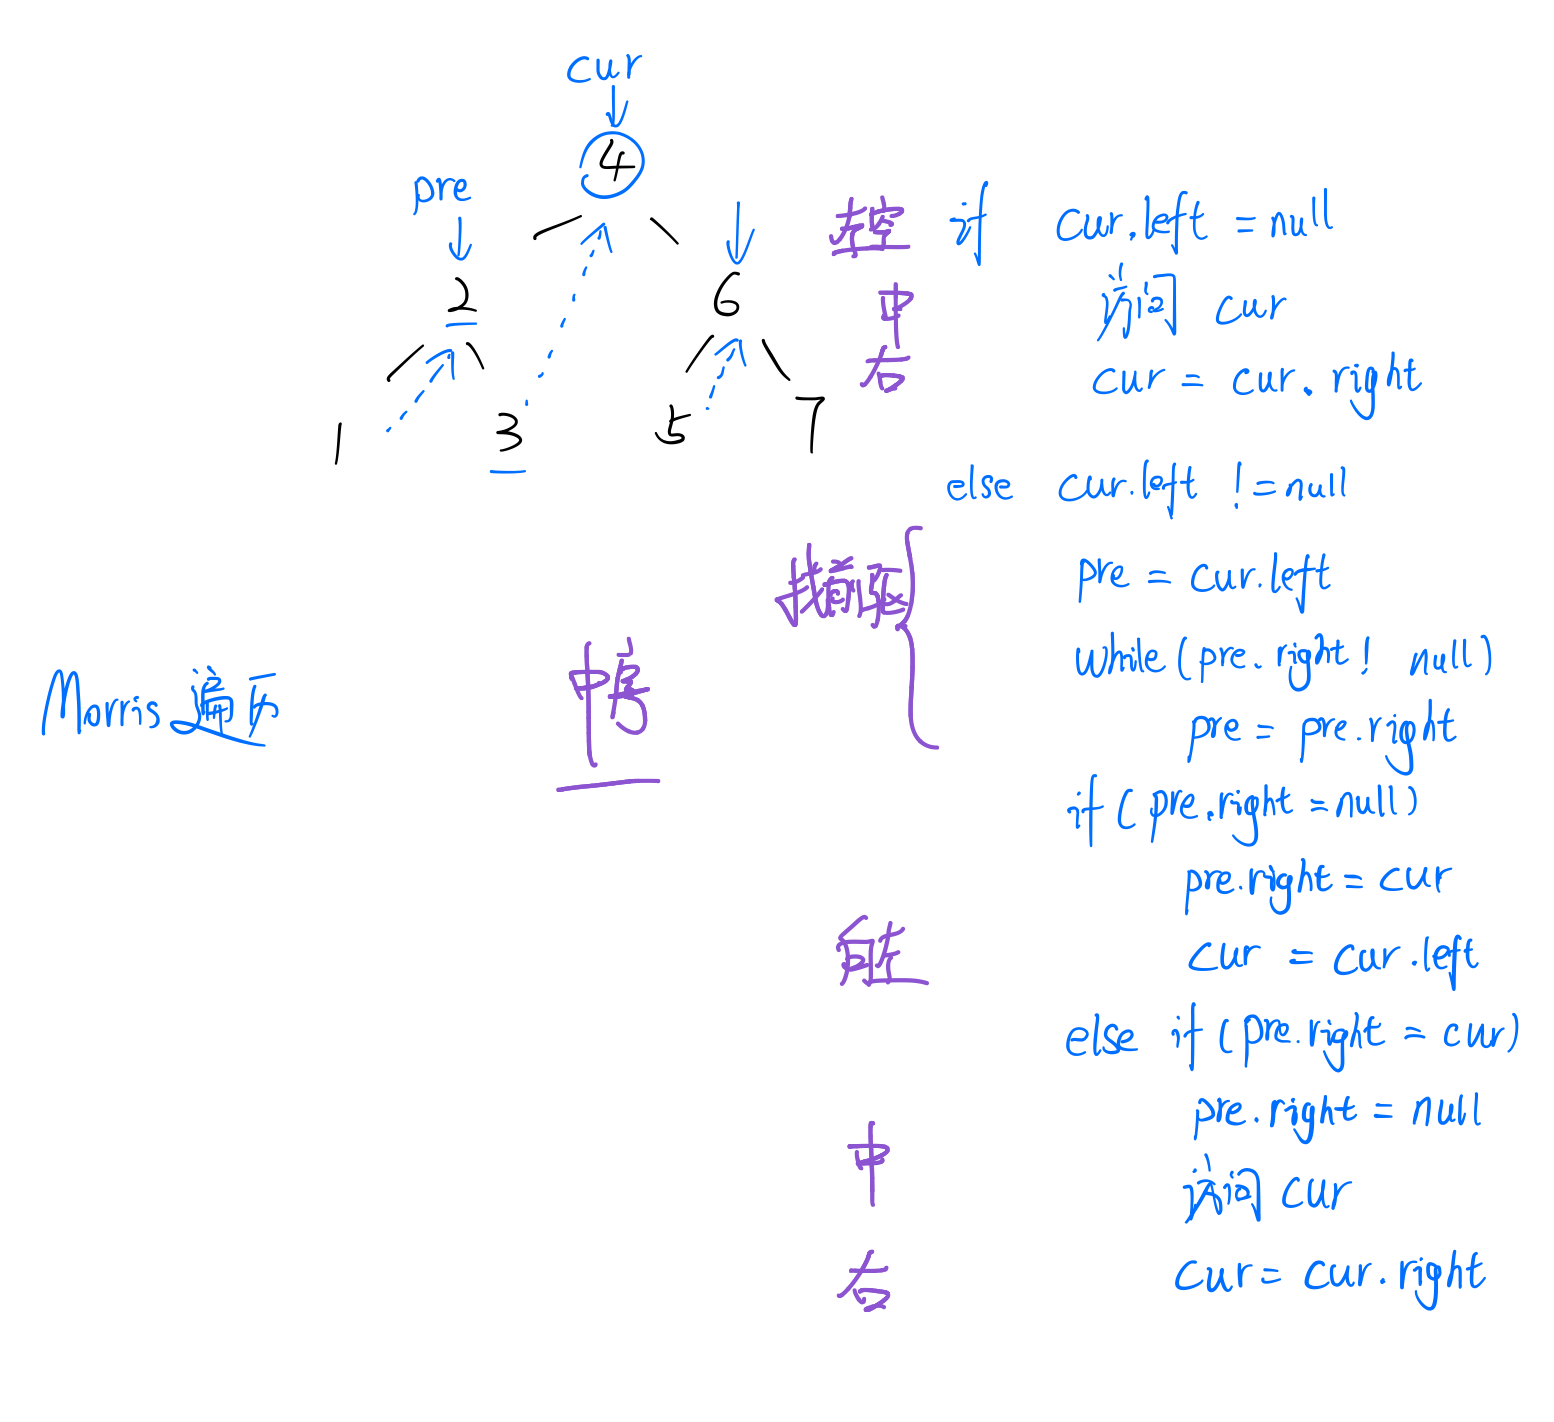
Morris遍历 学习了一个Morris遍历方式,这种方式可以在O(1)的空间复杂度下完成二叉树的遍历,并且不需要使用栈来存储节点.
1 2 3 4 5 6 7 8 9 10 11 12 13 14 15 16 17 18 19 20 21 22 23 24 25 26 27 28 29 class Solution { public List<Integer> preorderTraversal (TreeNode root) { List<Integer> res = new LinkedList <>(); TreeNode cur = root; while (cur != null ){ if (cur.left == null ){ res.add(cur.val); cur =cur.right; }else { TreeNode pre = cur.left; while (pre.right != null && pre.right != cur){ pre = pre.right; } if (pre.right == null ){ pre.right = cur; res.add(cur.val); cur = cur.left; }else { pre.right = null ; cur = cur.right; } } } return res; } }
1 2 3 4 5 6 7 8 9 10 11 12 13 14 15 16 17 18 19 20 21 22 23 24 25 26 27 class Solution { public List<Integer> inorderTraversal (TreeNode root) { List<Integer> res =new LinkedList <>(); TreeNode cur = root; while (cur != null ){ if (cur.left == null ){ res.add(cur.val); cur = cur.right; }else { TreeNode pre = cur.left; while (pre.right != null && pre.right != cur){ pre = pre.right; } if (pre.right == null ){ pre.right = cur; cur = cur.left; }else { pre.right = null ; res.add(cur.val); cur = cur.right; } } } return res; } }
1 2 3 4 5 6 7 8 9 10 11 12 13 14 15 16 17 18 19 20 21 22 23 24 25 26 27 28 29 30 31 32 33 34 35 36 37 38 39 40 41 42 43 44 import java.util.ArrayList;import java.util.Collections;import java.util.List;class TreeNode { int val; TreeNode left; TreeNode right; TreeNode(int x) { val = x; } } public class MorrisPostorderTraversal { public List<Integer> postorderTraversal (TreeNode root) { List<Integer> res = new ArrayList <>(); TreeNode curr = root; TreeNode prev = null ; while (curr != null ) { if (curr.right == null ) { res.add(curr.val); curr = curr.left; } else { prev = curr.right; while (prev.left != null && prev.left != curr) { prev = prev.left; } if (prev.left == null ) { prev.left = curr; res.add(curr.val); curr = curr.right; } else { prev.left = null ; curr = curr.left; } } } Collections.reverse(res); return res; } }
二叉树题目 翻转二叉树
1 2 3 4 5 6 7 8 9 10 11 12 13 14 15 16 17 18 19 20 21 22 23 24 25 26 27 28 29 30 31 32 33 34 35 36 37 38 39 40 41 42 43 44 45 46 class Solution { public TreeNode invertTree (TreeNode root) { if (root == null ) { return null ; } invertTree(root.left); invertTree(root.right); swapChildren(root); return root; } private void swapChildren (TreeNode root) { TreeNode tmp = root.left; root.left = root.right; root.right = tmp; } } class Solution { public TreeNode invertTree (TreeNode root) { if (root == null ) {return null ;} ArrayDeque<TreeNode> deque = new ArrayDeque <>(); deque.offer(root); while (!deque.isEmpty()) { int size = deque.size(); while (size-- > 0 ) { TreeNode node = deque.poll(); swap(node); if (node.left != null ) deque.offer(node.left); if (node.right != null ) deque.offer(node.right); } } return root; } public void swap (TreeNode root) { TreeNode temp = root.left; root.left = root.right; root.right = temp; } }
对称二叉树
1 2 3 4 5 6 7 8 9 10 11 12 13 14 15 16 17 18 19 20 21 22 23 24 25 26 27 28 29 30 31 32 33 34 35 36 37 38 39 40 41 42 43 44 45 46 47 48 49 50 51 52 53 54 55 56 57 58 59 60 61 62 63 64 65 66 67 68 69 70 71 72 73 74 75 76 77 78 79 80 81 82 83 84 85 86 87 88 89 90 91 92 93 94 95 96 97 98 99 100 public boolean isSymmetric1 (TreeNode root) { return compare(root.left, root.right); } private boolean compare (TreeNode left, TreeNode right) { if (left == null && right != null ) { return false ; } if (left != null && right == null ) { return false ; } if (left == null && right == null ) { return true ; } if (left.val != right.val) { return false ; } boolean compareOutside = compare(left.left, right.right); boolean compareInside = compare(left.right, right.left); return compareOutside && compareInside; } public boolean isSymmetric2 (TreeNode root) { Deque<TreeNode> deque = new LinkedList <>(); deque.offerFirst(root.left); deque.offerLast(root.right); while (!deque.isEmpty()) { TreeNode leftNode = deque.pollFirst(); TreeNode rightNode = deque.pollLast(); if (leftNode == null && rightNode == null ) { continue ; } if (leftNode == null || rightNode == null || leftNode.val != rightNode.val) { return false ; } deque.offerFirst(leftNode.left); deque.offerFirst(leftNode.right); deque.offerLast(rightNode.right); deque.offerLast(rightNode.left); } return true ; } public boolean isSymmetric3 (TreeNode root) { Queue<TreeNode> deque = new LinkedList <>(); deque.offer(root.left); deque.offer(root.right); while (!deque.isEmpty()) { TreeNode leftNode = deque.poll(); TreeNode rightNode = deque.poll(); if (leftNode == null && rightNode == null ) { continue ; } if (leftNode == null || rightNode == null || leftNode.val != rightNode.val) { return false ; } deque.offer(leftNode.left); deque.offer(rightNode.right); deque.offer(leftNode.right); deque.offer(rightNode.left); } return true ; }
二叉树最大深度
1 2 3 4 5 6 7 8 9 10 11 12 13 class Solution { public int maxDepth (TreeNode root) { if (root == null ) { return 0 ; } int leftDepth = maxDepth(root.left); int rightDepth = maxDepth(root.right); return Math.max(leftDepth, rightDepth) + 1 ; } }
1 2 3 4 5 6 7 8 9 10 11 12 13 14 15 16 17 18 19 20 21 22 class Solution { int maxnum = 0 ; public int maxDepth (TreeNode root) { ans(root,0 ); return maxnum; } void ans (TreeNode tr,int tmp) { if (tr==null ) return ; tmp++; maxnum = maxnum<tmp?tmp:maxnum; ans(tr.left,tmp); ans(tr.right,tmp); tmp--; } }
1 2 3 4 5 6 7 8 9 10 11 12 13 14 15 16 17 18 19 20 21 22 23 24 25 26 27 class Solution { public int maxDepth (TreeNode root) { if (root == null ) { return 0 ; } Deque<TreeNode> deque = new LinkedList <>(); deque.offer(root); int depth = 0 ; while (!deque.isEmpty()) { int size = deque.size(); depth++; for (int i = 0 ; i < size; i++) { TreeNode node = deque.poll(); if (node.left != null ) { deque.offer(node.left); } if (node.right != null ) { deque.offer(node.right); } } } return depth; } }
二叉树的所有路径
https://leetcode.cn/problems/binary-tree-paths/
1 2 3 4 5 6 7 8 9 10 11 12 13 14 15 16 17 18 19 20 21 22 23 24 25 26 27 28 29 30 31 32 33 34 35 36 37 38 39 40 41 42 43 44 45 46 47 48 49 50 51 52 53 54 55 56 57 58 59 60 61 62 63 64 class Solution { public List<String> binaryTreePaths (TreeNode root) { List<String> res = new ArrayList <>(); if (root == null ) { return res; } List<Integer> paths = new ArrayList <>(); traversal(root, paths, res); return res; } private void traversal (TreeNode root, List<Integer> paths, List<String> res) { paths.add(root.val); if (root.left == null && root.right == null ) { StringBuilder sb = new StringBuilder (); for (int i = 0 ; i < paths.size() - 1 ; i++) { sb.append(paths.get(i)).append("->" ); } sb.append(paths.get(paths.size() - 1 )); res.add(sb.toString()); return ; } if (root.left != null ) { traversal(root.left, paths, res); paths.remove(paths.size() - 1 ); } if (root.right != null ) { traversal(root.right, paths, res); paths.remove(paths.size() - 1 ); } } } class Solution { List<String> result = new ArrayList <>(); public List<String> binaryTreePaths (TreeNode root) { deal(root, "" ); return result; } public void deal (TreeNode node, String s) { if (node == null ) return ; if (node.left == null && node.right == null ) { result.add(new StringBuilder (s).append(node.val).toString()); return ; } String tmp = new StringBuilder (s).append(node.val).append("->" ).toString(); deal(node.left, tmp); deal(node.right, tmp); } }
迭代法:
1 2 3 4 5 6 7 8 9 10 11 12 13 14 15 16 17 18 19 20 21 22 23 24 25 26 27 28 29 30 31 32 33 34 35 class Solution { public List<String> binaryTreePaths (TreeNode root) { List<String> result = new ArrayList <>(); if (root == null ) return result; Stack<Object> stack = new Stack <>(); stack.push(root); stack.push(root.val + "" ); while (!stack.isEmpty()) { String path = (String) stack.pop(); TreeNode node = (TreeNode) stack.pop(); if (node.left == null && node.right == null ) { result.add(path); } if (node.right != null ) { stack.push(node.right); stack.push(path + "->" + node.right.val); } if (node.left != null ) { stack.push(node.left); stack.push(path + "->" + node.left.val); } } return result; } }
404.左叶子之和https://leetcode.cn/problems/sum-of-left-leaves/
1 2 3 4 5 6 7 8 9 10 11 12 13 14 class Solution { public int sumOfLeftLeaves (TreeNode root) { if (root == null ) return 0 ; int leftValue = sumOfLeftLeaves(root.left); int rightValue = sumOfLeftLeaves(root.right); int midValue = 0 ; if (root.left != null && root.left.left == null && root.left.right == null ) { midValue = root.left.val; } int sum = midValue + leftValue + rightValue; return sum; } }
1 2 3 4 5 6 7 8 9 10 11 12 13 14 15 16 17 class Solution { public int sumOfLeftLeaves (TreeNode root) { if (root == null ) return 0 ; Stack<TreeNode> stack = new Stack <> (); stack.add(root); int result = 0 ; while (!stack.isEmpty()) { TreeNode node = stack.pop(); if (node.left != null && node.left.left == null && node.left.right == null ) { result += node.left.val; } if (node.right != null ) stack.add(node.right); if (node.left != null ) stack.add(node.left); } return result; } }
513.找树左下角的值https://leetcode.cn/problems/find-bottom-left-tree-value/
1 2 3 4 5 6 7 8 9 10 11 12 13 14 15 16 17 18 19 20 21 22 class Solution { private int Deep = -1 ; private int value = 0 ; public int findBottomLeftValue (TreeNode root) { value = root.val; findLeftValue(root,0 ); return value; } private void findLeftValue (TreeNode root,int deep) { if (root == null ) return ; if (root.left == null && root.right == null ) { if (deep > Deep) { value = root.val; Deep = deep; } } if (root.left != null ) findLeftValue(root.left,deep + 1 ); if (root.right != null ) findLeftValue(root.right,deep + 1 ); } }
1 2 3 4 5 6 7 8 9 10 11 12 13 14 15 16 17 18 19 20 21 22 23 24 25 class Solution { public int findBottomLeftValue (TreeNode root) { Queue<TreeNode> queue = new LinkedList <>(); queue.offer(root); int res = 0 ; while (!queue.isEmpty()) { int size = queue.size(); for (int i = 0 ; i < size; i++) { TreeNode poll = queue.poll(); if (i == 0 ) { res = poll.val; } if (poll.left != null ) { queue.offer(poll.left); } if (poll.right != null ) { queue.offer(poll.right); } } } return res; } }
路径总和https://leetcode.cn/problems/path-sum/
106.从中序与后序遍历序列构造二叉树
1 2 3 4 5 6 7 8 9 10 11 12 13 14 15 16 17 18 19 20 21 22 23 24 25 26 27 class Solution { Map<Integer, Integer> map; public TreeNode buildTree (int [] inorder, int [] postorder) { map = new HashMap <>(); for (int i = 0 ; i < inorder.length; i++) { map.put(inorder[i], i); } return findNode(inorder, 0 , inorder.length, postorder,0 , postorder.length); } public TreeNode findNode (int [] inorder, int inBegin, int inEnd, int [] postorder, int postBegin, int postEnd) { if (inBegin >= inEnd || postBegin >= postEnd) { return null ; } int rootIndex = map.get(postorder[postEnd - 1 ]); TreeNode root = new TreeNode (inorder[rootIndex]); int lenOfLeft = rootIndex - inBegin; root.left = findNode(inorder, inBegin, rootIndex, postorder, postBegin, postBegin + lenOfLeft); root.right = findNode(inorder, rootIndex + 1 , inEnd, postorder, postBegin + lenOfLeft, postEnd - 1 ); return root; } }
106.从前序与后序遍历序列构造二叉树
1 2 3 4 5 6 7 8 9 10 11 12 13 14 15 16 17 18 19 20 21 22 23 24 25 26 27 class Solution { Map<Integer,Integer> mp = new HashMap <>(); public TreeNode constructFromPrePost (int [] preorder, int [] postorder) { int n = preorder.length; for (int i=0 ; i<n ; ++i){ mp.put(postorder[i],i); } return dfs(preorder,0 ,n-1 ,postorder,0 ,n-1 ); } private TreeNode dfs (int [] preorder , int pre_beg,int pre_end ,int [] postorder, int pos_beg , int pos_end) { if (pre_beg>pre_end || pos_beg>pos_end){ return null ; } int mid = preorder[pre_beg]; if (pre_beg == pre_end || pos_beg == pos_end){ return new TreeNode (mid); } int nx_l = preorder[pre_beg+1 ]; int ind_nxl = mp.get(nx_l); int lenOfLeft = ind_nxl - pos_beg + 1 ; TreeNode root = new TreeNode (mid); root.left = dfs(preorder,pre_beg+1 ,pre_beg+lenOfLeft,postorder,pos_beg,pos_beg+lenOfLeft-1 ); root.right = dfs(preorder,pre_beg+lenOfLeft+1 ,pre_end,postorder,ind_nxl+1 ,pos_end-1 ); return root; } }
617.合并二叉树https://leetcode.cn/problems/merge-two-binary-trees/
700.二叉搜索树中的搜索https://leetcode.cn/problems/search-in-a-binary-search-tree/
1 2 3 4 5 6 7 8 9 10 11 12 13 14 15 16 17 18 19 20 21 22 23 24 25 26 27 28 29 30 31 32 33 34 35 36 37 38 39 40 41 42 43 44 45 46 47 48 49 50 51 52 53 54 55 56 57 58 59 60 class Solution { public TreeNode searchBST (TreeNode root, int val) { if (root == null || root.val == val) { return root; } TreeNode left = searchBST(root.left, val); if (left != null ) { return left; } return searchBST(root.right, val); } } class Solution { public TreeNode searchBST (TreeNode root, int val) { if (root == null || root.val == val) { return root; } if (val < root.val) { return searchBST(root.left, val); } else { return searchBST(root.right, val); } } } class Solution { public TreeNode searchBST (TreeNode root, int val) { if (root == null || root.val == val) { return root; } Stack<TreeNode> stack = new Stack <>(); stack.push(root); while (!stack.isEmpty()) { TreeNode pop = stack.pop(); if (pop.val == val) { return pop; } if (pop.right != null ) { stack.push(pop.right); } if (pop.left != null ) { stack.push(pop.left); } } return null ; } } class Solution { public TreeNode searchBST (TreeNode root, int val) { while (root != null ) if (val < root.val) root = root.left; else if (val > root.val) root = root.right; else return root; return null ; } }
98.验证二叉搜索树
1 2 3 4 5 6 7 8 9 10 11 12 13 14 15 16 17 18 19 20 21 22 23 24 25 26 27 28 class Solution { public boolean isValidBST (TreeNode root) { Stack<TreeNode> stack = new Stack <>(); TreeNode pre = null ; if (root != null ) stack.add(root); while (!stack.isEmpty()){ TreeNode curr = stack.peek(); if (curr != null ){ stack.pop(); if (curr.right != null ) stack.add(curr.right); stack.add(curr); stack.add(null ); if (curr.left != null ) stack.add(curr.left); }else { stack.pop(); TreeNode temp = stack.pop(); if (pre != null && pre.val >= temp.val) return false ; pre = temp; } } return true ; } }
1 2 3 4 5 6 7 8 9 10 11 12 13 14 15 16 17 18 19 20 21 22 23 24 25 26 27 28 29 30 31 32 33 34 35 36 37 38 39 40 41 42 43 44 45 46 47 48 49 50 51 52 53 54 55 56 57 58 59 60 61 62 63 64 65 66 67 68 69 70 71 72 73 74 75 76 77 class Solution { TreeNode max; public boolean isValidBST (TreeNode root) { if (root == null ) { return true ; } boolean left = isValidBST(root.left); if (!left) { return false ; } if (max != null && root.val <= max.val) { return false ; } max = root; boolean right = isValidBST(root.right); return right; } } class Solution { public boolean isValidBST (TreeNode root) { if (root == null ) { return true ; } Stack<TreeNode> stack = new Stack <>(); TreeNode pre = null ; while (root != null || !stack.isEmpty()) { while (root != null ) { stack.push(root); root = root.left; } TreeNode pop = stack.pop(); if (pre != null && pop.val <= pre.val) { return false ; } pre = pop; root = pop.right; } return true ; } } class Solution { public boolean isValidBST (TreeNode root) { return validBST(Long.MIN_VALUE, Long.MAX_VALUE, root); } boolean validBST (long lower, long upper, TreeNode root) { if (root == null ) return true ; if (root.val <= lower || root.val >= upper) return false ; return validBST(lower, root.val, root.left) && validBST(root.val, upper, root.right); } } class Solution { private long prev = Long.MIN_VALUE; public boolean isValidBST (TreeNode root) { if (root == null ) { return true ; } if (!isValidBST(root.left)) { return false ; } if (root.val <= prev) { return false ; } prev = root.val; return isValidBST(root.right); } }
二叉树的最近公共祖先https://leetcode.cn/problems/lowest-common-ancestor-of-a-binary-tree/
1 2 3 4 5 6 7 8 9 10 11 12 13 14 15 16 17 18 19 20 21 class Solution { public TreeNode lowestCommonAncestor (TreeNode root, TreeNode p, TreeNode q) { if (root == null || root == p || root == q) { return root; } TreeNode left = lowestCommonAncestor(root.left, p, q); TreeNode right = lowestCommonAncestor(root.right, p, q); if (left == null && right == null ) { return null ; }else if (left == null && right != null ) { return right; }else if (left != null && right == null ) { return left; }else { return root; } } }
1 2 3 4 5 6 7 8 9 10 11 12 13 14 15 16 17 18 19 20 21 22 23 24 25 26 27 28 29 30 31 32 33 34 35 36 37 38 39 public TreeNode lowestCommonAncestor (TreeNode root, TreeNode p, TreeNode q) { int max = Integer.MAX_VALUE; Stack<TreeNode> st = new Stack <>(); TreeNode cur = root, pre = null ; while (cur != null || !st.isEmpty()) { while (cur != null ) { st.push(cur); cur = cur.left; } cur = st.pop(); if (cur.right == null || cur.right == pre) { if (cur == p || cur == q) { if ((cur.left != null && cur.left.val == max) || (cur.right != null && cur.right.val == max)) { return cur; } cur.val = max; } if (cur.left != null && cur.left.val == max && cur.right != null && cur.right.val == max) { return cur; } if ((cur.left != null && cur.left.val == max) || (cur.right != null && cur.right.val == max)) { cur.val = max; } pre = cur; cur = null ; } else { st.push(cur); cur = cur.right; } } return null ; }
二叉搜索树的最近公共祖先https://leetcode.cn/problems/lowest-common-ancestor-of-a-binary-search-tree/
450.删除二叉搜索树中的节点https://leetcode.cn/problems/delete-node-in-a-bst/
1 2 3 4 5 6 7 8 9 10 11 12 13 14 15 16 17 18 19 20 21 22 23 24 class Solution { public TreeNode deleteNode (TreeNode root, int key) { if (root == null ) return root; if (root.val == key) { if (root.left == null ) { return root.right; } else if (root.right == null ) { return root.left; } else { TreeNode cur = root.right; while (cur.left != null ) { cur = cur.left; } cur.left = root.left; root = root.right; return root; } } if (root.val > key) root.left = deleteNode(root.left, key); if (root.val < key) root.right = deleteNode(root.right, key); return root; } }
修剪二叉搜索树https://leetcode.cn/problems/trim-a-binary-search-tree/
1 2 3 4 5 6 7 8 9 10 11 class Solution {public : TreeNode* trimBST(TreeNode* root, int low, int high) { if (root == nullptr) return nullptr; if (root->val < low) return trimBST(root->right, low, high); if (root->val > high) return trimBST(root->left, low, high); root->left = trimBST(root->left, low, high); root->right = trimBST(root->right, low, high); return root; } };
回溯算法
回溯的理论基础 什么是回溯法 回溯是递归的副产品,只要有递归就会有回溯 。
因为回溯的本质是穷举 ,穷举所有可能,然后选出我们想要的答案,如果想让回溯法高效一些,可以加一些剪枝的操作,但也改不了回溯法就是穷举的本质。
回溯法解决的问题
回溯法,一般可以解决如下几种问题:
组合问题:N个数里面按一定规则找出k个数的集合
切割问题:一个字符串按一定规则有几种切割方式
子集问题:一个N个数的集合里有多少符合条件的子集
排列问题:N个数按一定规则全排列,有几种排列方式
棋盘问题:N皇后,解数独等等
组合是不强调元素顺序的,排列是强调元素顺序 。
回溯法模板
在回溯算法中,我的习惯是函数起名字为backtracking,这个起名大家随意。
回溯算法中函数返回值一般为void。一般是先写逻辑,然后需要什么参数,就填什么参数 。void backtracking(参数)
既然是树形结构,那么我们在讲解二叉树的递归 (opens new window)的时候,就知道遍历树形结构一定要有终止条件。
1 2 3 4 if (终止条件) { 存放结果; return; }
在上面我们提到了,回溯法一般是在集合中递归搜索,集合的大小构成了树的宽度,递归的深度构成的树的深度。
1 2 3 4 5 6 7 8 9 10 11 void backtracking(参数) { if (终止条件) { 存放结果; return; } for (选择:本层集合中元素(树中节点孩子的数量就是集合的大小)) { 处理节点; backtracking(路径,选择列表); // 递归 回溯,撤销处理结果 } }
回溯题目 第77题. 组合
贪心算法
选取每阶段的局部最优,最终达到全局最优.
解题步骤:
将问题分解为若干个子问题
找出适合的贪心策略
求解每一个子问题的最优解
将局部最优解堆叠成全局最优解
动态规划 由上一个状态推导出来的 ,这一点就区分于贪心,贪心没有状态推导,而是从局部直接选最优的.
解题步骤:
确定dp数组(dp table)以及下标的含义
确定递推公式
dp数组如何初始化
确定遍历顺序
举例推导dp数组
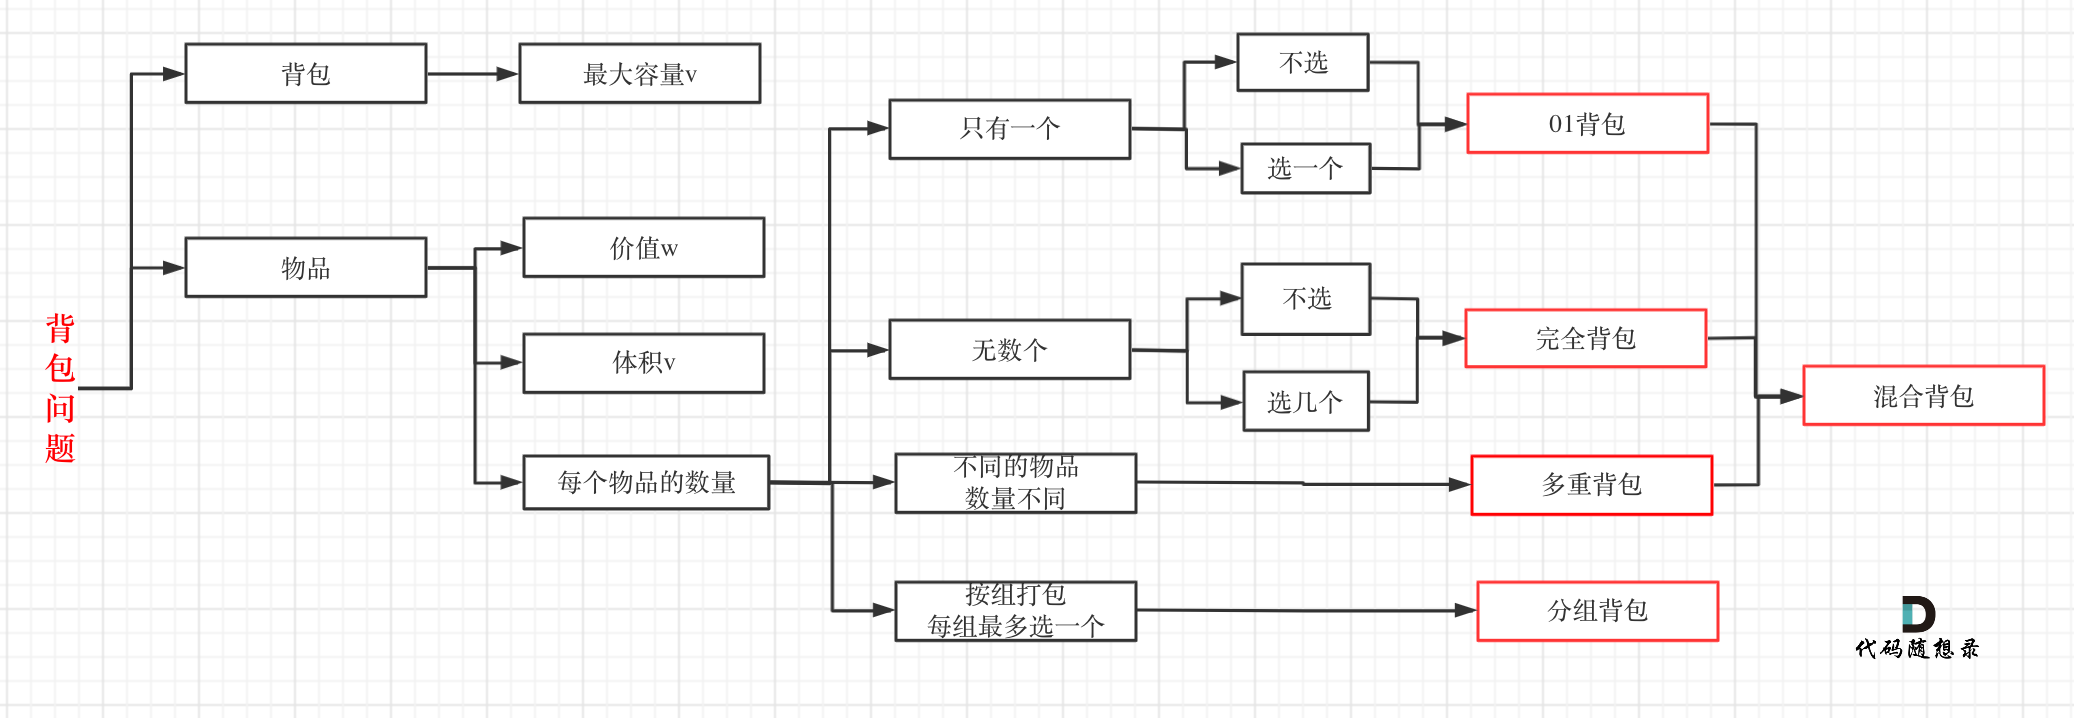
背包问题
0-1 背包 由于每个物品只能选一次,所以遍历背包容量时防止重复选择,只能倒序背包容量进行选择.
完全背包 由于每个物品没有数量限制,所以可以正序遍历背包容量.
动态规划中排列和组合的区别:
排列问题 (背包在外层循环)
当外层循环是背包容量,内层循环是物品时,相当于对于每个容量,我们尝试所有可能的物品。
组合问题 (物品在外层循环):只考虑物品的某种特定顺序的组合 ,不考虑顺序变化。
然后从代码来理解一下:排列问题 1 2 3 4 5 6 7 8 9 10 11 12 public int combinationSum4 (int [] nums, int target) { int [] dp = new int [target + 1 ]; dp[0 ] = 1 ; for (int i = 0 ; i <= target; i++) { for (int j = 0 ; j < nums.length; j++) { if (i >= nums[j]) { dp[i] += dp[i - nums[j]]; } } } return dp[target]; }
组合问题
1 2 3 4 5 6 7 8 9 10 public int combinationSum (int [] nums, int target) { int [] dp = new int [target + 1 ]; dp[0 ] = 1 ; for (int j = 0 ; j < nums.length; j++) { for (int i = nums[j]; i <= target; i++) { dp[i] += dp[i - nums[j]]; } } return dp[target]; }
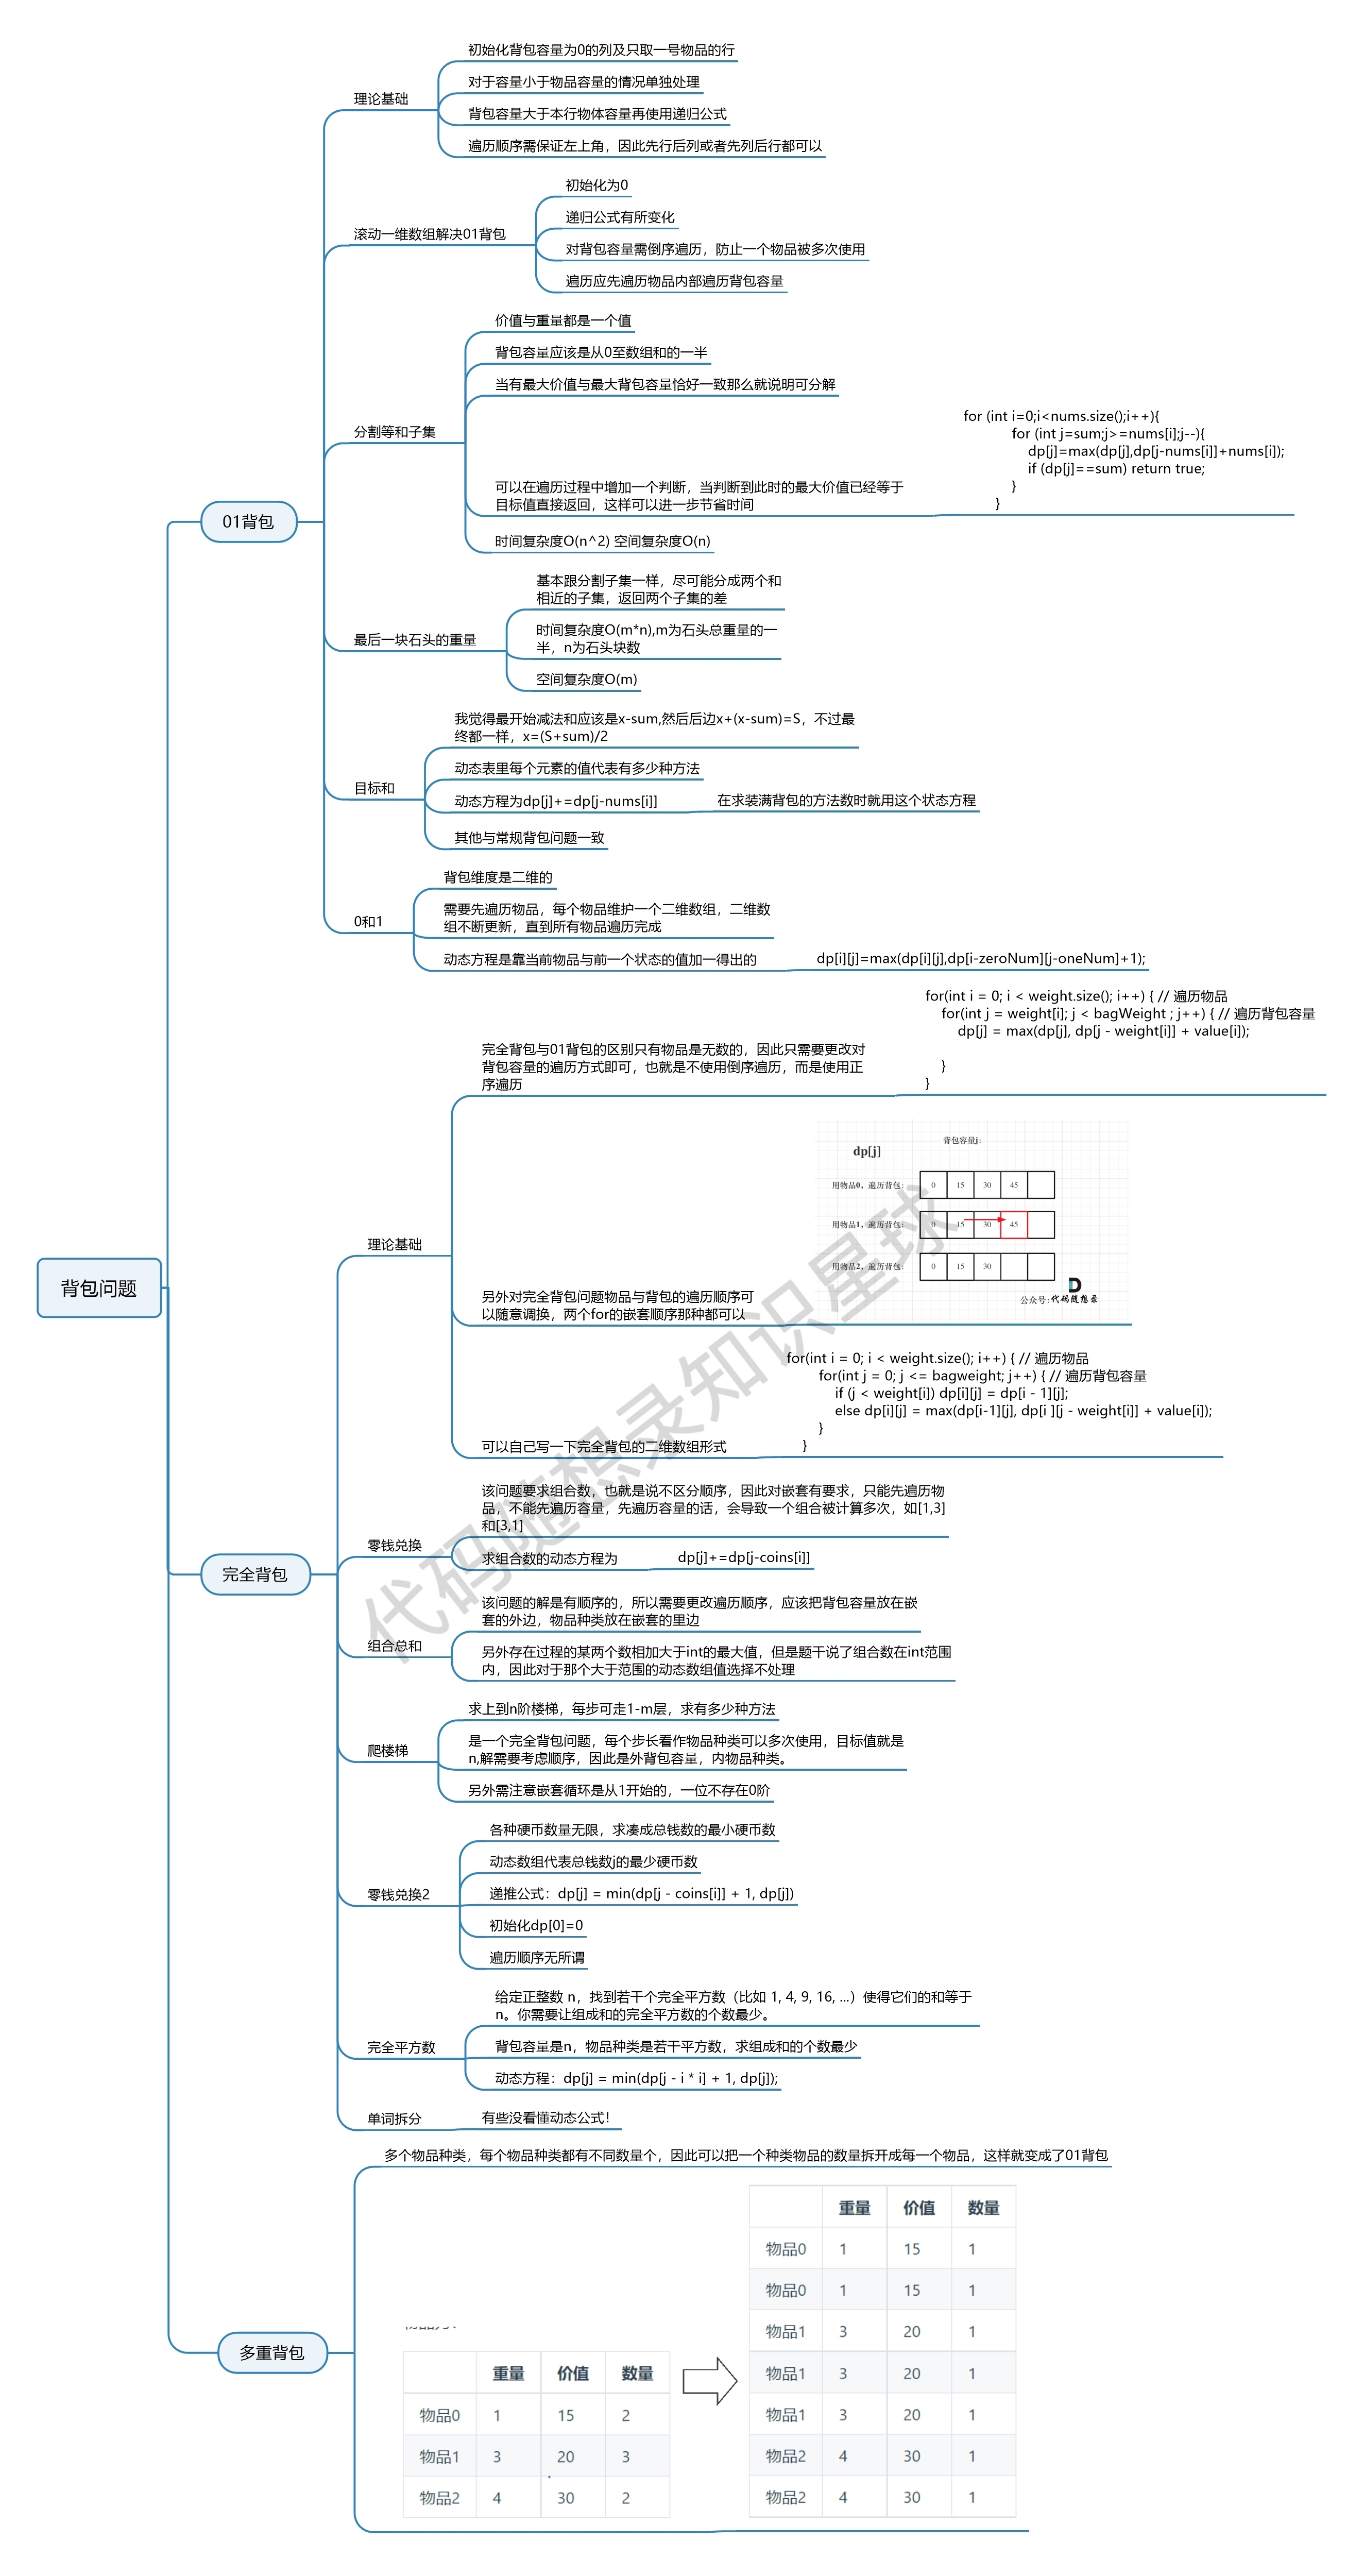
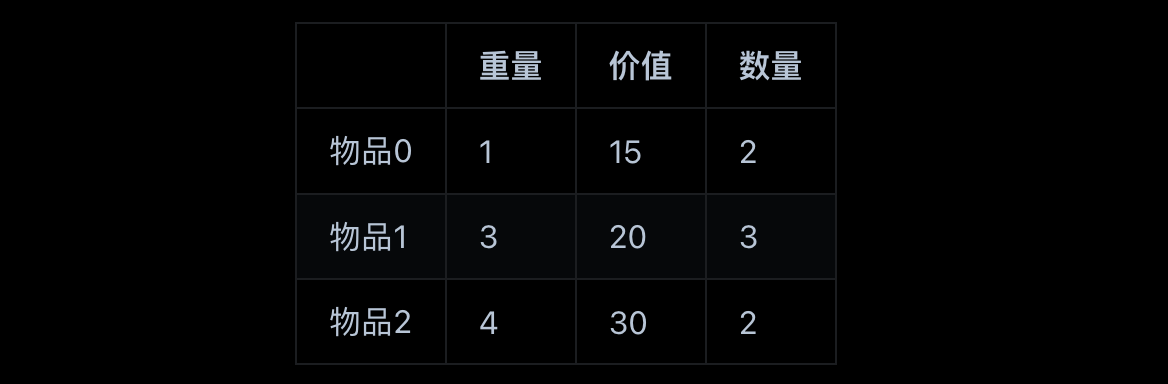
多重背包 有N种物品和一个容量为V 的背包。第i种物品最多有Mi件可用,每件耗费的空间是Ci ,价值是Wi 。求解将哪些物品装入背包可使这些物品的耗费的空间 总和不超过背包容量,且价值总和最大。
数位DP 单调栈 图论 图论基础 图的种类
度
在有向图中,每个节点有出度和入度。
出度:从该节点出发的边的个数。
入度:指向该节点边的个数。
连通图
强连通图
连通分量
强连通分量
图的构造 邻接表、邻接矩阵 或者用类来表示。
DFS 三色标记法 1 2 3 4 5 6 7 8 9 10 11 12 13 14 15 16 17 18 19 20 21 22 23 24 25 26 27 28 29 30 31 32 33 34 35 class Solution { public boolean canFinish (int numCourses, int [][] prerequisites) { List<Integer>[] g = new ArrayList [numCourses]; int [] learned = new int [numCourses]; Arrays.setAll(g , i -> new ArrayList <>()); for (int [] p : prerequisites){ int stu = p[0 ]; int dep = p[1 ]; g[stu].add(dep); } for (int i = 0 ; i < numCourses ; ++i){ if (learned[i] == 0 && dfs(g,learned,i)){ return false ; } } return true ; } private boolean dfs (List<Integer>[] g , int [] learned , int i ) { if (learned[i] == 1 ){ return true ; } learned[i] = 1 ; boolean flag = false ; for (Integer num : g[i]){ if (learned[num] == 1 || learned[num] == 0 && dfs(g,learned,num)){ return true ; } } learned[i] = 2 ; return false ; } }
字典树 前缀树 1 2 3 4 5 6 7 8 9 10 11 12 13 14 15 16 17 18 19 20 21 22 23 24 25 26 27 28 29 30 31 32 33 34 35 36 37 38 39 40 41 42 43 44 45 46 47 48 49 50 51 52 53 54 55 class Trie { private static class Node { Node[] son = new Node [26 ]; boolean isEnd; } private Node root; public Trie () { root = new Node (); } public void insert (String word) { Node temp = root; for (char c : word.toCharArray()){ int pos = c - 'a' ; if (temp.son[pos] == null ){ temp.son[pos] = new Node (); } temp = temp.son[pos]; } temp.isEnd = true ; } public boolean search (String word) { Node temp = root; for (char c : word.toCharArray()){ int pos = c-'a' ; if (temp.son[pos] == null ){ return false ; } temp = temp.son[pos]; } return temp.isEnd; } public boolean startsWith (String prefix) { Node temp = root; for (char c : prefix.toCharArray()){ int pos = c-'a' ; if (temp.son[pos] == null ){ return false ; } temp = temp.son[pos]; } return true ; } }
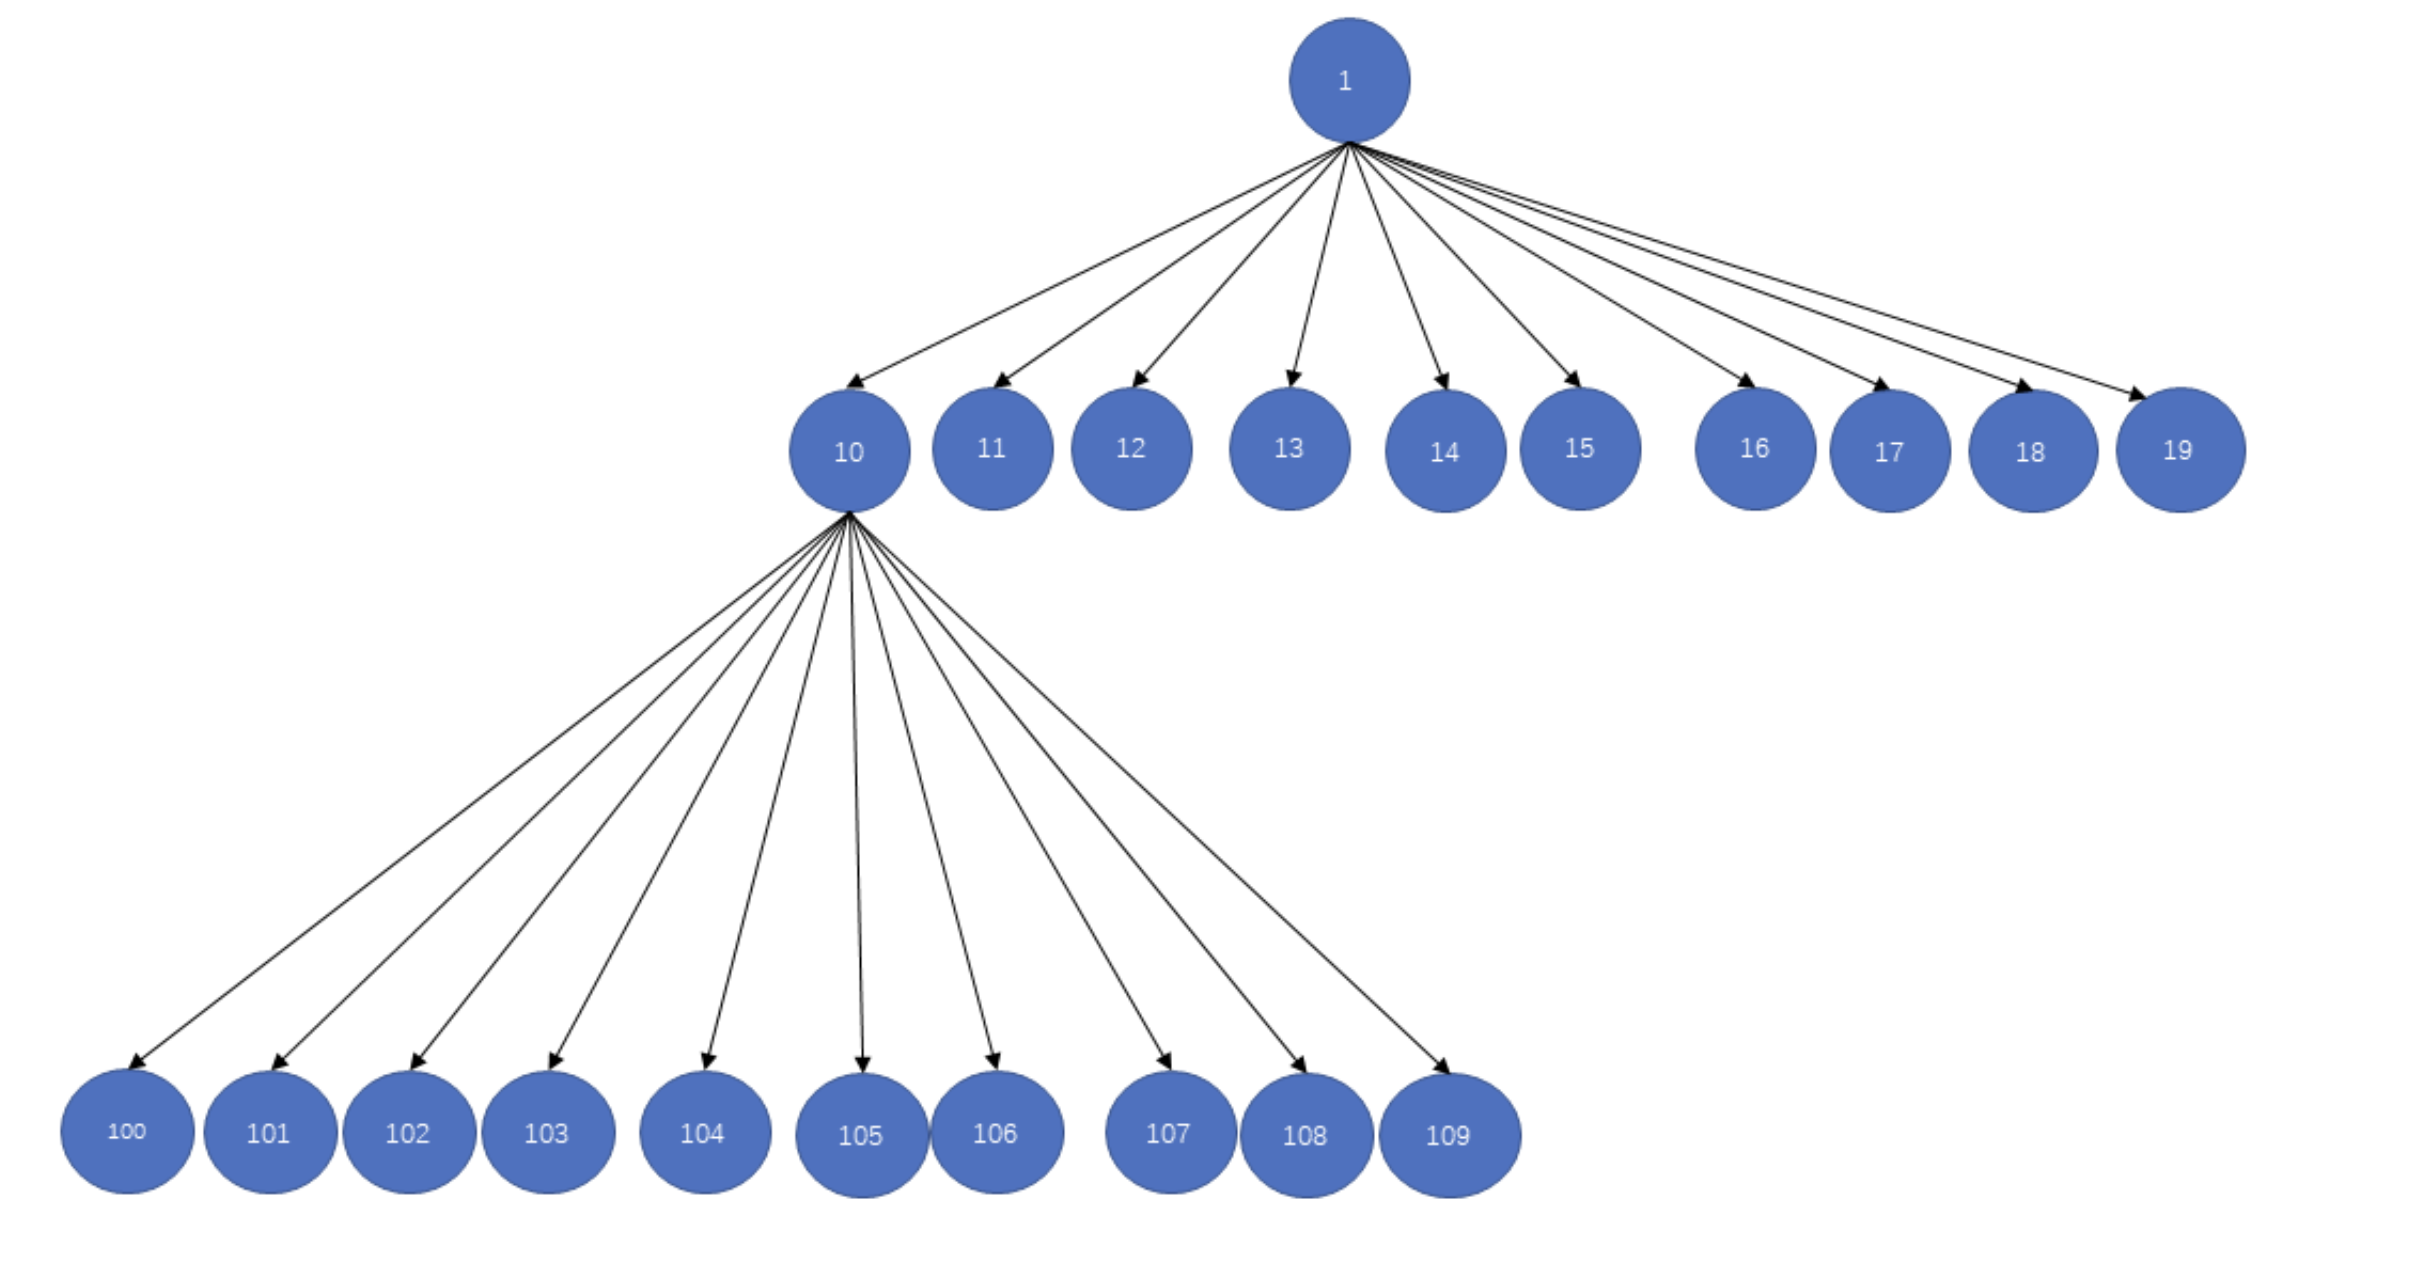
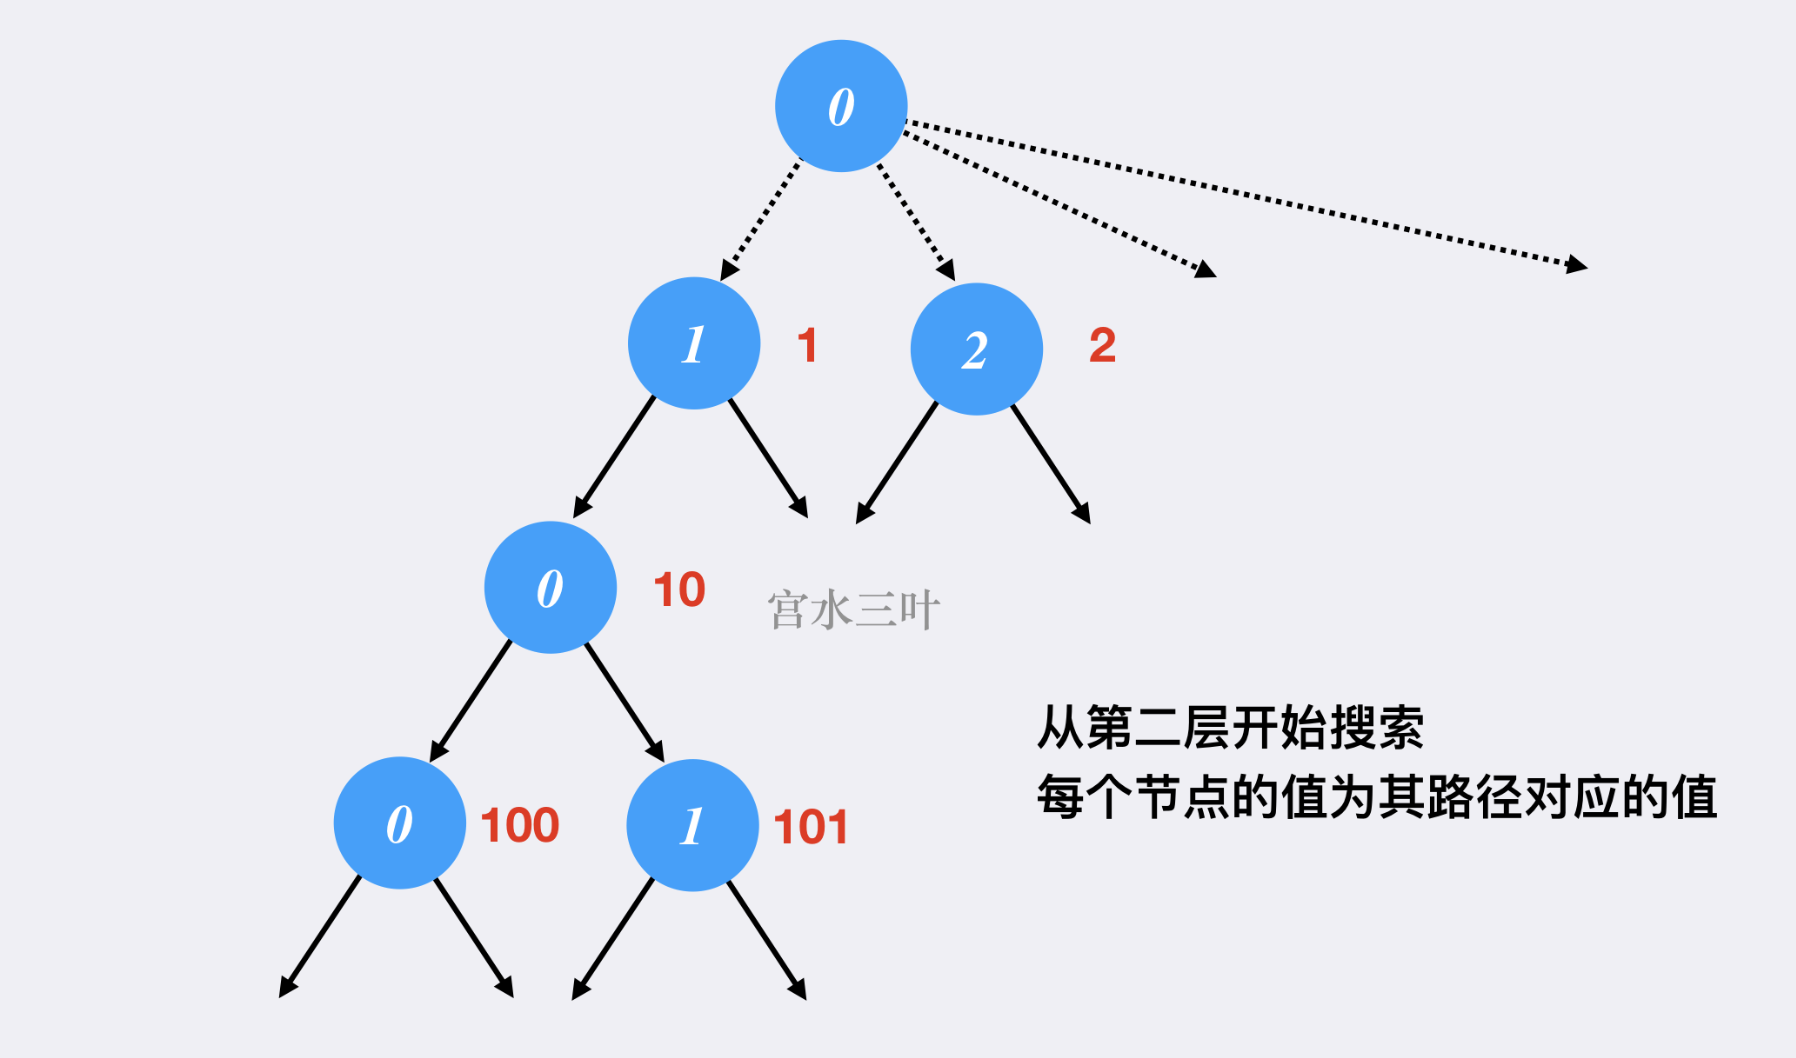
字典序 字典序 字典树:
字典树左子树字典序一定比右子树小.
字典树想要到右侧兄弟节点,直接num++就可以.
关键就是要找到以当前数字为根的十叉树的元素总个数.
这张图也很好:
1 2 3 4 5 6 7 8 9 10 11 12 13 14 15 16 17 18 19 20 21 22 23 24 25 26 27 28 29 30 31 32 33 34 35 36 37 38 39 40 41 42 43 44 45 46 47 48 class Solution { private int count (long num, int n) { int cnt = 0 ; int width = 1 ; while (true ) { if (num + width - 1 <= n) { cnt += width; num *= 10 ; width *= 10 ; } else { if (n - num >= 0 ) { cnt += n - num + 1 ; } break ; } } return cnt; } public int findKthNumber (int n, int k) { int cnt = 0 ; int num = 1 ; while (true ) { if (cnt == k - 1 ) { break ; } int temp = count((long ) num, n); if (cnt + temp >= k) { num *= 10 ; cnt++; } else if (cnt + temp < k) { num++; cnt += temp; } } return num; } }
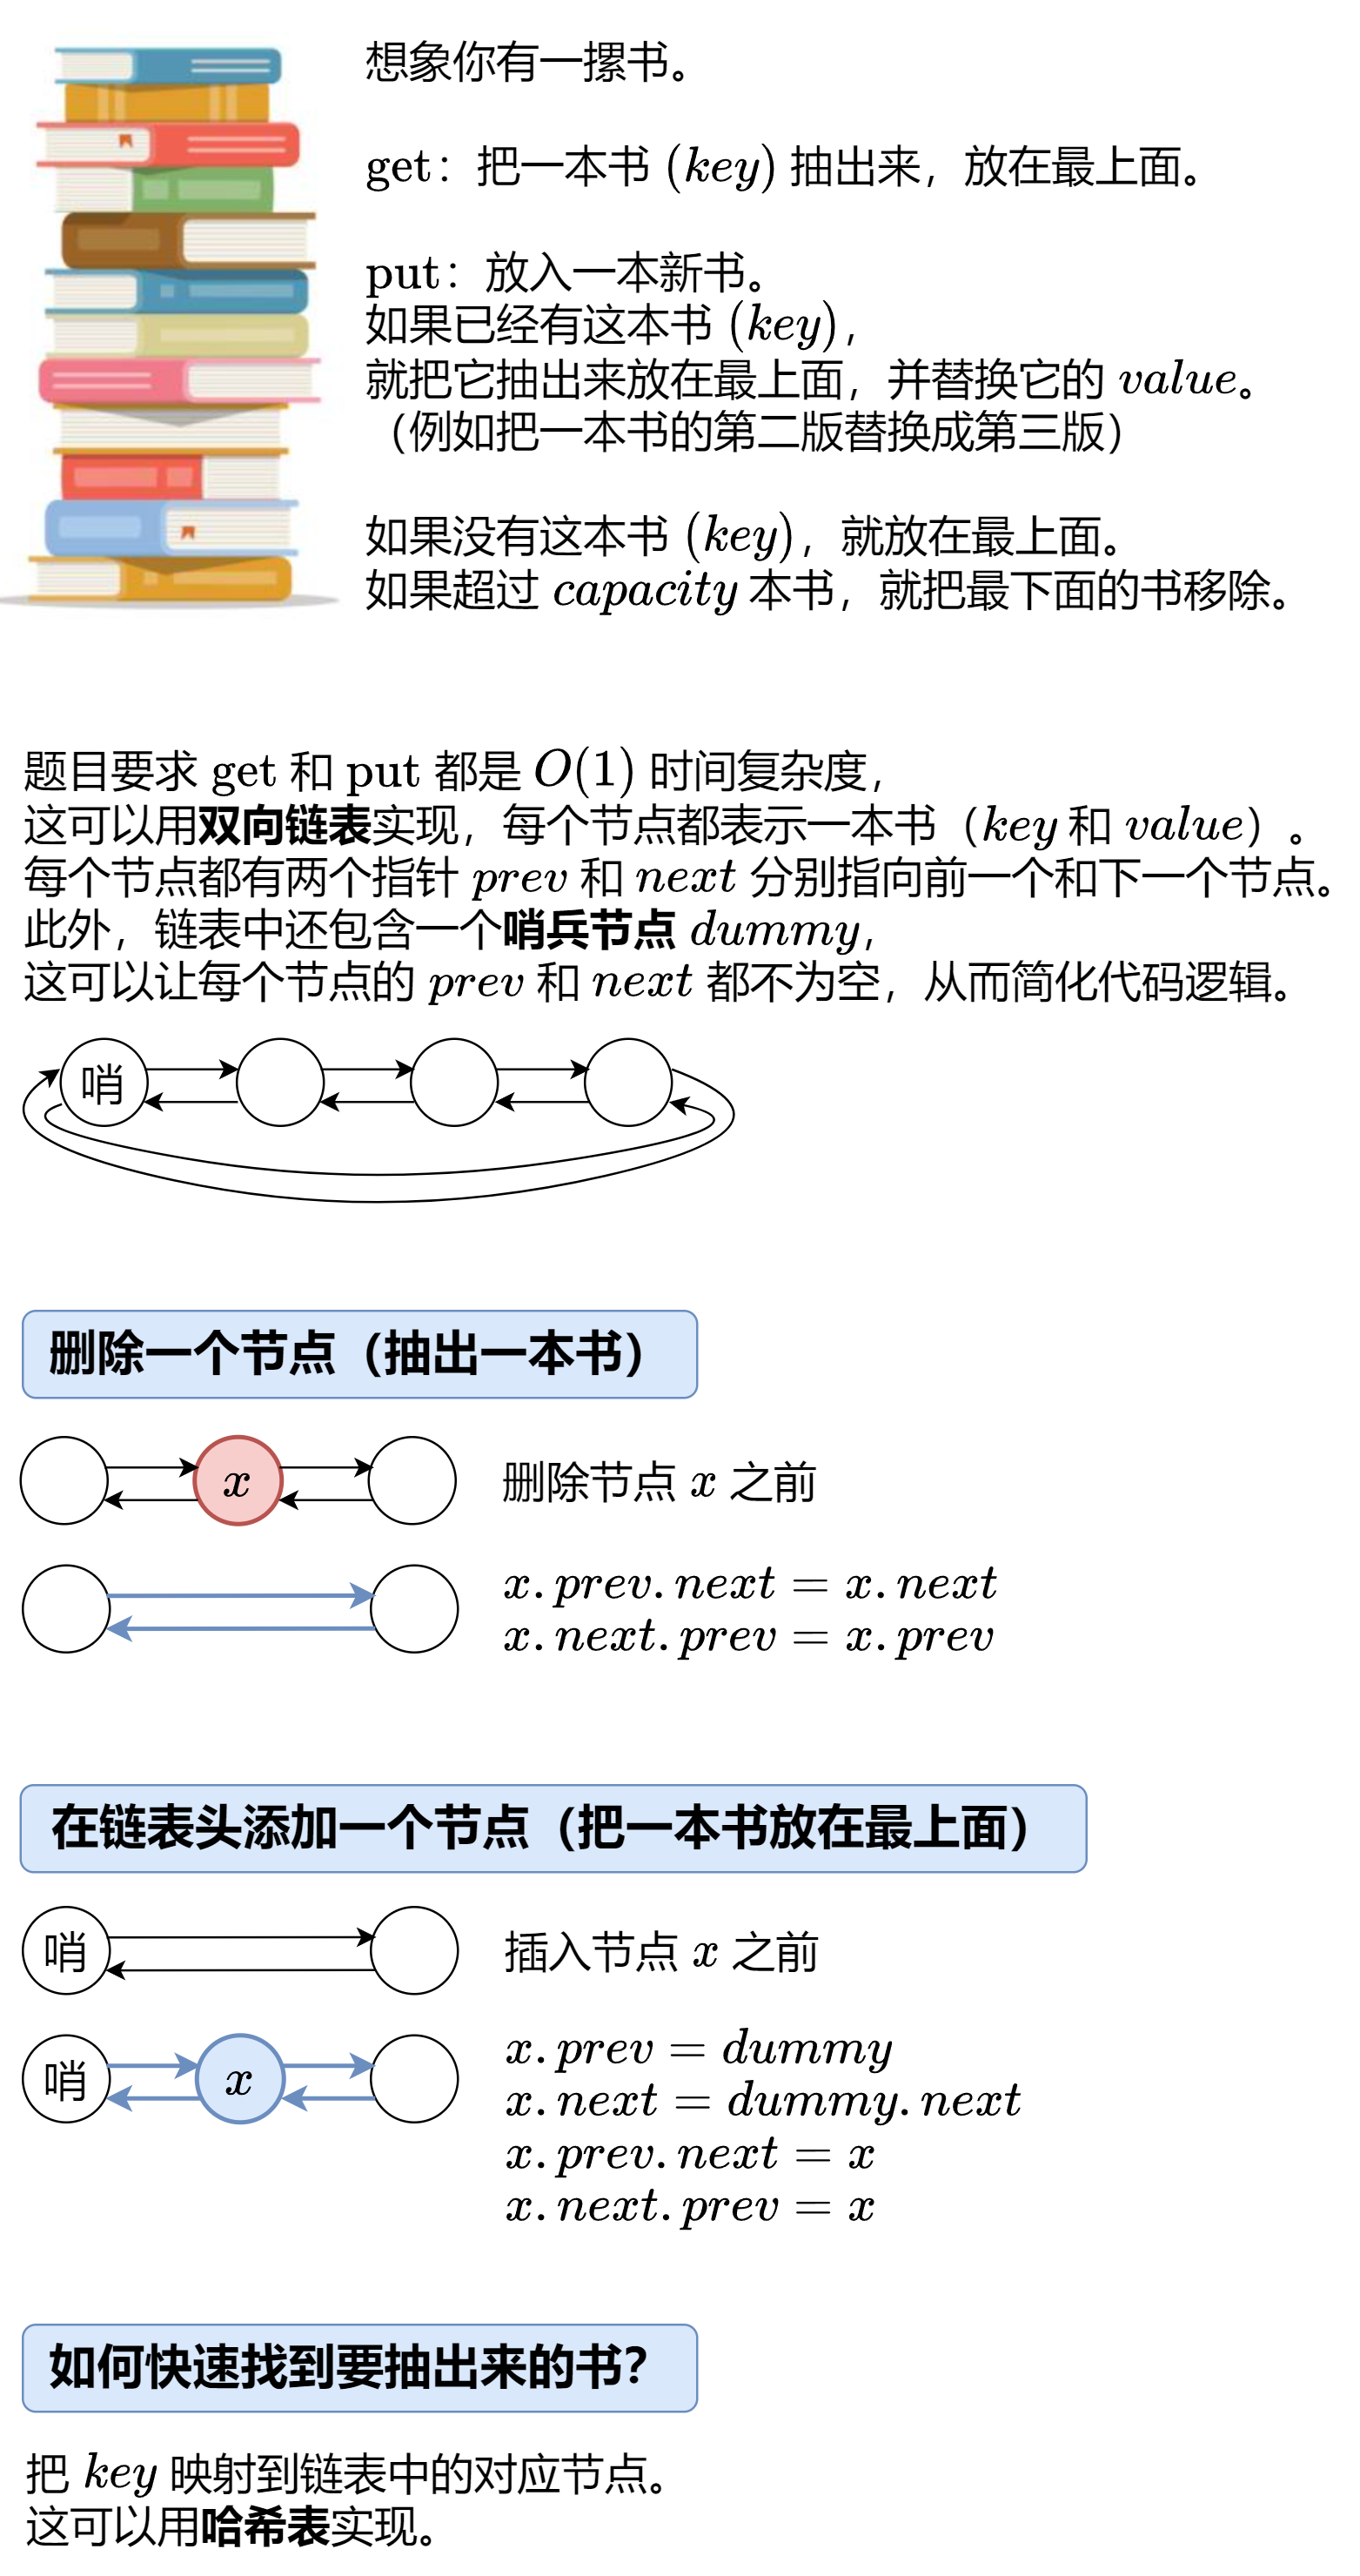
LRU缓存
1 2 3 4 5 6 7 8 9 10 11 12 13 14 15 16 17 18 19 20 21 22 23 24 25 26 27 28 29 30 31 32 33 34 35 36 37 38 39 40 41 42 43 44 45 46 47 48 49 50 51 52 53 54 55 56 57 58 59 60 61 62 63 64 65 66 public class LRUCache { private static class Node { int key, value; Node prev, next; Node(int k, int v) { key = k; value = v; } } private final int capacity; private final Node dummy = new Node (0 , 0 ); private final Map<Integer, Node> keyToNode = new HashMap <>(); public LRUCache (int capacity) { this .capacity = capacity; dummy.prev = dummy; dummy.next = dummy; } public int get (int key) { Node node = getNode(key); return node != null ? node.value : -1 ; } public void put (int key, int value) { Node node = getNode(key); if (node != null ) { node.value = value; return ; } node = new Node (key, value); keyToNode.put(key, node); pushFront(node); if (keyToNode.size() > capacity) { Node backNode = dummy.prev; keyToNode.remove(backNode.key); remove(backNode); } } private Node getNode (int key) { if (!keyToNode.containsKey(key)) { return null ; } Node node = keyToNode.get(key); remove(node); pushFront(node); return node; } private void remove (Node x) { x.prev.next = x.next; x.next.prev = x.prev; } private void pushFront (Node x) { x.prev = dummy; x.next = dummy.next; x.prev.next = x; x.next.prev = x; } }